Customizing the Ribbon
You can read the customized .xml files within Adams View. You can do this in the following ways:
1. In command language execute the "interface ribbon read filename=user-defined xml filename" command.
2. On the Tools menu, point to Ribbon → Read and select the ribbon.xml from the Select File dialog box.
When this command is executed, the earlier ribbon will be deleted and a new ribbon will be created based upon the .xml file read in. If the .xml file syntax is incorrect, then the default ribbon.xml provided in the installation folder will be used. Once you read your customized ribbon, you can revert back to the default ribbon by following the below steps:
1. In command language execute the "interface ribbon read" (without filename parameter).
2. On the Tools menu, point to Ribbon → Read Local Ribbon.
Steps for Running Example
1. Launch Adams View, create a new model and select OK.
2. Adams View launches with the Ribbon provided by default with the installation.
3. Create a copy from topdir/aview/ribbon.xml and rename this copy as my_ribbon.xml (you can give any name of your choice) and save it in a folder called "my_custom_ribbon" .
4. Open my_ribbon.xml in an editor of your choice and add the following lines just below the <ribbon> tag and above the <Tab name="Bodies"> tag:
<Tab Name="MyCustomTab" >
<Group Name="Settings" numRows= "2" numCols = "1">
<Button Name="LightingSettings" row="0" col="0">
<tip_text>Open the Lighting settings dialog</tip_text>
<icon_name>lightings.xpm</icon_name>
<single_click_commands>
file log command=off
int dia disp dia=lighting_panel
</single_click_commands>
</Button>
<Button Name="BackgroundColor" row="1" col="0">
<tip_text>Open the Edit Background color dialog</tip_text>
<icon_name>color.xpm</icon_name>
<single_click_commands>
file log command=off
interface dialog display dialog=edit_background_color
</single_click_commands>
</Button>
</Group>
</Tab>
5. Keep the 24x24pixel icons named lightings.xpm and color.xpm in the same directory as the file my_ribbon.xml.
6. On the Tools menu, point to Ribbon → Read and select the my_ribbon.xml from the my_custom_ribbon folder.
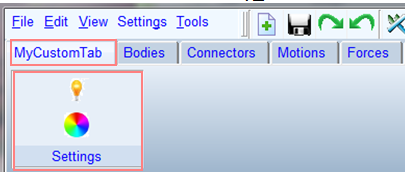
7. The following Ribbon will be displayed. Moving your mouse over these icons will display the tool tip text that had been set in my_ribbon.xml.
8. Selecting the light icon  will open the Lighting settings dialog box as shown below:
will open the Lighting settings dialog box as shown below: 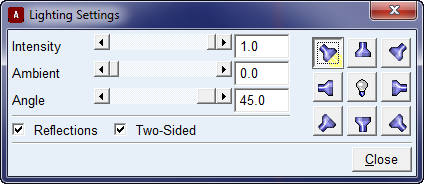
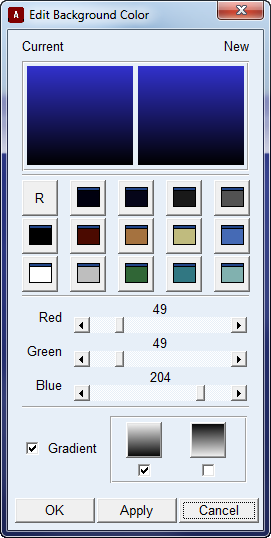
9. Clicking on the Color icon  will open the Modify Background color dialog box as shown below:
10. If you want to revert to the original Ribbon provided with the installation, select Tools → Read Local Ribbon.
11. If you want my_ribbon.xml to be launched at the startup, then add the following line to aview.cmd file in the working directory and keep the my_ribbon.xml in the same working directory along with the icons.
interface ribbon read filename = "my_ribbon.xml"