Using Adams Explore with Adams Car
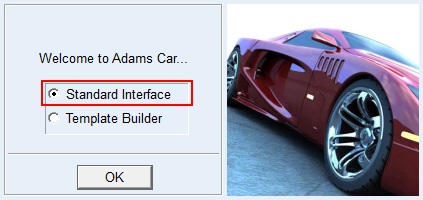
1. Start Adams Car
2. From the welcome screen click “Standard Interface”
3. From the Tools menu, select Plugin Manager. In the list of plugin names, find Adams Explore, and then select one or both of the following:
■Load - Loads Adams Explore in the current session.
■Load at Startup - Instructs Adams Car to load Adams Explore in all future Adams Car sessions.
■Select OK.
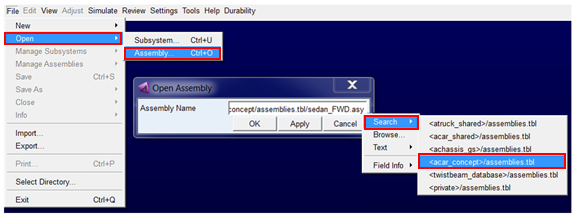
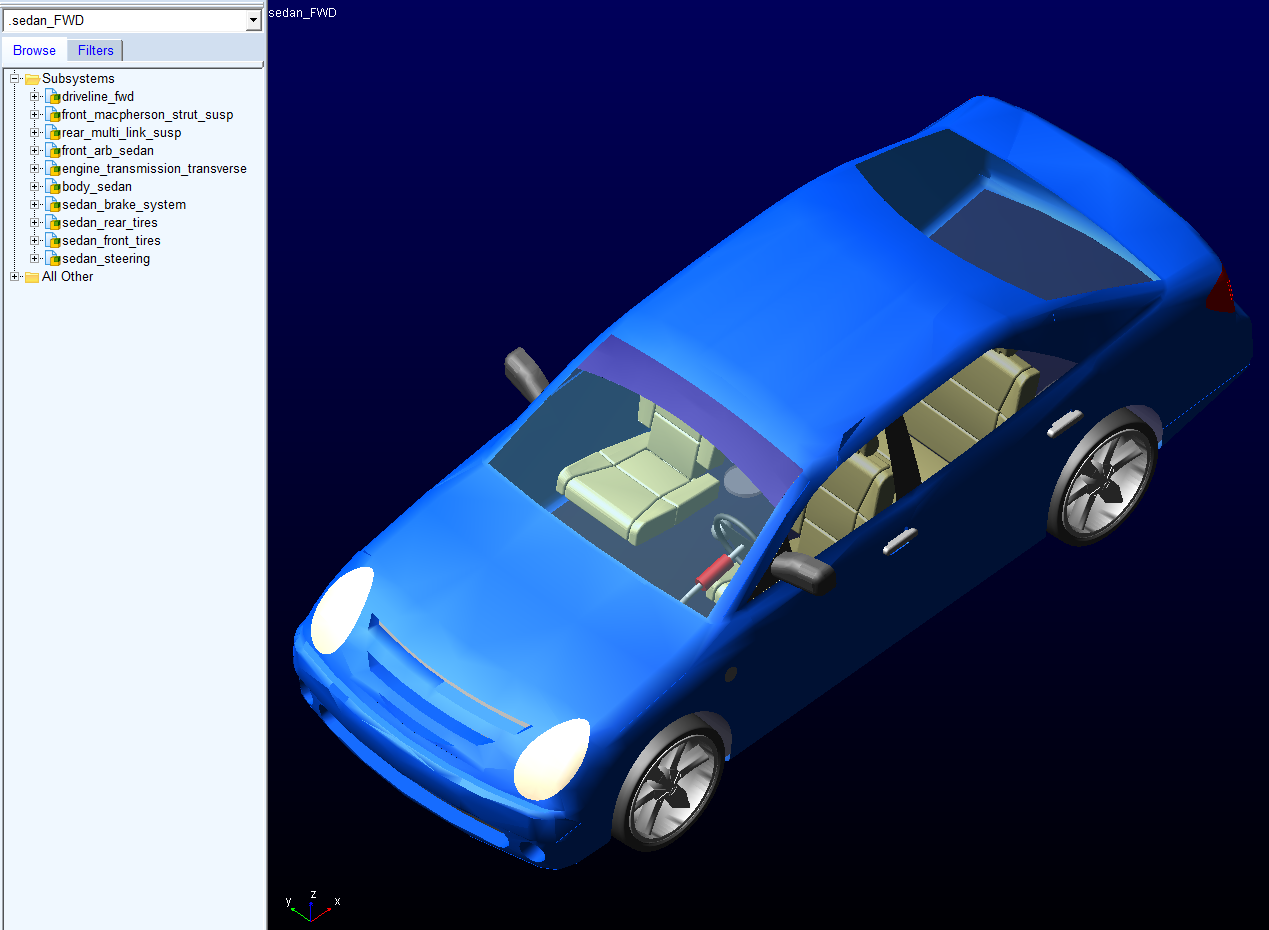
4. Open the assembly "sedan_FWD.asy" from the acar_concept database
The model will be displayed as shown below:
5. Since a pothole event will be run the tires should be switched to a more suitable model than the handling tires used by default.
a. Modify the front tires to use a 3D enveloping contact model by right-clicking a front wheel, selecting Modify and setting Property File = mdids://acar_shared/tires.tbl/pac2002_235_60R16_3d_contact.tir by searching for it in "<acar_shared>/tires.tbl"
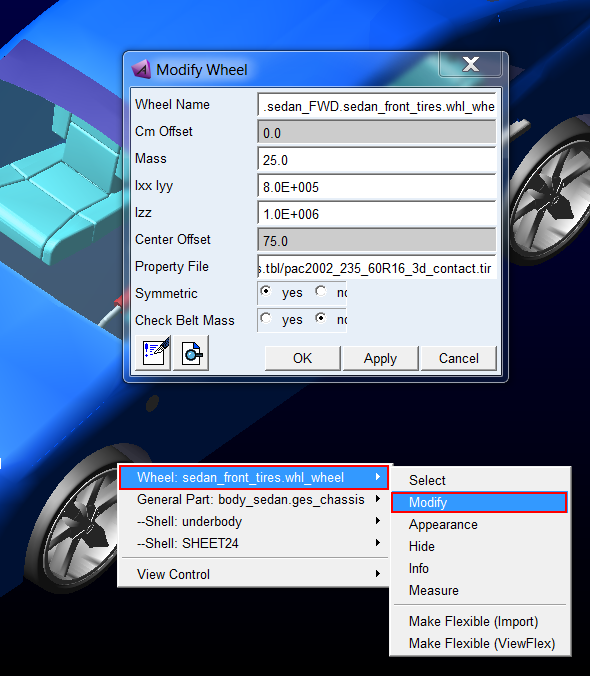
b. Modify the rear tires in the same way
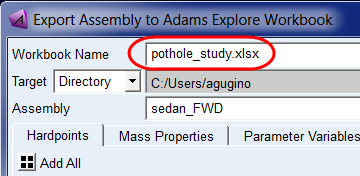
6. From the "Tools" menu select "Explore → Export to Workbook"

7. Specify the name of the workbook to be exported as "pothole_study.xlsx"
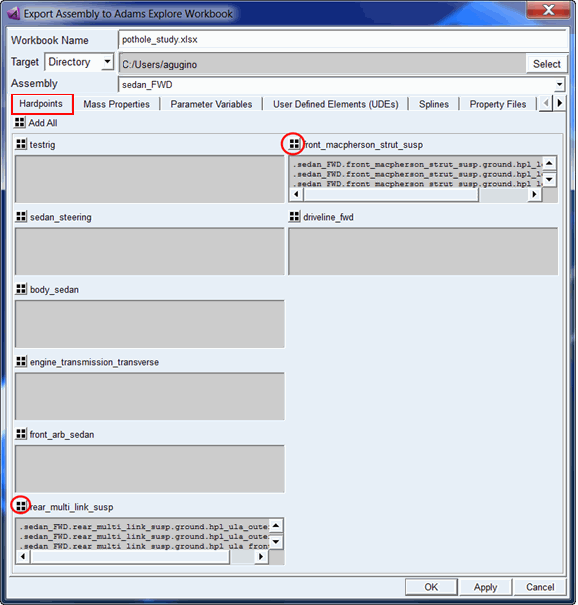
8. From the tabs below various modeling parameters can be chosen for inclusion in the exported spreadsheets. Begin with the Hardpoints tab and click the select-all button for the front and rear suspension subsystems ("rear_multi_link_susp" and "front_macpherson_strut_susp"), to include all their hardpoints (do not click OK yet, you still need to fill more tabs)
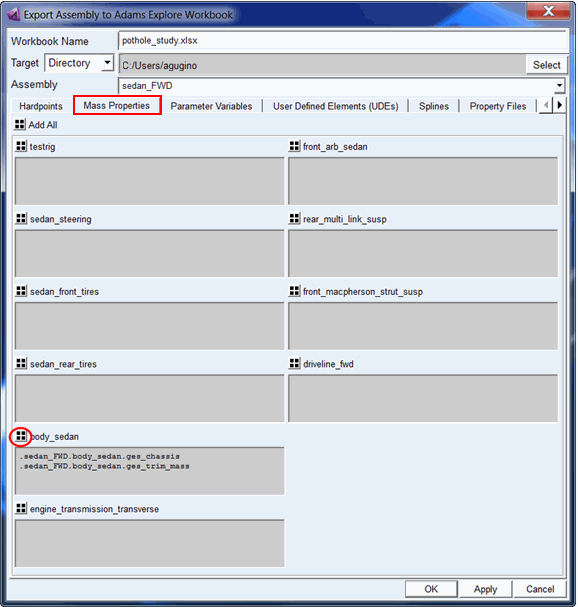
9. From the Mass Properties tab click the select all button for the body subsystem, "body_sedan" to include it's mass properties in the exported sheet (do not click OK yet, you still need to fill more tabs):
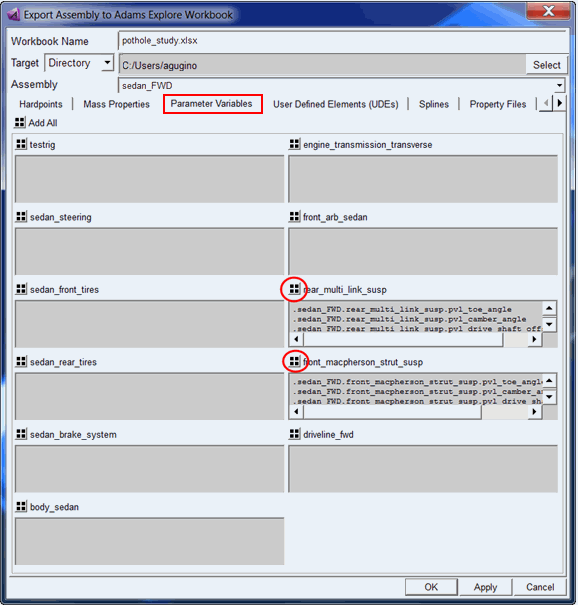
10. From the Parameter Variables tab select all for the front and rear suspensions (do not click OK yet, you still need to fill more tabs):
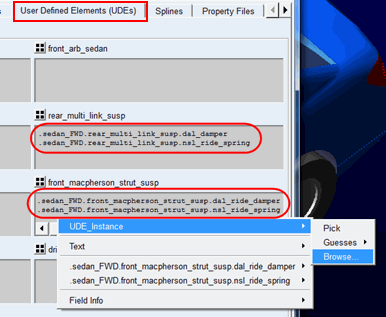
11. Complete the User-Defined Elements (UDEs) tab as shown below to select the ride springs and dampers in both suspensions (do not click OK yet, you still need to fill more tabs). Note that you can right-click Browse or Pick items and that selecting any one item (left or right) from a symmetric pair will include the parameters for both items in the exported spreadsheet workbook.
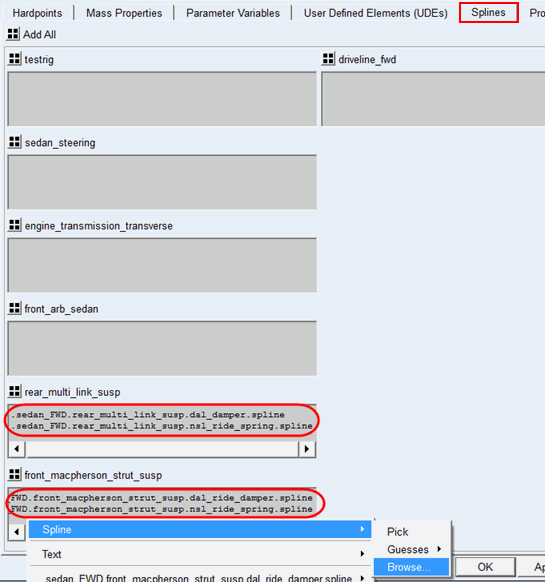
12. Complete the Splines tab as shown below to select the ride springs and dampers in both suspensions (do not click OK yet, you still need to fill more tabs).
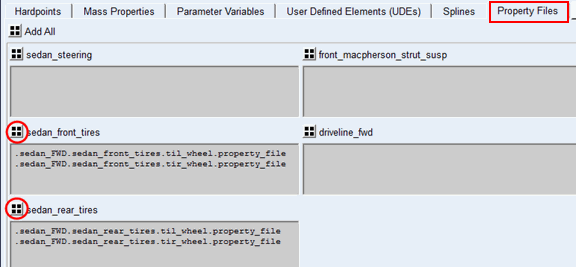
13. From the Property Files tab, click the select all button to select the front and rear tire property files (do not click OK yet, you still need to fill more tabs):
14. From the Objectives tab, select the pitch-related design objectives, min and max pitch angle and max pitch rate, present in the testrig; you may need to click the right arrow on the right side of the tab bar to scroll to this tab. (do not click OK yet, you still need to fill more tabs):

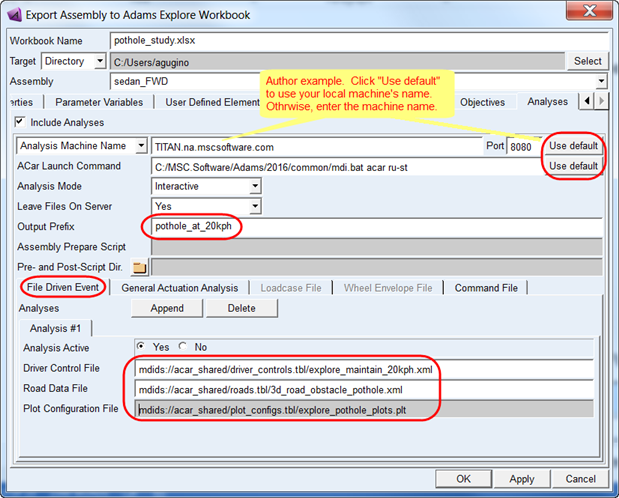
15. On the Analyses tab
a. Opt to "Include Analyses"
b. If you intend to use your local machine as the analysis machine on which spreadsheet-launched runs are to be performed, then click "Use Default" for the "Analysis Machine Name" and "Port" fields; otherwise, enter the name and port of the machine you intent to setup to accept spreadsheet-launched runs
c. For "ACar Launch Command" click "Use Default" or enter it directly if the command Adams senses for this installation does not match what you want to use.
d. For "Output Prefix" enter "pothole_at_20kph"
e. On the File-Driven Event tab click Append. Then, define Analysis #1 for a straight-line maintain event at 20kph that goes over a pothole and produces a set of plots of the vehicle pitch angle and forces from the springs and dampers. The three files needed are shown below and all located in the shared car database.
Hint: | Use right-click → Search → <acar_shared> to browse for these. |
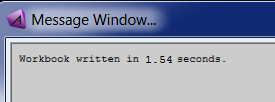
16. Click OK to export the spreadsheet workbook to your current working directory. You will get a message indicating this has been done.
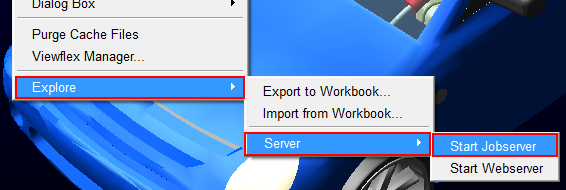
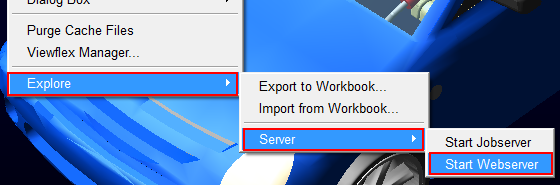
17. From the machine you specified as "Analysis Machine" you need to start the Explore job server and web server so that analyses launched from the spreadsheet workbook can be built (that is, models modified) and executed:
a. Logon to the analysis machine and launch Adams Car (of course, if you're hosting jobs this from the same machine from which you just exported the spreadsheet you have already done this)
b. From the "Tools" menu select "Explore → Server → Start Jobserver"
c. From the "Tools" menu select "Explore → Server → Start Webserver"
d. You will notice some command prompt windows open up logging status of the job server and web server
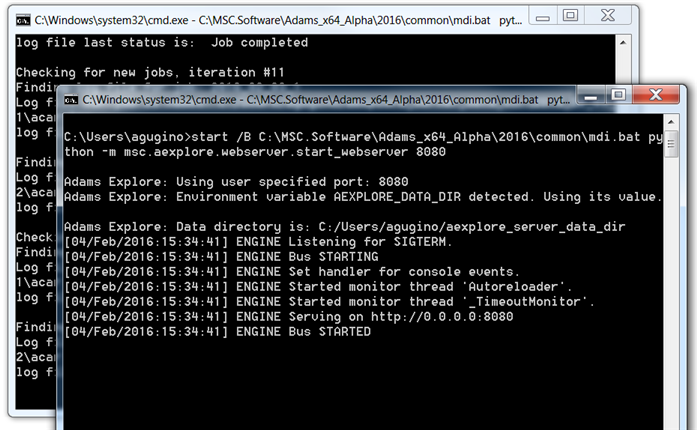
Notes: | ■Keep these windows open. Closing them will stop the servers. ■Alternatively these servers can be started from the Adams Command Prompt. ■Launch the Adams Command Prompt. For example, from the Start Menu on Windows machines under Adams 20XX click Command Prompt ■Enter the Adams start command (shown at the top of the window, for example, adams20XX), followed by the arguments "aexplore" and "ru-jobserver" like so: 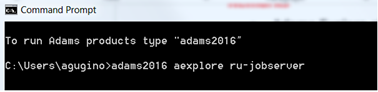 ■This will launch a separate window for the job server as shown earlier in this example ■Enter the Adams start command (shown at the top of the window, for example, "adams20XX"), followed by the arguments "aexplore" and "ru-webserver" like so: 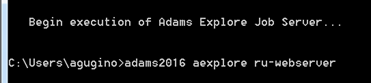 ■This will launch a separate window for the web server as shown earlier. |
18. If on a Windows OS machine using Excel, a one-time installation of an Excel 'Add-In' can be performed which will enable the Excel user to launch Adams analyses and retrieve results without ever leaving Excel.
Note: | If you are using a spreadsheet program other than Excel (for example, on a Linux OS) please see the tutorial Using the Webpage Job Monitor with Adams Car. |
a. Locate the Add-In file in your Adams installation. This file is named adams_explore_addin.xlam and is located in the “<install_dir>\aexplore\spreadsheet_software_plugins\Microsoft_Excel” directory. For example, on a Windows installation for Adams version 20XX the example files are placed in the following location:
C:\Program Files\MSC.Software\Adams\20XX\aexplore\spreadsheet_software_plugins\Microsoft_Excel\adams_explore_addin.xlam
b. Copy the adams_explore_addin.xlam file into the \AppData\Roaming\Microsoft\Addins found in your User Profile folder on Windows. To find your User Profile directory, copy this text and paste into Windows Explorer, as shown:
%USERPROFILE%\AppData\Roaming\Microsoft\AddIns

c. Paste the adams_explore_addin.xlam file into this folder.
d. Next, open Microsoft Excel and load a blank file.
e. In Excel, navigate to: File → Options
f. In the Excel Options dialog box, select Add-Ins
g. Ensure that the “Manage:” selection at the bottom of the screen is set to “Excel Add-Ins” and then select the Go button.
h. The Add-Ins dialog box should list the Adams_Explore_Addin. Ensure that is checked and then select OK.
i. A new Ribbon Bar should appear in Microsoft Excel named Adams Explore Server, as shown:

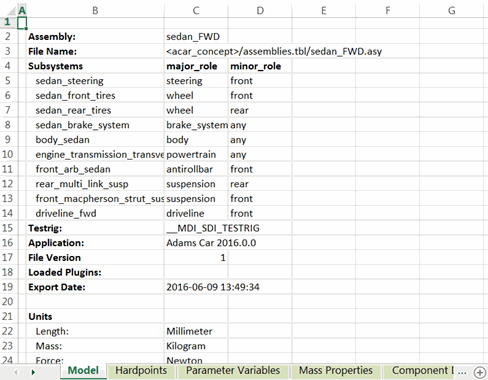
19. Navigate to your Adams Car working directory and open the exported workbook file "pothole_study.xlsx". Browse through the tabs to see the information you exported. General model information is presented on the "Model" tab and the other tabs reflect the information you, from the dialog in Adams Car, requested be exported.
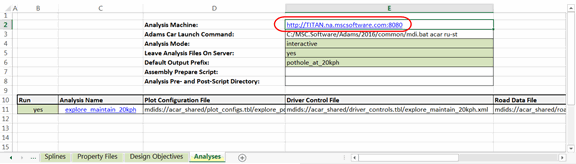
20. On the Analyses tab you'll notice the details of the analysis machine and the events that were specified.
21. To run this analysis, from the "Adams Explore Server" tab in the Excel ribbon click on "Submit Job"
Note: | If you are not on Windows and using Excel, skip the following steps and instead use the "Webpage-Based Job Submission Alternative" described at the end of this document |

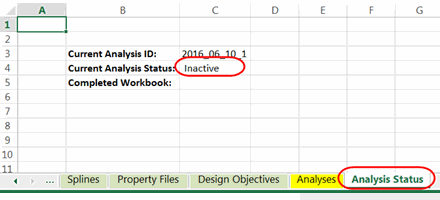
This will create a new tab in the Excel workbook called "Analysis Status" which will display the very initial status as "Inactive".
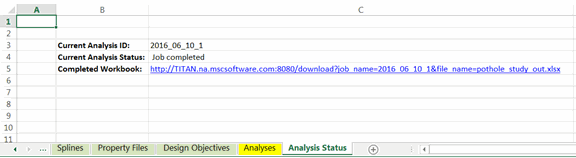
22. You can then manually query the status via the "Job Status" button above or have the spreadsheet automatically update the status every 10-seconds via the "Stream Status" button.
23. Once "Current Analysis Status" reads "Job completed" there will be a hyperlink from which the completed workbook (that is, one which includes the results of the analysis) can be downloaded (you may need to click through a warning about opening a non-local file):
24. Once opened, save this locally (for example, to the directory from which you are running this example) as "pothole_out.xlsx"
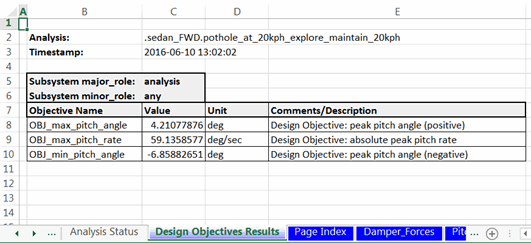
25. Browse through the result tabs showing the design objective values and all the plots defined in the plot configuration files that were specified for each analysis.
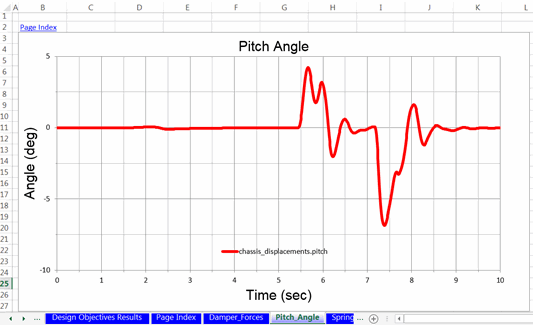
Note: | If you scroll down below each plot you will find columns containing the data points for each curve |
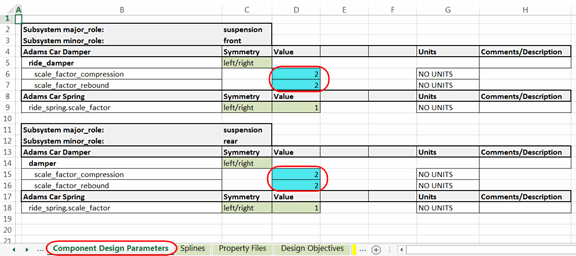
26. Now try to reduce the pitching of the vehicle through the pothole by increasing the damper rates. While direct access to the damper spline data is available, we also have access to scaling factors them on the component design parameters tab. On the "Component Design Parameters" tab change the value of "scale_factor_compression" and "scale_factor_rebound" for both the front and rear suspensions' dampers to "2". Note that, throughout the spreadsheet editable cells are green and turn tuirquoise when modified:
27. Save the workbook under a new name, "pothole_study_damper2.xlsx"
28. Go to the "Analysis Status" tab and from the Excel ribbon's "Adams Explore Server" tab click "Submit Job"

29. After a minute or so click "Job Status" and once "Current Analysis Status" reads "Job completed" click on the "Completed Workbook" hyperlink to view the new results:

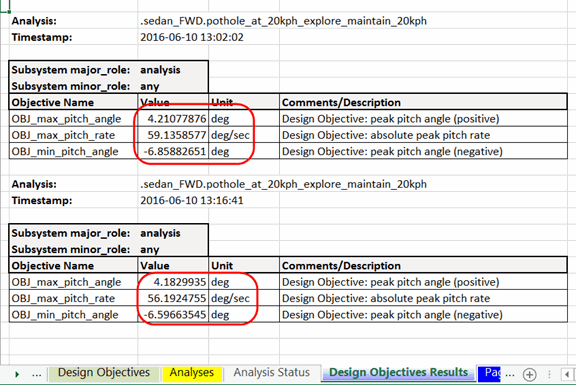
30. Now inspect the new results. Since you supplied a workbook with results from the first run present, a second set of design objective tables have been added. The plots are simply overwritten; in the future, cross-plotting and/or appended plot tabs will be provided. Notice that the maximum pitch rate and the minimum and maximum pitch angles reduced.
31. Optionally save this workbook locally to your exercise directory as "pothole_study_damper2_out.xlsx"
Note: | Adams Explore also allows one to edit an Adams model based on the values of an .xlsx file previously exported against the same model. So, in the above example, the Adams analyst could update the assembly with the stiffer bushings from the engineer's .xlsx file using "Tools → Explore → Import from Workbook" 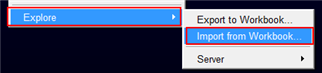 |