Reviewing Connections
It is a good idea to review the connections that will be established for you between the link and the rest of the model. As part of the swapping operation, all the markers on the rigid body will be transferred to the flexible body, thereby establishing connections to the flexible body.
1. In the Swap a rigid body for a flexible body dialog box, select the Connections tab.
2. Verify that Sort By is set to Marker (it is on the far right of the dialog box).
The Markers and Nodes table appears, as shown below. Notice that it has identified a list of markers on the rigid link that will be transferred to the flexible link. The Connections column identifies the names of constraints or forces that exist on the rigid body that you are replacing. The nodes on the flexible body that are nearest to the markers are listed in the Node ID column.
Note: | You can display more digits of precision by entering a value in the Number of digits text box. |
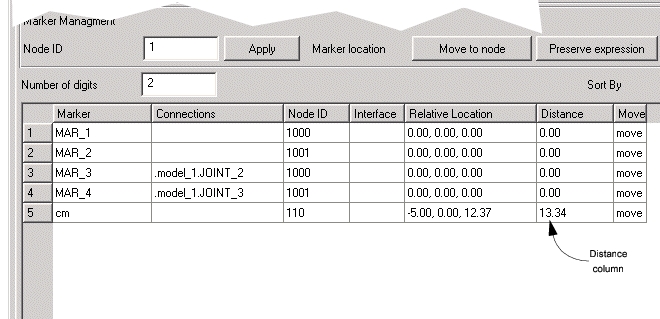
Figure 3 Marker and Nodes Table
3. Notice that the Distance column is reporting the distance between the nearest node and the rigid body marker that will be transferred to the flexible body.
Because you have positioned the flexible body precisely, the connections are coincident with nodes and the distances are 0.00 for the markers (MAR_1 through MAR_4).
The CM marker distance is nonzero because the finite element mesh was not constructed to have a node at the CM. This is a very common scenario and is not really a problem because it can be automatically moved to the nearest node by default.
Keep in mind that the flexible body already has its own CM so you can safely ignore the CM marker on the rigid body and just let it move to the nearest node. To demonstrate the move/preserve feature of the dialog box, however, you will preserve the location.
4. Select the Distance cell (13.34) for the CM.
5. Select the Preserve Location button.
The cell in the Move column has now been updated to loc. This means that the location of the CM marker will be preserved and it will not be moved to the nearest node when it is transferred to the flexible body.
6. Select OK.
The flexible body has been swapped, the rigid body deleted, and all connections to the model have been established.