Introducing the Suspension Tutorial
Overview
This chapter introduces you to the suspension tutorial and gets you started. The tutorial uses a simple automotive example to illustrate the basics of Adams Insight. Even if you don’t have an interest in automotive parts as a regular part of your job, we think you’ll find these instructions sufficient to help you focus on the capabilities of Adams Insight.
The sections in this chapter are:
 This tutorial takes about one hour to complete.
About the Tutorial
This tutorial guides you through the process of creating an experiment and analyzing results. In the initial sections, you’ll run a model through a number of simulations that you set up in the experiment, fit your data against a polynomial to determine which factors most affect the performance of your model, and publish your results to an HTML page that you can view with a Web browser.
This first tutorial uses an experiment for a model of a simple automotive front suspension system that you’ll import from an examples library. The model is a Short Long Arm (SLA), independent front suspension that you’ll exercise through its range of motion while the steering input is held constant in the straight-ahead position. You’ll monitor aspects of the model while you make modifications to it. Table 3 describes the modifications.
Table 3 Modifying and Monitoring Your Model
Parameters you’ll modify: | Performance attributes you’ll monitor: | Description of event: |
|---|---|---|
Outer tie-rod location | You’ll track the changes in toe angle as the suspension moves through its range of motion from jounce to rebound. Toe angle is the projected angle the wheel plane makes with the ground when viewed from above the vehicle. Toe-in is considered positive, and toe-out is considered negative. | You’ll determine how modifying the geometric location of the outer tie-rod affects toe angle. A real-world application for this event includes: ■Determining if exaggerated changes in toe angle result in aggressive tire wear. ■Assessing your model against a manufacturing variation. ■Assessing packaging requirements for your model. |
Starting Adams View
The section provides instructions on how to start Adams View on Linux and Windows.
Note: | On Windows, you may need to set the permissions to Full Control to edit the tutorial files. |
To start Adams View on Linux:
1. Copy the install_dir/ainsight/examples/ain_tut_101_aview.cmd to your working directory, where install_dir is where the Adams software is installed. If you cannot locate this directory, please see your system administrator.
Note: | You can skip this step if you previously used the Help‡Copy Examples To feature to copy all of the tutorials for Adams Insight. Your working directory is ain_examples/aview. |
2. Type the command to start the Adams Toolbar at the command prompt, and then press Enter.
3. Select the Adams View tool  .
.
.The Adams View main window appears.
To start Adams View on Windows:
1. Copy the install_dir/ainsight/examples/ain_tut_101_aview.cmd to your working directory, where install_dir is where the Adams software is installed. If you cannot locate this directory, please see your system administrator.
Note: | You can skip this step if you previously used the Help‡Copy Examples To feature to copy all of the tutorials for Adams Insight. Your working directory is ain_examples/aview. |
2. From the Start menu, point to Programs, point to Adams 2024.1, and then select Adams View.
The Adams View main window appears.
Creating a Modeling Database
You start this tutorial by creating a modeling database that contains a new model called Suspension Assembly.
To create a modeling database:
1. In the Welcome dialog box, select Import a file.
2. If the Start in text box doesn’t show the path to your working directory, select the Browse button  . Use the Select File dialog box to navigate to your working directory, and then select OK.
. Use the Select File dialog box to navigate to your working directory, and then select OK. 3. Select OK in the Welcome dialog box.
The File Import dialog box appears.
4. In the File to Read text box, enter ain_tut_101_aview.cmd or right-click and select Browse. You can then use the Select File dialog box to open ain_tut_101_aview.cmd.
5. Select OK.
Adams View imports the file, and then displays the car suspension model. It also opens the Simulation Control dialog box.
Running a Simulation
Before you create your experiment, you’ll simulate the suspension model in Adams View.
To simulate the model:
■In the Simulation Control dialog box, select the Start tool  , and wait for the simulation to finish.
, and wait for the simulation to finish.Adams View runs the simulation.
Starting Adams Insight
In this section, you’ll open Adams Insight from Adams View and begin creating an experiment to measure the performance of a suspension model.
To start Adams Insight from Adams View:
1. From the View Ribbon menu select Design Exploration tab. From the Insight container, click Adams Insight Export Dialog box icon .
.
.The Adams Insight Export dialog box appears.
2. In the Experiment text box, enter a name for your experiment or use the default.
3. Leave the default values in the Model and Simulation Script text boxes.
4. Select OK.
Adams View launches Adams Insight and the Adams Insight main window appears.
Note: | On Windows systems, Adams View opens a command prompt window to launch Adams Insight. This window stays open until you close Adams Insight. Do not manually close the command prompt window. |
To start Adams Insight from Adams View: (Classic Interface)
1. From the Main menu in Adams View, point to Simulate, point to Adams Insight, and then select Export.
The Adams Insight Export dialog box appears.
2. In the Experiment text box, enter a name for your experiment or use the default.
3. Leave the default values in the Model and Simulation Script text boxes.
4. Select OK.
Adams View launches Adams Insight and the Adams Insight main window appears.
Note: | On Windows systems, Adams View opens a command prompt window to launch Adams Insight. This window stays open until you close Adams Insight. Do not manually close the command prompt window. |
Adams Insight Interface
This section describes what you see when Adams Insight first opens. Figure 19 shows the main window as it appears when you first launch Adams Insight. It includes the following items:
■Menu bar - Contains pull-down menus for File, Edit, Define, Simulation, Tools, and Help.
■Toolbars - Contain commonly used tools for accessing files, creating and modifying designed experiments.
■Treeview - Displays a hierarchical list of objects that you can include in an experiment. The tree is especially useful for selecting and identifying objects when you are creating a design matrix.
■Viewport - The area of the window that displays parameters for modifying the objects you select from the treeview.
■Status bar - Displays messages and issues prompts during your Adams Insight session.
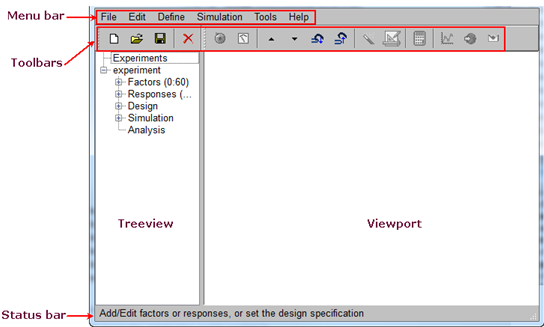
Figure 19 Adams Insight Main Window
Adams Insight Toolbars
The Adams Insight main window has four toolbars:
■Main (Experiments) toolbar - Lets you execute basic commands.
■Adams Insight (Experiments Contents) toolbar - Helps you build and execute your experiment.
■Work Space toolbar - Lets you execute commands on the work space.
■Report toolbar - Lets you generate and export a report.
If you hold your mouse pointer over any tool, tip text appears giving a short description of the tool.
Tools in toolbars are arranged in the order that you’ll use them in the process of creating and executing your designed experiment. Depending on where you are in the process of creating an experiment, Adams Insight enables or disables the tools (you can always display and undisplay them if you need to). This feature alerts you to the correct order of procedures to follow. For example, the Run simulations tool is disabled until you define required elements for a design matrix.
For more information on the toolbars, see the Adams Insight online help.