Controlling Time-Domain Animations
Learn how to control Time-domain animations:
Playing Portions of a Time-Domain Animation
By default, Adams PostProcessor uses every frame of a time-domain animation. You can select to skip any number of frames and play only a portion of the animation based on time or frame number. For example, to view an animation between 3.0 and 5.5 seconds, you would set the start time to 3.0 and the end time to 5.5.
To skip frames:
2. In the Frame Increment text box, enter the number of frames to skip.
To play only a portion of the animation:
1. From the dashboard, select Animation.
2. Set Display Units to Frame or Time.
3. In the Start text box, enter the starting frame or time and in the End text box enter the ending frame or time.
Setting Animation Speeds of Time-Domain Animations
You can change the speed at which time-domain animation play by introducing a time delay between each frame of an animation. Use the slider on the Animation Dashboard to introduce the delay. The default, when the slider is all the way to the right, is to play each animation as fast a possible. Moving the slider to the left introduces a time delay of up to 1 second.
To change the speed:
2. Click and drag the Speed Control slider at until you reach the desired time delay.
Displaying Specific Frames of Time-Domain Animations
Adams PostProcessor provides you with several options for playing specific frames of Time-domain animations. You can play one frame, display each frame one at a time, or display a frame associated with a particular time. You can also display a frame or frames representing:
■Model input - Model input represents the state that the model is in before the simulation. It does not account for assembly initial conditions or static solutions.
■Static equilibrium
■Contact between parts - By default, Adams PostProcessor does not display intermittent contact frames that two- and three-dimensional contacts produce to avoid the illusion of deceleration during animations.
To display a frame from an animation:
2. Do one of the following:
■Click and drag the topmost slider until you reach the number of the frame or time you want to display.
■In the text box to the right of the slider, enter the number of the frame or time you want displayed.
To display the frame representing the model input:
1. From the dashboard, select Animation.
2. Select Model Input.
To display the frames representing static equilibrium:
1. From the dashboard, select Animation.
2. Select Include Static.
3. Continue selecting Next Static to view all static equilibrium positions.
To display the frames representing contacts:
1. From the dashboard, select Animation.
2. Select Include Contacts.
3. Continue selecting Next Contact to view all contacts between parts.
Tracing the Paths of Points in Time-Domain Animations
During Time-domain animations, you can draw curves on the screen that represent the path that one or more points in your model travelled. This can be useful when you are trying to design a mechanical system to produce a certain motion, and want to see whether or not the parts move as intended.
Tracing the paths of points can also be useful when performing envelope studies to see if any parts move outside a particular working envelope as the mechanical system completes a typical work cycle. By default, Adams PostProcessor does not trace the paths of any points in your model during animation.
To draw paths on the screen, you specify one or more Markers for which you want paths generated. Adams PostProcessor draws curves representing the path of the marker during each animation frame.
To trace the paths of points during an animation:
2. In the Trace Marker text box, enter the names of one or more markers for which you want Adams PostProcessor to generate paths.
Tips on Entering Object Names in Text Boxes.
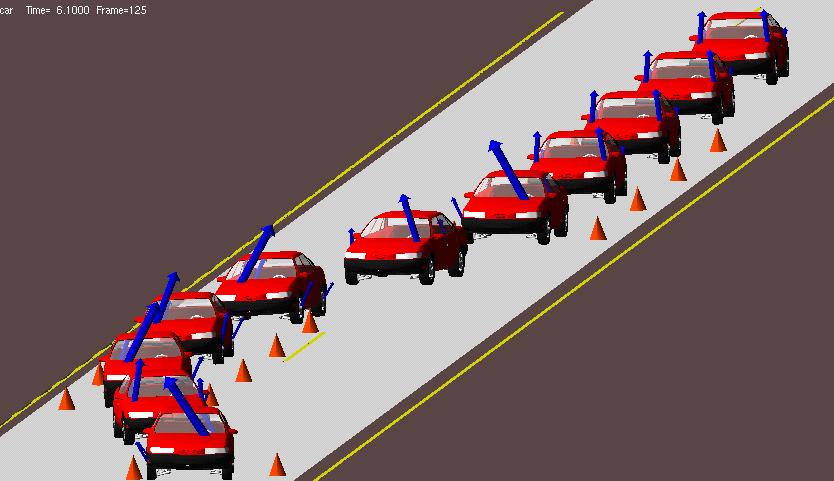
Superimposing Frames
You can superimpose successive frames of Time-domain animations. When you toggle the Superimpose button, Adams PostProcessor accumulates each frame, as shown below.
To superimpose frames:
2. Select Superimpose.
Setting Trailing Frames in Time-Domain Animations
You can overlap successive frames of Time-domain animations. Setting up trailing of frames helps you to better visualize the motion of a model or to add a sense of motion to still images of the animation.
You can control the decay rate using the Trail Decay Rate slider. It sets the rate at which the frames disappear. By default, the slider is all the way to the left, specifying no decay.
To trail frames:
2. In the Trail Frames text box, enter the number of frames to trail.
3. Move the Trail Decay Rate to set the rate at which the frames diminish or decay.