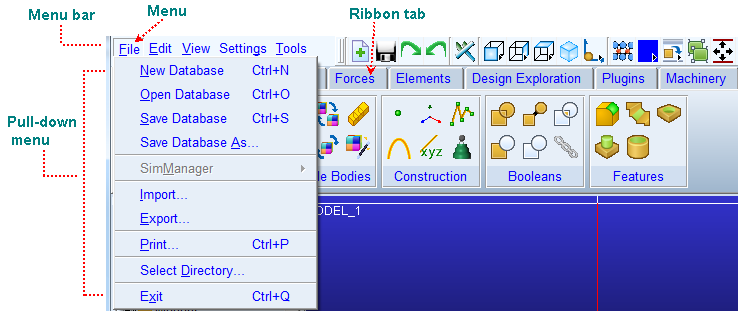
Customizing Menus Using the Menu Builder
You can use the Menu Builder to modify and create menus to better suit your needs and preferences. With the Menu Builder, you can change the structure of an existing menu to match your industry's terminology or create new menus. For example, you can use the Menu Builder to change the main window's menu bar so it includes a Tire menu for adding tires to your model. You can build menus for a particular model or for an entire application.
When you create menus in Adams View, you can specify keyboard accelerators (shortcuts) and mnemonics.
Menu Entry Syntax
The Menu Builder uses an outline-like format to display menus. You modify the menus by directly editing the text outline.
Each line defines an object and its name, or specifies information about the parent object. For clarity, Adams View indents the lines. As you edit the text, you can also indent the lines.
There are four types of objects in menus: menus, push buttons or icon buttons, toggle buttons, and separators. The text lines that define these are shown in the table below. Click a text line to learn more.
The text line: | Its parameter is: |
|---|---|
MENUn | label |
label or name of icon file | |
label | |
(none) |
The text lines have the following parameters:
■n is an integer between 1 and 10, usually 1, 2, or 3. It defines the menu level in which the object appears. Level 1 is the first level. MENU1 appears on the menu bar, for example, while BUTTON2 appears under the preceding MENU1. The n is required for MENU, but is optional for the other objects. If you omit the level, Adams View assumes the object belongs under the last MENU.
You can cascade menus up to 10 deep by nesting MENUs below other MENUs. You can include as many buttons in a menu as you want, although you should not create more than will fit on your screen.
■label is the text that appears in the menu. For an icon button, you specify the icon name instead of the text. In Motif, the icon name is the name of a XBM (X BitMap) or XPM (X PixMap) format file. In Windows, the icon name is the name of a bitmap (.bmp) format file.
labels can contain ampersand (&) characters that specify keyboard mnemonic shortcuts for a menu item (for example, ALT-F opens the File menu).
Note that with the exception of CMD=lines, spaces are not permitted in the menu structure input. Therefore, NAME = my_menu is not valid, but NAME=my_menu is. This differs from Adams View command language where spacing rules are flexible.
The following shows a portion of the Menu Builder could be used to define a Help menu in Adams View. To the right of the Menu Builder is the corresponding Help menu as it appears in Adams View.
Menu Builder and Corresponding Help Menu
MENU1 &Help NAME=help HELP=Get Help on Adams BUTTON2 &Toggle Tip Text NAME=tips HELP=Toggle popup descriptions on/off CMD=help tips=toggle SEPARATOR2 BUTTON2 Adams View &Help NAME=view_help HELP=Help for Adams View | 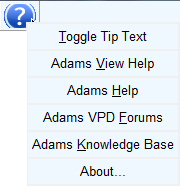 |
CMD=interface help file="view/view_hlp/view_home.htm" BUTTON2 &Other Product Help NAME=other_help HELP=Help for other products CMD=interface help file=products.htm" SEPARATOR2 BUTTON2 &About... HELP=Display product info CMD=int dia disp dia=.gui.about_adams | |
MENU
A MENU entry creates a pull-down or pull-right menu. First-level menus, MENU1, appear in the menu bar and pull downward. Lower-level menus, such as MENU2 and MENU3, appear as cascading pull-right menus.
Syntax
MENUn TITLE
NAME=name
HELP=Help
Parameters
■n = Number identifying whether the menu appears on the menu bar or on a pull-down menu. Can be either:
♦n = 1 - Menu appears on menu bar.
♦n 2 - Menu appears on pull-down menus.
■TITLE = Text string that appears in the menu bar. You can also place an & in the title in front of the letter to be used as the keyboard mnemonic (for example, enter &File to have the resulting menu be File and the mnemonic would be Alt+F).
■NAME = Name of the object in the modeling database. If you omit NAME, Adams View constructs a default identifier, such as MENU_4 or BUTTON_7.
■HELP = Text that appears in the status bar and in the tool tips, and describes the menu group.
Example
MENU1 File
NAME=file
HELP=Read and write files
BUTTON (Menu Command)
A BUTTON entry defines a menu command. You can place a button either on a pull-down menu or on a sub-menu. BUTTONS can specify an accelerator key (for example, Ctrl+M, Shift+G, or F12) that invokes the button's action.
Syntax
BUTTONn LABEL :: ACCELERATOR
NAME=name
HELP=help
CMD=command
Parameters
■n = Number identifying the placement of the button. Can be either:
♦n = 2 - Button appears on pull-down menu.
♦n = 3 - Button appears on a sub-menu.
■LABEL = Button name that appears in the pull-down or sub-menu. By convention, you should include ellipsis (...) after the button name if the button displays a dialog box. You can also place an & in the label in front of the letter to be used as the keyboard mnemonic (for example, enter &Save to have the resulting menu command be Save and its mnemonic be Alt+S.)
■ACCELERATOR = Key or series of keys that execute the menu command. To create a series of keys, you use the Shift, Ctrl, or Alt keys followed by the plus symbol (+) and any letter (a to z) or function key (F1, F2, and so on). No spaces can be between any of the keys (for example, Alt+A, instead of Alt + A).
The Shift, Ctrl, and Alt keys are case sensitive (the first letter must be capitalized), while the key letters are not (user can enter A or a). You also can group the Shift key with the Ctrl and Alt keys (for example, Shift+Ctrl+A). If you combine the keys, the Shift key must be executed first.
■NAME = Name of the menu object in the modeling database. If you omit NAME, Adams View constructs a default identifier, such as MENU_4 or BUTTON_7.
■HELP = Text that appears in the status bar or tool tips describing the button.
■CMD = Command, sequence of commands, that the button executes.
Note: | Multiple-line commands need CMD before each line. |
Example
BUTTON2 &Export
NAME=export
HELP=Write data to file
CMD=interface dialog_box display dialog_box_name=.gui.file_export
TOGGLE
A toggle creates a menu entry that toggles between two states. It creates a check mark depending on the state value (on or off). Make sure that if you create a toggle, you maintain its state. A TOGGLE can be on a pull-down or sub-menu.
Syntax
TOGGLEn TITLE
NAME=name
HELP=help
STATE=state
CMD=command
Parameters
■n = Number identifying the placement of the toggle. Can be either:
♦n = 2 - Toggle appears on pull-down menu
♦n = 3 - Toggle appears on a sub-menu
■TITLE = Toggle name that appears in the pull-down or sub-menu.
■NAME = Text that identifies the toggle so that you can define keyboard shortcuts and mnemonics for it. If you omit NAME, Adams View constructs a default identifier, such as MENU_4 or BUTTON_7.
■HELP = Text that appears in the status bar or tool tips describing the toggle.
■STATE = Current state of toggle (on or off).
■CMD = Command to execute.
SEPARATOR
A separator creates a horizontal line between menu entries on either a pull-down or sub-menu to indicate groups of comments.
Syntax
SEPARATORn
Parameters
■n = Number identifying the placement of the separator. Can be either:
♦n = 2 - Separator appears on pull-down menu
♦n = 3 - Separator appears on a sub-menu
Example
SEPARATOR2
Creating or Modifying a Menu
The Menu Builder lets you create and modify menu bars for existing Adams View windows. If you don't want to use the Menu Builder to create and modify menus, you can create a text file that defines a menu and then import that text into the Menu Builder.
To create or modify a menu in the Menu Builder:
1. On the Tools menu, point to Menu, and then select Modify.
The Menu Builder appears, displaying the main menu.
2. Scroll to the menu you want to modify or to the location where you want to add a menu.
3. Type in your changes.
4. From the Menu Bar, select Apply.
Restoring a Customized Menu
There are two menu commands that read in your customized menus:
■Read local Main Menu - Reads in the file main.mnu, which must be located in the local directory (the directory where you started Adams View or the current directory set using the commands File - Select Directory).
■Read - Reads in a .mnu menu file of any name and location.
These menu commands are helpful if you have a new version of Adams View or created a new Modeling database and want to read in your customized menus.
To read a main.mnu file in the local directory:
■From the Tools menu, point to Menu, and then select Read local Main Menu.
To read in any .mnu file:
1. From the Tools menu, point to Menu, and the select Read.
2. Enter the name and location of the file.
3. Select OK.
Importing and Exporting Menus
You can import text from a .mnu file at the current position of the cursor in the Menu Builder. You can also export the menu to a .mnu text file, for example, for review by others or use in another Modeling database.
To import text:
1. In the Menu Builder, place the cursor at the location you want to bring in the text.
2. From the Menu Builder File menu, select Import.
3. Enter the name and location of the text file containing the menu text.
4. Select OK.
Loading a Menu into the Menu Builder
After opening the Menu Builder, you can load any .mnu menu file in the current modeling database for editing or review. After loading the menu, Adams View also displays it in its window.
To load a menu into the Menu Builder:
1. From the Menu Builder File menu, select Load.
The Database Navigator appears with a list of menus in the modeling database.
2. Select the desired menu, and then select OK.