Modifying the Modal Content
One of the keys to successfully simulating flexible bodies is having the right modal content. In many cases, an MNF has more modes than you need to simulate a particular response. Using Adams Flex, you can select the modes that you want included in the flexible body. You can disable a particular mode if it does not contribute to the overall response of a flexible body. You can also remove low influence modes if they are slowing down the simulation of your model. You can disable modes based on their mode number, frequency, or contribution of strain energy. You can also disable modes one at a time or disable a range of modes.
In this section, you’ll use the Flexible Body Modify dialog box to display the different modes in the flexible body, examine them, and then disable them based on their mode number and frequency.
Displaying the Flexible Body Modify Dialog Box
To display the Flexible Body Modify dialog box so you can modify the modal content:
1. From the Main menu, select the Select tool  to reset the model.
to reset the model. 2. Display the Flexible Body Modify dialog box, if necessary, as explained in Displaying the Flexible Body Modify Dialog Box.
Disabling Individual Modes
The MNF file that you read into Adams View contains 32 modes. Some of these modes are rigid body modes, and Adams Flex disables them by default. Because Adams Flex supplies each flexible body with its six nonlinear rigid body degrees-of-freedom, you do not need to nor should you include rigid body modes.
In this section, you’ll view the first six modes (1 through 6), which are disabled because they are rigid body modes. You’ll also view the first mode that is enabled, mode 7, and disable it because it bends out-of-plane and is not needed for this simulation. Finally, you’ll disable other modes that do not contribute to inplane motion. You disable the modes so the simulation of your model is more efficient.
To disable modes one at a time:
1. From the Flexible Body Modify dialog box, select the Next Mode tool  to view the first available mode (mode 1). The mode appears on the undeformed flexible body if the Superimpose check box is selected. The Superimpose check box controls whether the undeformed shape is superimposed on the deformed shape.
to view the first available mode (mode 1). The mode appears on the undeformed flexible body if the Superimpose check box is selected. The Superimpose check box controls whether the undeformed shape is superimposed on the deformed shape. 2. From the Flexible Body Modify dialog box, select the Animate tool  to animate the mode. By default, Adams View runs the animation 3 times or through 3 cycles.
to animate the mode. By default, Adams View runs the animation 3 times or through 3 cycles. The mode you are currently animating is a rigid body mode and is disabled. To tell if a mode is disabled, Adams Flex selects the Disable radio button and displays the mode’s number and frequency in parenthesis on the Flexible Body Modify dialog box.
3. Select the Next Mode tool until you reach mode 7 or, in the Mode Number text box, type 7 and press Enter.
until you reach mode 7 or, in the Mode Number text box, type 7 and press Enter. Mode 7 is the first flexural mode that bends out-of-plane and is the first enabled mode. Because the event you are modeling is inplane, you can disable this mode to improve efficiency.
To view the out-of-plane mode better, look at the model from a top view by selecting T (uppercase) in the main window.
4. Select Disable to disable mode 7. The mode number and its natural frequency now appear in parentheses.
5. Change to mode 8. This is the first inplane bending mode.
6. Use the Contour, Datum Node, and Deformation Scale Factor settings to modify the appearance of mode 8 so you can view it more easily. Ensure that mode 8 is enabled; it is critical for the motion you are trying to capture.
7. Examine the remaining mode shapes and disable them if they do not contribute to inplane motion. If in doubt, leave the modes enabled. Remember, however, that disabling modes results in more efficient simulations. Therefore, by leaving those modes that do not contribute to inplane motion enabled, you will not see significant improvements in your simulation time.
Disabling a Range of Modes
In this section, you’ll disable a range of modes by specifying to disable all modes that have a frequency of 10000Hz or higher.
To disable a range of modes:
1. From the Flexible Body Modify dialog box, select range.
The Enable or Disable a Range of Modes dialog box appears. This dialog box is very useful when you have a large number of modes that you are managing. It lets you enable and disable ranges of modes by either their mode number or their frequency.
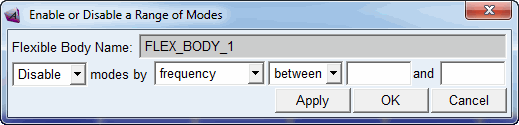
2. From the third pull-down menu from the left, select above and enter 10000 in the text box that appears next to the pull-down menu.
3. Select OK.
Simulating the Model with Disabled Modes
Now that you’ve disabled the modes in your model that do not contribute to inplane motion, run the simulation again as explained below. You should notice an improvement in simulation time.
To simulate the model:
1. From the Flexible Body Modify dialog box, reset the deformation scale factor to 1, set Plot Types to Contour, and set Datum Node to 1000.
2. Select OK.
3. Now repeat the simulation as explained in Simulating the Flexible Model. Depending on how many modes you disabled, the simulation time should decrease.
You should use caution when disabling modes, however. Once you disable a mode, the flexible body cannot take on the particular shape of the disabled mode. This is the same as applying a constraint to the model. If you were to remove all out-of-plane modes from the example, the flexible body would behave like a rigid body when responding to out-of-plane loads.