Modifying Axis Attributes
You can change the following about the horizontal and vertical axes of two-dimensional plots and the x, y, and z axes of three-dimensional plots:
Modifying Axes Format
By default, Adams PostProcessor automatically scales the axes in a plot based on the curves. You can change the default values.
To modify the format of the horizontal or vertical axis:
1. Select a horizontal or vertical axis.
3. Set the scaling for the axis as explained in the table below.
Scaling Options
To: | Do the following: |
|---|---|
Automatically calculate the scaling | Select Auto Scale. You can specify that Adams PostProcessor automatically set the minimum and maximum values or your can set them manually. By manually setting minimum and maximum values for the axis, you can zoom in on different areas of your plot. For example, to view the values between 0 and 10, you can set the minimum value to 0 and the maximum value to 10. Adams PostProcessor then only displays the values between these numbers in your plot. |
Use the current time range as the axis limits | Select Auto Time Limits. |
Set the time limits | Clear Auto Time Limits and enter the time limits for the axis in the two Time Limits text boxes that appear. Enter the minimum value in the first box and the maximum value in the second box. Note: Setting time limits is only useful when working with the independent (horizontal) axis. For linear- and dB-scaled axes, enter lower and upper limits. For logar-scaled axes, enter log base 10 for lower and upper limits. (See scaling options below.) |
4. Set Scale to the type of scaling. By default, Adams PostProcessor displays the axis values linearly, starting at 0. You can also change the scaling to:
■Logarithmic - Scales the axis values so that each power of 10 is separated by the same distance. For example, the values 1, 10, 100, 1000, and 10,000 are equally spaced.
■Decibel (dB) - Displays 20 * log10(value) for each value.
5. Set Placement to where you want to place the axis. The options available depend on whether you are modifying the horizontal or vertical axis. You can place an axis on the right or left or at the top or bottom.
6. In the Offset text box, set how far from the border of the plot you want to display the axis.
7. Set Color to the color for the axis.
Modifying Tic Marks
By default, Adams PostProcessor displays short lines, called tic marks, at regular intervals across the axis. The tic marks help to define the scale of the axis. Adams PostProcessor displays the major tic marks at every unit value and the minor tic marks halfway between the major tic marks.
For major tic marks, you can set the spacing by setting:
■Increments - Specifies intervals across the axis, such as at every unit value, every second unit value, and so on, at which tic marks should appear.
■Divisions - Divides the axis evenly into a number of segments and places a tic mark at every division.
For minor tic marks, you can set how many minor tic marks appear between each major tic mark.
To modify tic marks:
1. Select a horizontal or vertical axis.
3. To turn off automatic divisions, clear the selection of Auto Divisions and select how you want the major tic marks spaced from the pull-down menu. Enter the number of increments or divisions in the text box.
4. In the Minor Divisions text box, enter the number of divisions between each major tic mark. The number of divisions sets the number of minor tic marks. For example, if you set the number of divisions to two, Adams PostProcessor places one tic mark between each major tic mark.
5. Set Color to the color for the tic marks.
Modifying Axis Labels
By default, Adams PostProcessor displays a label next to an axis to help identify the values in the axis. The label identifies the unit of measurement in the axis. You can change the text of the label, its placement, font size, and color.
Note: | You can also modify the label text using the instructions in Adding Notes and Modifying Text, which allows you to create multi-line labels. |
To modify axis labels:
1. Select a horizontal or vertical axis.
3. In the Label text box, enter the text for the label.
4. Set the properties for the axis label as explained in the table below.
Axis Label Options
To set: | Do the following: |
|---|---|
Size of the text | In the Font Size text box, enter a font size. The font size you can enter depends on the type of font you selected. |
Orientation of the text | Select either: ■Horizontal - text ■Vertical -  |
Alignment | Select how you want the label to be aligned relative to its anchor position, which is the center of the text. See the figure below. You can select: ■Left - Left-justifies the text from the anchor position. ■Center - Centered the text on its anchor position. ■Right - Right-justifies the text from the anchor position. 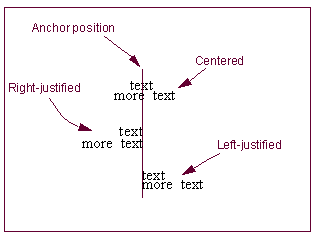 |
Color | Set Color to the color for the text. |
Location | Clear the selection of Auto Position and, in the Offset text box, enter an offset value to define the distance the label is offset from the border of the plot. |
Modifying Axis Numbers
By default, Adams PostProcessor displays numeric values for an axis at each major increment. You can change the way in which Adams PostProcessor displays the values, such as the number of decimal places displayed and whether or not Adams PostProcessor uses scientific notation.
To modify axis numbers:
1. Select a horizontal or vertical axis.
3. Set the properties for the axis numbers as explained in the table below.
Axis Number Options
To set: | Do the following: |
|---|---|
Trailing zeros | Select Trailing Zeros to have Adams PostProcessor display zeros after the numbers in the axis. The number of zeros depends on the number of decimal places you selected as explained next. |
Decimal places | In the Decimal Places text box, enter the number of decimal places to which the numbers in the axes should be displayed. |
Scientific range | In the Scientific Range text boxes, enter the exponential form for scientific notation. This controls the lower and upper powers of ten where the format for real numbers switches from a fixed point format to scientific notation. The default values are -4 and 5, meaning that any number less than or equal to 1.0E-04 or greater than or equal to 1.0E+05 will be written in scientific notation. |
Font size | In the Font Size text box, enter a font size. The font size you can enter depends on the type of font you selected. |
Color | Set Color to the color for the numbers. |