Model Browser
Welcome to the Model Browser
Model Browser represents a hierarchical overview of all objects in the database. It also provides advanced functionality to:
■Search the objects in the database.
■Create and manage filters.
■Create and manage object groups.
Model Browser Interface
The Model Browser provides a simpler and intuitive interface for model construction, and easy access to hierarchical objects in the database. It is an integral part of to the Adams View window and located on the left side, as shown below:
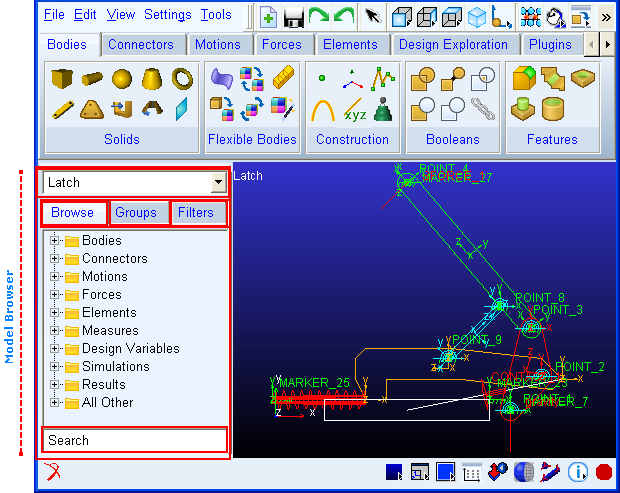
The Model Browser window can be divided into three sections, based on the three tabs:
■Browse
■Group
■Filters
These three tabs are discussed in detail in separate sections, later in this chapter.
Moving and Docking/Undocking the Model Browser
You can dock/undock and move the Model Browser window. It can be docked on the left (default) or right edge of the Adams\View window.
■To undock the Model Browser, double-click on its control bar. The browser gets undocked.
■To dock the undocked Model Browser, double-click on its control bar. The browser gets docked on its previous location.
■To dock the undocked Model Browser on a different (right/left) location, click on the browser’s control bar and drag the window where you want to dock the window; when you get close enough, the browser will jump into the docking position.
■To move the undocked Model Browser, click on its control bar and drag anywhere on your screen.
Working with objects in the Model Browser
■To select a single object, click on it.
■To select multiple objects, hold down the Ctrl key and click on the desired objects.
■To select a range of objects, hold down the Shift key and select a range of objects.
These actions may differ slightly depending on the current tab (Browse, Groups, or Filters) and are discussed in detail in respective sections.
The text objects, selected in the browser window get synchronized with their corresponding objects in the graphics viewport as well as with the corresponding objects in the graphical topology display. For example, if you select an object in the browser the same object gets selected and highlighted in the viewport.
Right-click Menus
When you click right mouse button, different shortcut menus appear depending on the tab and the entity selected in the Model Browser. The menus can be divided in three types:
■Shortcut menu: Appears, when you right-click in the free space in the Model Browser.
■Context menu for single selection: Appears, when you right-click on a single entity in the Model Browser.
■Context menu for multiple selection: Appears, when you right-click after selecting multiple entities.
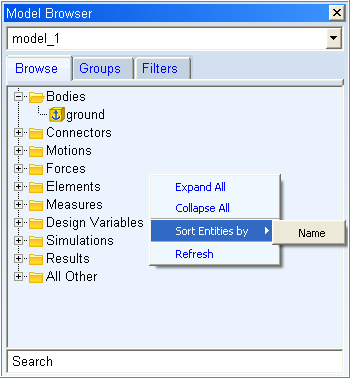
Shortcut Menu
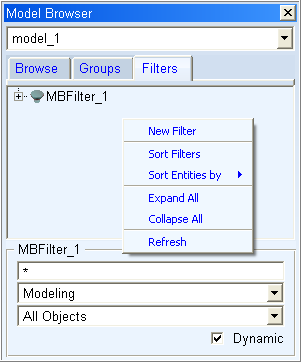
When you click in the free space of any tab of the Model Browser a shortcut menu appears. The options in this menu differ in different tabs but some common functionality is described below:
■To expand all nodes in the Model Browser tree, select Expand All from the shortcut menu.
■To collapse all nodes in the Model Browser tree, select Collapse All from the shortcut menu.
■To refresh the Model Browser, select Refresh from the shortcut menu.
■To sort the objects in the Model Browser by either type or name, point to Sort Entities by on the shortcut menu and click either Type or Name, as required.
Note that the Browse section provides only one option: Sort Entities by Name.
The options under the context menus for single and multiple selection differ depending on the current tab (Browse, Groups, or Filters) and are discussed in the respective sections.
Browse Tab
The browse tab is the default tab. It depicts a hierarchy of all the objects in the database. It has nine top level folders that contain the objects by type. The objects that do not fit into the first eight categories are included in the "All Other" folder.
A drop down menu at the top of the browse tab displays currently active model. The browse tab has a quick search box that enables you to specify search criteria and find matching objects in the database.
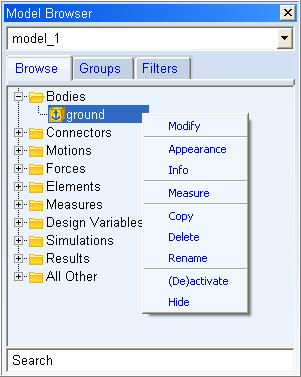
Modifying Objects
The Model Browser lets you modify database objects.
To modify objects:
1. Right-click on the object, and then select Modify. Based on the object type selected the relevant Modify window appears.
2. Modify the specified values as required and click OK.
Editing Object Appearance
You can also edit object appearance here.
To edit object appearance:
2. Modify the specified values as required and click OK.
Checking Object Information
The complete information about an object can be checked by following the instructions, given below.
To check object information:
2. Check the information and click Close when done.
Creating Measure
The procedure of creating object measure is described below. Read About Measures for more information on object measures.
To change object measure:
1. Right-click on the object, and then select Measure. Based on the object type selected the relevant Measure window appears.
2. Provide the measure values and click OK.
Renaming Objects
You can rename an object in the model browser.
To rename an object via the Rename Object window:
2. Type the new name of the object and click OK.
To rename an object in-line:
1. Left-click on the object to rename.
2. Move the mouse cursor slightly to somewhere else on the object name and left-click again. The object name highlights.
3. Type over the object name with the new object name and press Enter.
Activating/ Deactivating Objects
From the Model Browser, you can deactivate objects and/or their dependents and reactivate deactivated objects.
To activate/deactivate objects:
1. Right-click on the object to Activate/Deactivate, and then select (De)activate. The Activate/Deactivate window appears.
2. Choose one from the following:
■To deactivate the object and its dependents, deselect the Object Active checkbox.
■To deactivate only the dependents of selected object, deselect the Object’s Dependent Active checkbox.
■To reactivate a deactivated object and its dependents, select the Object Active checkbox.
■To reactivate the deactivated dependents of an object, select the Object’s Dependent Active checkbox.
3. Click OK.
Hiding/Showing Objects
You can change object display preferences.
To hide an object or show a hidden object:
■Right-click on the object, and then select Show or Hide, as required.
Groups Tab
The groups tab enables you to create and manage groups in the database. Group creation and modification is supported along with the facility to drag-drop members across groups.
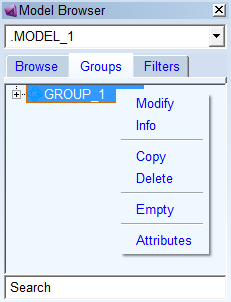
Grouping Objects
The Groups tab enables you to select and group database objects based on your preferences. It is shown below.
To create a new group:
1. Right-click in the free space in Groups tab, and then select New Group. The Group Create window appears.
2. Provide the required information in the fields in the Group Create window, and then click OK. The new group gets created.
Modifying Groups
The Model Browser lets you modify the object groups.
To modify groups:
2. .Modify the specified values as desired and click OK.
Removing Objects from Groups
If you want to empty a group (remove all group entities from the group) follow the instructions given below.
To empty a group:
1. Right-click on the group, and then select Empty. All the objects get removed from the group.
Sorting Groups
You can sort groups by either name or type.
To sort groups:
Right-click in the free space in Groups tab, and then point to Sort by and select Name or Type as required. The groups will get sorted.
Quick Search
The quick search box will also be present at the bottom of the groups tab. It functions in exactly the same way as on the Browse Tab, but only displays group names or those items present in groups.
Filters Tab
The Filters tab enables you to create and save complex searches which can update dynamically.
Filtering Objects
You can select search criteria in the filter input area located at the bottom of the browser window, and type text in the search text field for this search.
To create a filter:
1. Right-click in the free space in Filter tab, and then select New Filter. The Filter Creation window appears.
2. Type the name of the filter and click Add Filter. The filter gets added.
3. In the Filter text box, enter the name of the objects that you want to display. Type any wildcard that you want to include.
4. From the pull-down menu below Filter text box, select the type of object or objects that you want to display in the Model Browser.
5. To only display active or inactive objects, set the pull-down menu below the Filter objects to either Active Objects or Inactive Objects.
6. Select the Dynamic check box if you want the filter to update automatically when new objects that meet the filter specifications are added.
7. Press Enter.
Combining Filters
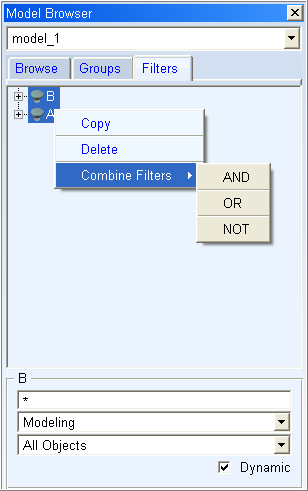
You can create a new filter by combining two filters. One of the three operators: AND, OR, or NOT can be used for combining the filters.
■AND: Creates a filter that consolidates the two filters as:  , only the common objects of both filters will be in the resulting filter.
, only the common objects of both filters will be in the resulting filter.■OR: Creates a filter that consolidates the two filters as:  , all objects of both filters will be in the resulting filter.
, all objects of both filters will be in the resulting filter.■NOT: Creates a filter that consolidates the two filters as:  , only the objects that are in
  but not in
  , will be in the resulting filter.
, only the objects that are in but not in , will be in the resulting filter.Where  and
and  are the names of the filters to combine.
and are the names of the filters to combine.To combine filters:
1. Select the two filters to combine and right-click on them.
2. From the right-click menu that appears, point to Combine and select one condition from AND, OR, or NOT, as required.
The new filter will be created, satisfying the condition selected.
The order of the filter combination is determined by the order in which the filters appear in the list from the bottom to top. For example, if two filters A and B are selected for combination such that A appears above B in the list, then the filter created with an AND operation between the two will be B_AND_A (and will be so named as the default). In order to create a filter A_AND_B, the list needs to be sorted first (using the 'Sort Filters' option from the context menu that pops up when the list is right-mouse clicked.).
The filter operations AND and OR are inherently commutative and as such the order of the filter created by a combination of these do not matter as far as the result is concerned. For example, the filter created with the combinations (A AND B) and (B AND A) will yield the same result. The filter combination NOT however is not commutative and the order here can be determined by the sorting method as explained above.