Animation Controls
Ribbon menu → Results Tab → Review container → 
or
(Classic) Review → Animation Controls
Main toolbox →
Main toolbox →
Allows you to work with Animations and control the frames from your simulation. Animations provide instant feedback to you as your simulation runs.
By default, each time you run a simulation, Adams Solver replaces the previous animation frames. To replay earlier animations, you must save them in your modeling database.
During animations, Adams View displays frames as quickly as it can based on the graphics capabilities of your computer hardware.
Animation Controls Dialog Box - View | Animation Controls Dialog Box - Car |
|---|---|
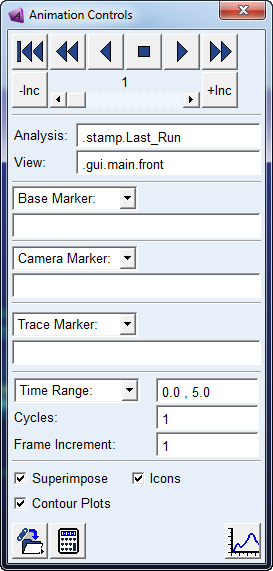 | 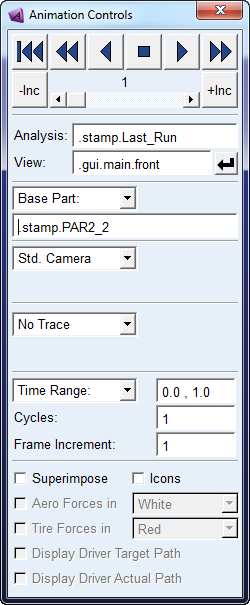 |
Option/Icon | Description |
|---|---|
 | Plays the animation backward. |
 | Stops the animation. |
 | Plays the animation forward. |
 | Rewinds the animation. |
  | Advances one frame. |
  | Rewinds one frame. |
 | Plays the animation in fast-backward mode. |
 | Plays the animation in fast-forward mode. |
Slider | Click and drag until you reach the number of the frame you want to display. |
Analysis | Do one of the following: ■Enter the name of a saved Simulation. ■To animate multiple simulations simultaneously, enter the names of the simulations you want to animate. Separate each simulation name with a comma. Note: When animating multiple simulations simultaneously, each simulation must have the same number of output steps or frames associated with it, as well as the same output time step size. |
View | Do one of the following: ■Play animations in a different view window, by entering the name of any view window that is currently visible on your screen. The default name is the currently active view. ■Play animation in multiple view windows at the same time by entering multiple view names, separating each name with a comma. Note: If you choose to animate in more than one view simultaneously, every view you specify must animate the same simulation results. You cannot display one simulation in one view and another simulation in another view. |
 | Switches to the Variant, Testrig and Road Graphics used for the selected analysis. |
Base Part/ Fixed Base/ Std Camera | Lets you set the view perspective or camera angle for an Animation. Setting different animation view perspectives can be especially useful when parts undergo large motions and move off your screen during an animation, such as with vehicle simulations. Learn about Specifying the View Perspective of Animations. |
Render | See Rendering mode. |
No Trace/Trace | You can trace the paths of points during animation. See Tracing Paths of Points During Animations. |
Time Range | Defines a subset of the complete sequence of frames in an animation to play. By default, Adams View plays the complete sequence of frames. You can set the interval to view based on time or frame number. Choose from: ■Time Range - Enter a start time and stop time in the text box. Adams View replays those frames whose time is within the specified range. ■Time - Enter an interval and select Apply. ■Frame Range - Enter a start frame and an end frame. ■Frame - Enter a frame number and select Apply. |
Cycles/Loop | Sets how many times to replay the animation. The default is to play the specified sequence of frames once. In the Cycles box, enter a whole number representing the number of times you want Adams View to play the animation. It automatically rewinds the animation before each replay. |
Frame Increment | Enter a number of frames to skip. For example, enter 5 to have Adams View display only every fifth frame. |
Superimpose | Toggles the overlay of frames on top of one another. By default, during an animation, Adams View erases the previous frame before drawing the next frame. We recommend that you use the frame or time range features, as well as the frame increment so that only certain frames are superimposed on top of one another. |
Icons | Toggles the Screen icons during animations. Shortcut: Type a lowercase v. |
Contour plots | Toggles the display of Contour plots of flexible bodies. The default is set to off to improve the speed of the animation, and to remove any caching of the animation before playing it. To learn about setting defaults for caching animations see PPT Preferences - Animation. To learn about displaying contour plots on flexible bodies see Animating Deformations, Modal Forces, and Stress/Strain. |
 | Save Simulated Position Displays the Save Model at Simulation Position dialog box so you can save the model at a simulated position into the Modeling database under a new name. |
 | Save Model at Simulation States Displays the Save Model at Simulation State dialog box so you can save the model at a simulated state into the Modeling database under a new name so you can use it as your new design configuration with states. |
 | Displays the Simulation Controls dialog box. |
 | Displays Adams PostProcessor. |
Aero Forces* | Toggles the visualization of the Aerodynamic force components in user defined color (if available) |
Tire Forces* | Toggles the visualization of the Road contact force components in user defined color (if available) |
Display Driver Target Path* | Toggles the visualization of the target path data used by the Driving Machine for controlling the vehicle (if available). |
Display Driver Actual Path* | Toggles the visualization of the actual path data of the vehicle as a result of the controlling actions of the Driving Machine (if available). |
The options marked * are only available in Adams Car, and the visualization of those characteristics is automatically available for interactive analyses (Analysis Mode).
Background analyses (and files_only + command shell invoked analyses) are also supported if the results files are imported to the Car session using the Review → Analysis Management → Read option and associated with the matching assembly. The generic File → Import functionality for Solver results files does not support these visualization options.
Learn about: