PPT Preferences
Edit -> Preferences
Changes the ways in which Adams PostProcessor works. In addition, you can specify the directory to which Adams PostProcessor saves files.
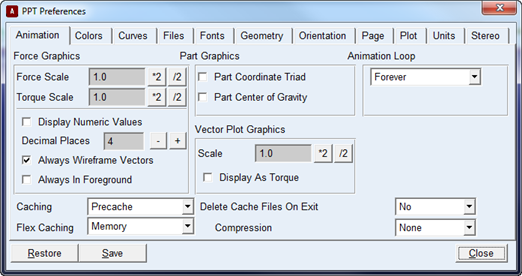
PPT Preferences - Animation
Edit -> Preferences-> Animation Tab
You can set preferences for animations, including preferences for force graphics, caching of animations, part graphics, and flexible body display.
Learn more:
Note: | For flexible bodies, you can also use the Performance Tuning Guide, which steps you through all the preferences you can set for improving the performance of animations of flexible bodies, including some that are on this tab. See Tuning the Performance of Flexible Body Animations |
For the option: | Do the following: |
|---|---|
Force graphic options: | |
Force Scale/Torque Scale | Enter the amount by which you want to scale force (straight arrows) and torque (semi-circular arrows) graphics. The default scale is 1.0 for both forces and torques. |
Display Numeric Values | Clear if you do not want to see the values of the force and torque magnitudes during animation. If you leave it selected, Adams PostProcessor continuously displays the magnitudes for all force and torque graphics during the animation. |
Decimal Places | Enter the number of decimal places to be written for force graphics numeric values. The default value is four. |
Always Wireframe Vectors | Clear if you want to see the force and torque graphic arrows represented as three-dimensional objects instead of as simple lines and arcs when animating in shaded model. If you leave it selected, Adams PostProcessor shows the force graphics in wireframe render mode even when you are rendering the view in shaded mode. |
Always in Foreground | Select if you want to see the graphic arrows in front of the shaded model. |
Caching | Set to the type of caching you want. See Caching of Animations. |
Flex Caching | By default, cache information necessary for animations containing flexible bodies is maintained in physical memory which results in significantly less disk input/output, higher CPU utilization, and, consequently, faster performance. Adams PostProcessor can also maintain this information on disk in files with a *.fcf extension. If you work in an environment with remote disk servers (accessed across a network), you should see a significant improvement in performance if you select to maintain the cache in memory. Users using local disk will see improvements on a smaller scale. The disadvantage of memory caching is the increased process size and the risk that it will exceed your computer's physical memory. If your computer has enough physical memory, then this approach is more efficient. If your computer doesn't have enough physical memory, then its operating system will begin swapping and the animation performance may be worse than when using the *.fcf file. We recommend that you test each model with this setting and monitor the process size using the Task Manager on Windows or the equivalent tool on Linux (for example, gmemusage -s on SGI). When an animation is run, cache data is created (either in memory or disk depending on the option chosen). If the caching option is set to ‘Disk’, cache files are stored on disk before running the animation. If the option is set to ‘Memory’, the cache files are stored on the disk before the Animation is deleted or session is closed. These cache files are reused when the animation is re-run in a new session to save the time needed to regenerate the cache data. When a flex body is cached in ‘Run Cache’ mode, a progress meter is shown to let the user know that a flexible body deformation is being cached for animation. The progress meter will also show indicate the total number of flex bodies that will be cached and which one is currently being cached. |
Compression | Three different levels of data compression are available for controlling the size of flexible body animation caches. The levels, from the lowest to highest compression, are None (default), Mild, and Aggressive. Each level implements a higher level of data compression at a risk of greater data loss. Note that the compression is applied to nodal deformations only and, therefore, may only lead to slightly incorrect geometric representations. Contour plot information accuracy is maintained. The disadvantage of applying data compression is that the precaching times for certain flexible bodies may increase. Data compression should only be used when the size of flexible body cache information needs to be minimized. |
Part graphic options: | |
Part Coordinate Triad | Select if you want to display part coordinate triads. |
Part Center of Gravity | Select if you want to display part center of gravity markers. |
Vector plot graphic options: (For more on vector plots, see Animating Flexible Bodies and Adams Durability Results). | |
Scale | Enter a value by which to scale the deformations. Set a large scale to exaggerate the deformations. |
Display as Torque | Display vectors as linear lines or as torque vectors. |
PPT Preferences - Colors
Review -> Postprocessing -> Edit -> Preferences -> Colors Tab
You can change the definition of existing colors and create new colors. You can also set the color of the Adams PostProcessor background.
For the option: | Do the following: |
|---|---|
Color | Select the color you want to modify or a color close to the color that you want to create. If you want to change the background color, select Background. The color appears in the color box. |
New Color | Select if you want to create a New Color. |
Color Picker | Select to create or modify a color. See Using the Color Picker to Select Colors. |
PPT Preferences - Curves
Review -> Postprocessing -> Edit -> Preferences-> Curves Tab
Each time Adams PostProcessor adds a curve to an existing plot, it assigns the curve a different color and line style so that you can differentiate between one curve and another. For example, the first curve you create is red, the next is blue, and the third is magenta. You can change the automatic assignment of properties so that Adams PostProcessor assigns to each curve a single color, style, and symbol that you define.
For the option: | Do the following: |
|---|---|
Auto Color | Select if you want Adams PostProcessor to automatically set the color. If you do not select it, choose a color from the option menu. |
Auto Style | Select if you want Adams PostProcessor to automatically set the style of the curve. If you do not select it, choose a style from the option menu. |
Auto Symbol | Select if you want Adams PostProcessor to automatically set the symbol. If you do not select it, choose a symbol from the option menu. |
Symbol Increment | Select the symbol increment. The default value of 1 specifies that a symbol is displayed on every data point on the curve. If you have a large number of points, the symbols can obscure the curve. Therefore, you can set higher increments to more widely distribute the symbols along the curve. For example, if a curve has 10,000 data points, the default setting of 1 creates symbols that are too close together and obscures the curve. Setting the symbol increment to 100 distributes only 100 symbols along the curve, making the curve visible. |
Line Weight | Select the weight of the line. The weight values range from 1 to 5 screen pixels. |
Decimal places | In the Decimal Places text box, enter the number of decimal places to which the numbers in the axes should be displayed. |
Scientific range | In the Scientific Range text boxes, enter the exponential form for scientific notation. This controls the lower and upper powers of ten where the format for real numbers switches from a fixed point format to scientific notation. The default values are -4 and 5, meaning that any number less than or equal to 1.0E-04 or greater than or equal to 1.0E+05 will be written in scientific notation. |
Trailing zeros | Select Trailing Zeros to have Adams PostProcessor display zeros after the numbers in the axis. The number of zeros depends on the number of decimal places you selected as explained next. |
Apply to All Current plots | Selecting the ‘Apply to All Current Plots’ button, Axis numbers settings will be applied to all current plot objects in session. |
PPT Preferences - Files
Review -> Postprocessing -> Edit -> Preferences -> Files Tab
Allows you to specify how Adams PostProcessor imports Adams View command files.
Turning off the display of the commands and the results should increase the speed at which Adams PostProcessor imports the command file.
For the option: | Do the following: |
|---|---|
Echo Commands | Select if you want Adams PostProcessor to display the commands as it reads them in the command window. |
Update Screen | Select if you want Adams PostProcessor to display the effect of each command on the screen as it reads them or only display the final results on the screen when the command import is complete. |
On Error | Select one: ■Continue - Adams PostProcessor continues processing the line as if it were typed interactively. This can be dangerous if there is no correction later on in the line, because Adams PostProcessor keeps issuing error messages until the error is corrected. The errors can continue beyond the end of the line, even to the end of the file, if carriage returns are invalid. Use this value only if the command file is a literal recording of your key strokes, complete with back spaces or other corrections of mistakes. ■Ignore - Adams PostProcessor ignores the line on which it finds the error and starts processing the next line as a new command. Adams PostProcessor can usually recover and execute subsequent commands in the file. If subsequent commands depend on the results of the invalid command, however, they can fail or give unexpected results. ■Abort - Adams PostProcessor immediately stops reading the command file and returns control to interactive input. This is the most conservative setting because it guarantees subsequent commands will cause no further errors or unexpected results. |
PPT Preferences - Fonts
Review -> Postprocessing -> Edit -> Preferences -> Fonts Tab
Allows you to specify which system fonts to use when displaying text in Viewports or when printing to PostScript files.
Note: | Changing fonts does not affect the text used to display the interface (for example, text in dialog box or the Property Editor), reports, or tables. |
For the option: | Do the following: |
|---|---|
Screen Font | Enter a font type to be used for displaying text in viewports. |
Postscript Font | Select a font from the pull-down menu. The options available depend on the fonts available on your computer platform. |
Default Font Size | Enter a size for the font. |
PPT Preferences - Geometry
Review -> Postprocessing -> Edit -> Preferences -> Geometry Tab
Allows you to specify how to display and import geometry.
For the option: | Do the following: |
|---|---|
Graphics Endcaps | Select if you want to display endcaps. Endcaps are the ends of geometric objects, such as cylinders and frustra. Because of the large number of edges on endcaps, they can reduce animation performance. You can, therefore, turn off the display of endcaps to increase the animation speed. |
Trimesh geometry during file import | Select if you want to import the triangular geometry as trimesh strips. Trimesh strips display significantly faster than individual polygons, resulting in faster animations. Adams PostProcessor automatically imports shell files (.shl, .slp, and .stl) as trimesh strips. Note that when you select to import CAD files at trimesh strips, importing of the files may be slow. |
Fast transparencies | Select if you want to display the transparency faster, but the quality of images containing transparencies will suffer. By keeping this check box clear (which is the default) better images will be displayed, especially when transparent images overlay on each other, but at a cost of performance. |
PPT Preferences - Orientation
Review -> Postprocessing -> Edit -> Preferences -> Orientation Tab
Allows you to change the view orientation in Viewports. By default, the view orientation of animations is set to positive y-axis pointing up and the positive z-axis pointing out of the screen. Changing the view orientation is particularly helpful when your models use a coordinate system that is different than the standard coordinate system. For example, in some automotive applications, the orientation of the vehicle is such that the z-axis is pointing up and the x-axis is pointing from the front to the rear of the vehicle. Specifying these new directions allows the viewport orientations such as Top or Left to behave as expected with respect to the model. You can specify any orientations as long as you do not use the same axis to define both up and forward.
Tip: | You can turn on the display of the viewport triad by selecting View in the dashboard, and then selecting Display Triad. |
For the option: | Do the following: |
|---|---|
Up Axis | Select the axis to be pointing up. |
Forward Axis | Select the axis to be pointing out of the screen. |
PPT Preferences - Page
Review -> Postprocessing -> Edit -> Preferences -> Page Tab
Allows you to set the header and footer that automatically appear on subsequently created pages. Each header and footer can have three items of information (left, center, and right). Each item on the header footer can be a bitmapped image (.jpg, .xpm, or .bmp) or text.
Set the headers and footers you want to appear on each page or select None to remove the headers and footers.
Use the Left, Center, and Right tabs to add text or images to the page header or footer.
Learn about Managing Pages
For the option: | Do the following: |
|---|---|
Source | Choose either Text or Image. |
If you set Source to Text, Adams PostProcessor displays the following options: | |
■Text | Enter the text you want to appear in the header or footer. |
■Font Size | Enter the font size. |
■Color | Select a color from the pull-down menu. |
If you set Source to Image, Adams PostProcessor displays the following options: | |
■Image | Enter the image you want to appear in the header or footer. The image can be a .jpg, .xpm, or .bmp. |
■Height | Enter the height at which you want the image displayed. Adams PostProcessor automatically displays the image as 50 pixels high. |
PPT Preferences - Plot
Review -> Postprocessing -> Edit -> Preferences -> Plot Tab
Allows you to:
■Specify the information that appears automatically on each plot that you create, including:
■Titles
■Subtitles
■Analysis name and date analysis run
The information comes from the Measures, result set, or Objects file. You can change the default as explained in Modifying Titles and Axis Placement.
■Always display the plots as tables. (for more information, see Displaying Plots as Tables).
■Set how Adams PostProcessor handles duplicate time values on curves during operations.
For the option: | Do the following: |
|---|---|
Auto Titles | Select if you want titles to automatically appear on each plot. |
Auto Subtitles | Select if you want subtitles to automatically appear on each plot. |
Auto Date Stamp | Select if you want the date on which the simulation was performed to appear on each plot. |
Auto Analysis Name | Select if you want the name of the analysis from which the plot data was generated to appear on each plot. |
Table | Select if you want to always display plots as tables. |
Object Comment in Legend | Select if you want to display object comment in legend text on the plot. |
Duplicate Points | Select how you want Adams PostProcessor to handle duplicate time values on a curve. You can select: ■Use last duplicate - Keeps the last value, which is the default because the earlier time values are likely to be static steps and the last one the dynamic step. ■Use first duplicate - Keeps the first value. ■Keep all duplicates - If you select to keep all duplicates, you will receive errors messages about not being able to perform an operation because of duplicate points. This will occur during Curve Edit toolbar integrate and filter operations, as well as during FFT operations. |
PPT Preferences - Units
Review -> Postprocessing -> Edit -> Preferences -> Units Tab
Allows you to set the units to be used for curve data. It can also toggle between using full unit names and abbreviations for axis labels. Adams PostProcessor scales data to the proper units conversion factor where appropriate
Note: | Changing the unit preferences also changes the units preferences for the complete model in both Adams View and Adams PostProcessor. |
For the option: | Do the following: |
|---|---|
Length, Mass, Force, Time, Angle, Frequency | Select the units you want or use a preset value below. |
The buttons below are preset values. For all preset values, time is in seconds. | |
 | Sets length to millimeter, mass to kilogram, and force to Newton. |
 | Sets length to meter, mass to kilogram, and force to Newton. |
 | Sets length to centimeter, mass to gram, and force to Dyne. |
 | Sets length to inch, mass to pound-mass, and force to PoundForce. |
Abbreviations | When selected, the axis label’s units are shown in abbreviated form. (e.g., if the full unit name is “meter” it will be displayed as “m”). |
PPT Preferences - Stereo
Edit -> Preferences -> Stereo Tab
Sets options for using Adams PostProcessor with stereo viewing. Stereo viewing is available on all Linux platforms but not Windows. When running Adams PostProcessor, stereo viewing mode cannot be set until you've displayed an animation. The easiest way to do this is to either load an animation or set the mode to Animation (in the upper left corner of the window).
In addition, before running Adams, you need to set the MDI_STEREO environment variable MDI_STEREO (setenv MDI_STEREO 1). Learn more about setting environment variables.
Stereo viewing is only available when running Native OpenGL graphics with the OpenGL_Software_Assisted registry setting set to disabled. You use the Registry Editor.
To set this registry setting:
1. From the Adams Toolbar, right-click the Toolbar tool  , and then select Registry Editor.
, and then select Registry Editor.The Registry Editor appears.
2. Select AView -> Preferences -> Graphics -> OpenGL_Software_Assisted.
For the option: | Do the following: |
|---|---|
Stereo viewing | Select to enable stereo viewing. |
Depth of Field | Slide to control the depth of the perspective matrix. |
Eye Separation | Slide to control of offset between the left and right modeling views. |
Parallax | Control the type of parallax view used to display the model: ■Positive - Positive parallax viewing produces images that appear to be within the space of the monitor. For engineering purposes where objects are often cut off by the window borders or partially obscured by dialog boxes, positive parallax viewing produces images that are less confusing to the viewer and are, therefore, easier to view. ■Negative - Negative parallax viewing produces images that appear to float in space in front of the display. Viewing floating images that are partially obscured by interface items produces confusing cues to the viewer. While the image appears in front of the screen, the interface items appear to be on the screen but these interface items can obscure part of the image. These conflicting inputs can be confusing and lead to extra strain. |
Eye Position | Use with Negative parallax viewing and use it to control how far the image floats in front of the screen. |
Save
Select to save the changes permanently for the next sessions.
■If you are using Adams PostProcessor stand-alone, it stores the preferences in the file pptBS.cmd in your working directory.
■If you are using Adams PostProcessor with Adams View, it stores the preferences in the file aviewBS.cmd. The BS stands for Before Startup, meaning that Adams PostProcessor will read it before it reads any other setup files.
If Adams PostProcessor finds either pptBS.cmd or aviewBS.cmd in the current working directory or the home directory, it automatically loads it when it starts up. Since Adams PostProcessor overwrites the file when you save it during a session, you should not edit it manually.
Restore
Select to restore the settings to their defaults.