Revolute Joint Tool
Ribbon menu → Connectors tab → Joints container → Revolute Joint Tool 
or
(Classic) Build → Joints → Revolute Joint Tool
Creates a revolute joint that allows the rotation of one part with respect to another part about a common axis. The revolute joint can be located anywhere along the axis about which the joint’s parts can rotate with respect to each other.
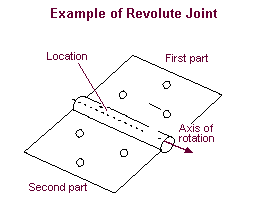
The orientation of the revolute joint defines the direction of the axis about which the joint’s parts can rotate with respect to each other. The rotational axis of the revolute joint is parallel to the orientation vector and passes through the location.
Learn about:
For the option: | Do the following: |
|---|---|
1 Location (Bodies Implicit)/ 2 Bodies - 1 Location/ 2 Bodies - 2 Locations | Set how you want the joint connected to parts: ■1 Location (Bodies Implicit) - Lets you select the location of the joint and have Adams View determine the two parts that should be connected. Adams View selects the parts closest to the joint location. If there is only one part near the joint, Adams View connects the joint to that part and ground. ■2 Bodies - 1 Location - Lets you explicitly select the two parts to be connected by the joint and the location of the joint. The joint remains fixed on the first part and moves relative to the second part. ■2 Bodies - 2 Locations - Lets you explicitly select the two parts to be connected by the joint and the location of the joint on each part. You should use this option if you are working in exploded view. For more on exploded view, see Initial Conditions Tool. For more on the effects of these options, see Connecting Constraints to Parts. |
Normal to Grid/ Pick Geometry Feature | Set how you want the joint oriented: ■Normal to Grid - Lets you orient the joint along the current Working grid, if it is displayed, or normal to the screen. ■Pick Geometry Feature - Lets you orient the joint along a direction vector on a feature in your model, such as the face of a part. |
First Body/Second Body (only appears if you select to explicitly define the bodies using the options 2 Bodies - 1 Location or 2 Bodies - 2 Locations explained above) | Set the bodies on which you want to attach the joint. Select either: ■Pick Body - Select to attach the joint to a body. ■Pick Curve - Select to attach the joint to a curve. If you select to attach the joint to a curve, Adams View creates a curve marker, and the joint follows the line of the curve. Learn more about curve markers with Marker Modify dialog box help. Attaching the joint to a spline curve is only available with Adams Solver (C++). Learn about switching solvers with Solver Settings - Executable dialog box help. |