Overview of Constraints
- Types of Constraints
Constraints define how parts (rigid bodies, Flexible bodies, or Point mass) are attached to one another and how they are allowed to move relative to each other. Constraints restrict relative movement between parts and represent idealized connections.
Types of Constraints
Adams View provides a library of constraints including:
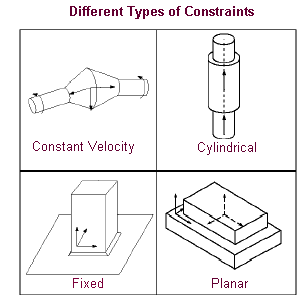
The following figure shows some of the different types of idealized joints that Adams View supports.
Constraints and Degrees of Freedom
Degrees of freedom (DOF) are a measure of how parts can move relative to one another in a model. A body free in space has six DOF in which it can move: three translational and three rotational. Each DOF corresponds to at least one equation of motion. When you add a constraint, such as a revolute joint, between two parts, you remove DOF between the parts, causing them to remain positioned with respect to one another regardless of any motion or force in the model. Each constraint in Adams View removes different DOF.
For example, a revolute joint removes all three translational DOF and two of the rotational DOF between two parts. If each part had a point on the joint that was on the centerline of the revolute pin, then the two points would always remain coincident. They would only rotate with respect to one another about one axis: the centerline of the revolute joint.
The total number of DOF in a model is equal to the difference between the number of allowed part motions and the number of active constraints in the model. When you run a simulation of your model, Adams Solver calculates the number of DOF in your model as it determines the algebraic equations of motion to be solved in your model. You can also calculate the DOF in your model before running a simulation as explained in Verifying Your Model.
For a list of the DOF that the different constraints in Adams View remove, see the following:
Connecting Constraints to Parts
Adams View uses the convention that the first part that you select when you create a Constraint is the part that moves relative to the second part that you select. For example, if you join a door and a door frame with a Joint, the first part that you select is the door so that it moves relative to the door frame.
Adams View always applies forces at the location of the constraint. For example, for a revolute joint, Adams View applies any forces at the center of the joint. For joints that allow translational movement, such as a screw joint connecting a nut and bolt, the location of the joint changes over time as the first part moves relative to the second part and, therefore, the locations of the forces change. For the nut and bolt, as the nut moves along the bolt, the location of the joint changes and the reaction forces also change relative to the bolt.
When you create many of the constraints in Adams View, including most idealized joints, primitive joints, and some types of motion, Adams View provides you with shortcuts for specifying the parts that the constraints are to connect or to which the motion is to be applied. As you create a constraint, you can:
■Let Adams View connect the constraint to the parts nearest to the constraint location. If there is only one part, Adams View assumes that the second part is ground. Note that letting Adams View select the parts is only appropriate when two parts are located near one another and when it does not matter which part Adams View considers the first or second part.
There are some constraints, such as revolute, translational, and cylindrical, to which you can apply motions. If you think that you will apply a joint motion, you should explicitly select the two parts when creating the constraints.
There are other constraints, such as Hooke/universal, inline, and perpendicular, which are very sensitive to which part is the first part and which is the second. When you create these constraints, you should explicitly select the parts to be connected.
■Explicitly select the parts to be connected. The first part that you select moves relative to the second part that you select.
■If you created your model in exploded view, which lets you create individual parts and then assemble them together into a model, you can specify the parts to be connected by the constraint and then select a different location for the constraint on each part. When you assemble the parts into a model, Adams View joins the parts together at the location on the first part that you selected. Learn about Performing Initial Conditions Simulation.
Constraints and I and J Markers
When you create a Constraint, Adams View creates Markers at the specified location on both parts. Adams View orients the markers in the direction of the axis along which the parts can move with respect to each other. The marker on the first part is often called the I marker and the marker on the second part is called the J marker.
When Adams View creates a joint primitive, it creates an I marker on the first part and a J marker on the second part. It connects the I marker on the first part to the J marker on the second part.
For more on the effects of I and J markers on the joint, see JOINT in the Adams Solver online help.
Tips on Constraining Your Model
The following are some tips to help you constrain your model correctly.
■Build your model by adding constraints to a few parts and testing the constraint connections frequently. By building your model, you can more easily pinpoint the cause of any simulation problems.
■Be sure that you connect the right parts and that you correctly define which part should move relative to another part.
Be sure that you connect the right parts and that you explicitly select which part is to move relative to another part if the constraint allows translational motion.
■Be sure to orient the constraint correctly.
If you do not define constraint directions correctly, you might not remove DOF from the model that you intended to and, in fact, you might remove DOF that you did not intend to.
For example, if you have a slider-crank model and you direct a translational joint between the slider and ground so that it is out of the plane of desired motion, the model locks up immediately when you run a simulation.
■Be sure to select the correct type of constraint.
Try to find only one constraint that removes all the DOF that you need to remove. If you define more than one constraint between two parts, you get the union of the DOF that each constraint removes, which may not be what you expected. For example, if you have two concentric, cylindrical parts that you want to allow to rotate and translate with respect to each other, and you use one translational and one revolute joint between the parts, you lock the parts together. They lock together because the translational joint allows no relative rotational movement and the revolute joint allows no relative translational movement. In this case, instead of using the two joints, you should use a single cylindrical joint.
■Check the DOF in your system periodically.
Use the Verify command to check the DOF in your model to make sure you have the correct number of parts and constraints. Learn about Verifying Your Model.
■Run a Kinematic simulation to test your model without forces.
If possible, run a kinematic simulation before performing a dynamic simulation. By running a kinematic simulation, you can ensure that connections are correct before you add forces to your model. You may have to add temporary constraints to your model to run a kinematic simulation.
■Remove redundant constraints from your model even if a simulation of your model runs correctly. See More on Redundant Constraint Checking.