Create/Modify Sensor
Ribbon menu → Design Exploration tab → Instrumentation container → Create/Modify Sensor 
or
(Classic) Simulate → Sensor → New
Right-click sensor → Modify
Right-click sensor → Modify
Allows you to add a sensor to your model or modify an existing one. A sensor monitors a Simulation for a specified event and changes a set of simulation controls when the event occurs.
Learn about:
■SENSOR statement in the Adams Solver online help
For the option: | Do the following: |
|---|---|
Name | Enter a name for the sensor. |
Event Definition | Choose either: |
If you selected Run-Time Expression, the following two options are available: | |
Expression | Enter a function expression. |
 | Select to display the Adams View Function Builder. |
If you selected User-Written Subroutine, the following option is available: | |
Parameter List | Enter the parameters to be passed to the user-written subroutine SENSUB. Enter up to 30 values (r1[,...,r30]) that Adams View is to pass to SENSUB. For more information on user-written subroutines, see the Subroutines section of the Adams Solver online help. |
The following option is available for all choices: | |
Event Evaluation | Choose either: ■Run-Time Expression - Specifies an expression that is evaluated when the event Adams View is monitoring becomes true. You can obtain the scalar value of the expression using the SENVAL function expression. ■User-Written Subroutine - Defines and passes constants to a user-written subroutine that is evaluated when the event Adams View is monitoring becomes true. You can obtain the return value of the user-written subroutine using the SENVAL function. Example: If you set the following values, you can retrieve the distance between two markers. You use the SENVAL function to retrieve the distance. ■Event Definition: Run-time Expression ■Expression: MOD (time, .5) ■Event Evaluation: Run-Time Expression ■Expression: DY(3,2) ■Target: 0 |
If you selected Run-Time Expression, the following two options are available: | |
Expression | Enter a function expression. |
| Select to display the Adams View Function Builder. |
If you selected User-Written Subroutine, the following option is available: | |
Parameter List | Enter the parameters to be passed to the user-written subroutine SEVSUB. Enter up to 30 values (r1[,...,r30]) that Adams View is to pass to SEVSUB. For more information on user-written subroutines, the Subroutines section of the Adams Solver online help. |
The following options are available for all choices: | |
Non-Angular Values | Select to indicate that the expression measures non-angular values. |
Angular Values | Select to indicate that the expression measures angular values. |
Pull-Down Menu | Select one of the following: ■Equal - From (Target - Error) to (Target + Error). ■Greater than or equal - Greater than or equal to (Target - Error). ■Less than or equal - Less than or equal to (Target + Error). See example of the choices 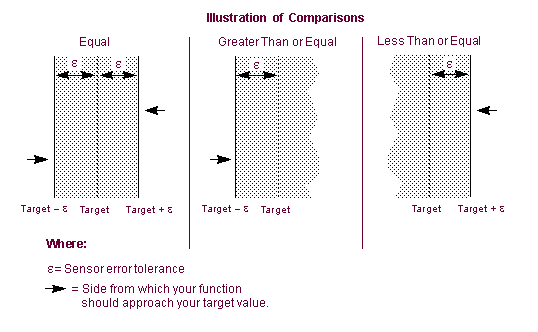 . . In the figure, the sensor triggers whenever the value of the function being monitored is in the shaded areas. Be careful that your function does not evaluate in the shaded area at the start of your simulation unless you want your sensor to trigger immediately. It is a good idea to define a function measure using the same expression used for your sensor so you can check it by plotting it. |
Value | Enter the target value that triggers an action. |
End Tolerance | Enter the absolute value of allowable error between the targeted value and the actual sensed value. |
Generate additional Output Step at event | Select to create an extra Output step when Adams Solver triggers the sensor so you can capture the action. |
Set Output Stepsize | Select to redefine the time between consecutive output steps. Adams Solver uses this value until it is changed. The default is the current time between output steps for the simulation. |
Terminate current simulation and...[stop, or continue with a simulation script] | Select to: ■Stop the simulation ■Stop the current command in the simulation Script and continue with the next command. |
Set Integration Stepsize | Select to redefine the next integration step size. This change is temporary and lasts only for the next solution step. The default is an integrator-determined value except when you’ve included restarting the integrator as part of the sensor action as explained next. In this case, the step size defaults to the integrator step size. |
Restart Integrator | Select to restart integration and reduce the integration order to one. If you also set integration step size as explained above, Adams Solver reinitializes the integration step size to the specified value. If you do not specify the step size, Adams Solver reinitializes the integration step size to the integrator's default step size. To define integration order, see Solver Settings - Dynamics. |
Refactorize Jacobian | Select to cause Adams Solver to generate a new pivot sequence for matrix factorization. This can help the integrator produce more accurate data or proceed more robustly through the simulation. Adams Solver generates a pivot sequence for matrix factorization before starting the simulation. Adams Solver does not generate a new pivot sequence unless you specify to refactorize the Jacobian or it is necessary to refactorize to reach convergence. |
Dump State Variable Factor | Select to write the entire array of state variable values to the simulation message file. |
 | Select to add any comments about the sensor to help you manage and identify it. See Comments. |
 | Only available for Run-Time Expression. Create two measures to monitor the expression and state of a sensor during simulation. Learn about Object Measures. |