Adding Sensors to Your Model
A sensor monitors a simulation for a specified event and changes a set of simulation controls when the event occurs. Learn more about sensors:
Also refer to the cautions for using sensors in the Adams Solver SENSOR statement.
About Sensors
You can use sensors to trigger actions during simulations when a specified event occurs. The actions you can trigger include:
■Stopping the simulation completely - You might want to monitor the vertical distance between a wheel center and the ground and stop the simulation when it exceeds the undeformed radius of the tire.
■Changing the parameters controlling the solution - You might want to monitor the distance between two objects that are expected to collide during a simulation. Just before the objects collide, you reduce the solution step size to avoid convergence problems and reduce the output step size to capture the magnitude of the contact force.
■Changing inputs to the simulation - Sensors are often used in vehicle applications to transition between different maneuvers, such as from a controlled, straight-line movement to a J-turn. Any characteristic of the vehicle's movement that you can measure in Adams View, you can monitor through a sensor and trigger a change in simulation conditions. For vehicles, these include the yaw, lateral, or longitudinal velocity; the yaw or slip angle; the engine or wheel speed; and so on.
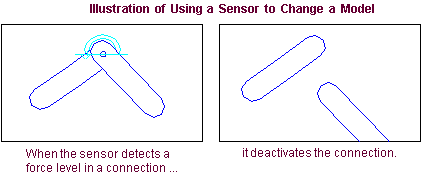
■Changing the model topology - You can create a sensor that monitors the reaction force in a connection and then deactivates the connection when the force exceeds a specified value. A simple example of this is shown in the figure below.
Defining Events for Sensors to Detect
You define the event that a sensor is to detect by creating a function, which can depend on:
■Distance, velocity, acceleration, or force between markers
■User-defined variables
■Simulation time
You can also reference object data, such as measures.
When performing a Dynamic simulation, Adams View evaluates the function after every successful Integration step. When performing other types of simulations, it evaluates the function after every successful solution step. To define the function, you can use a run-time expression or a user-written subroutine.
The sensor function should be continuous because Adams Solver tries to adjust the step size to find the exact time the sensor becomes active. This process is inaccurate and time consuming when the function is discontinuous. For that reason, functions of time or displacements work best for sensors; functions of velocities, accelerations, and forces are less desirable.
Generally, Adams Solver tests sensors after every successful integration step. If the triggering condition or event that the sensor is monitoring occurs and persists, you may have to turn off the sensor so it doesn't continue to trigger. You can turn off a sensor using the DEACTIVATE simulation script command. To help reduce the possibility of the continuous triggering effect, once the sensor triggers the first time, Adams Solver does not test the sensor again until after three subsequent successful integration steps.
Triggering the Action of a Sensor
You set the value to trigger the sensor by specifying a target value, providing an allowable tolerance from the target value, and then setting a comparison for the sensor to evaluate, as explained in the next sections:
About Error Tolerance
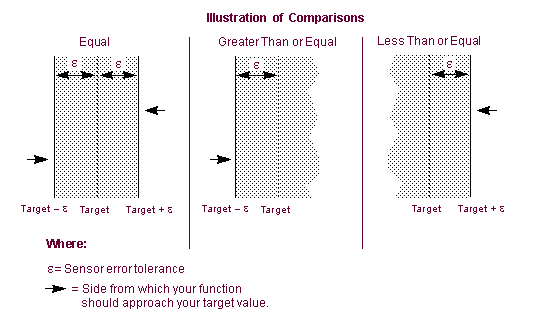
Because a function rarely equals a target value exactly, you can specify the allowable error tolerance between the target value and the actual value of the function. Adams Solver compares the function’s instantaneous value to the target value +/- the error tolerance at each integration step according to the comparison that you specify. Note that the sensor error tolerance must be a positive number.
About Setting Comparisons
Specifies what kind of comparison Adams Solver should make to determine if it should initiate the sensor action. The comparisons can be one of those in the following table.
The comparison: | Initiates the action when the function value is: |
|---|---|
Equal | From (Target - Error) to (Target + Error). |
Greater than or equal | Greater than or equal to (Target - Error). |
Less than or equal | Less than or equal to (Value + Error). |
The figure below illustrates each of the comparisons. In the figure, the sensor triggers whenever the value of the function being monitored is in the shaded areas. Be careful that your function does not evaluate in the shaded area at the start of your simulation unless you want your sensor to trigger immediately. It is a good idea to define a measure for your sensor function so you can check it by plotting it.
Types of Actions for Sensors
There are several actions a sensor can trigger. These are grouped into:
■Standard actions - Commonly used actions.
■Special actions - Actions used to assist in debugging your model.
Standard Actions
You can specify one or more of the following standard actions to occur when Adams View senses the event.
■Generate additional output step - Creates an extra Output step when Adams Solver triggers the sensor so you can capture the action.
■Set output step size - Redefines the time between consecutive output steps. Adams Solver uses this value until it is changed. The default is the current time between output steps for the simulation.
■Terminate current step and stop, or continue with a simulation script - Stops simulation or stops current command in simulation script and continues with next command. For information on simulation scripts, see Performing a Scripted Simulation.
Special Actions
■Set integration step size - Redefines the next Integration step size. This change is temporary and lasts only for the next solution step.
The default is an integrator-determined value except when you’ve included restarting the integrator as part of the sensor action as explained next. In this case, the step size defaults to the integrator step size.
■Restart integrator - Restarts integration and reduces the integration order to one. If you also set integration step size as explained above, Adams Solver reinitializes the integration step size to the specified value. If you do not specify the step size, Adams Solver reinitializes the integration step size to the integrator step size.
■Refactorize Jacobian - Causes Adams Solver to generate a new pivot sequence for matrix factorization. This can help the integrator produce more accurate data or proceed more robustly through the simulation. Adams Solver generates a pivot sequence for matrix factorization before starting the simulation. Adams Solver does not generate a new pivot sequence unless you specify to refactorize the Jacobian or it is necessary to refactorize to reach convergence.
■Dump state variable vector - Writes the entire array of state variable values to a text file in your current working directory.
Creating a Sensor
To create a sensor:
1. From the Simulate menu, point to Sensor, and then select New.
The Create/Modify Sensor dialog box appears.
2. Enter a name for the sensor.
3. To define the event to be detected:
■To define the event using a function expression, set Event Definition to Run-time Expression, and then enter a function expression in the Expression text box.
To get help on entering a function expression, right-click the Expression text box, and then select Function Builder to display the Adams View Function Builder. For information on using the Function Builder, see Adams View Function Builder online help. Shortcut to Function Builder: Click the More button  .
.
.■To define the event using a subroutine, set Event Definition to User Written Subroutine, and then enter the parameters to be passed to the user-written subroutine SENSUB in the Parameter List text box. Enter up to 30 values (r1[,...,r30]) that Adams View is to pass to SENSUB.
4. To specify a function expression or user-written subroutine to be evaluated with the event occurs:
■To define the evaluation using a function expression, set Event Evaluation to Run-time Expression, and then enter a function expression in the Expression text box.
To get help on entering a function expression, right-click the Expression text box, and then select Function Builder to display the Adams View Function Builder. For information on using the Function Builder, see Adams View Function Builder online help. Shortcut to Function Builder: Click the More button .
.■To define the evaluation using a subroutine, set Event Evaluation to User Written Subroutine, and then enter the parameters to be passed to the user-written subroutine SEVSUB in the Parameter List text box. Enter up to 30 values (r1[,...,r30]) that Adams View is to pass to SEVSUB.
5. To set up the target value to trigger an action:
■Set the option menu to the comparison to be used to determine if the event is to be triggered. For information on the different comparisons, see Triggering the Action of a Sensor.
■In the Value text box, enter the value to trigger an action.
■In the Error Tolerance text box, enter the absolute value of allowable error between the targeted value and the actual sensed value.
6. To set up the action, select an action from the Standard or Special Actions areas of the dialog box as explained in Types of Actions for Sensors. If you select to continue with a simulation script, you must run the simulation with a script, as explained in Performing a Scripted Simulation.