About Adams View Macros
A macro is a single command that you create to execute a series of Adams View commands. To create a macro, you give Adams View the list of commands you want executed, as well as a new command that will execute them. You write the commands that the macro executes using the Adams View command language.
You can use parameters in macros. Parameters give you a way to send data to the macro each time you use it. They are placeholders for information that you will provide when you actually execute the macro. When you issue a macro command containing a parameter, Adams View substitutes the values that you provide into the commands contained in the macro.
Adams View treats a macro as it does all other Adams View commands. You can enter the macro in the command window, select it from the Command Navigator, include it in other macros, or execute it from your own custom menus, dialog boxes, or buttons.
Among the tasks you can perform with macros are:
■Automate repetitive procedures.
■Build general-purpose extensions to Adams View.
■Automatically create an entire model.
■Quickly build many variations of a mechanism.
To make it easy for you to create a macro, Adams View contains tools to automate the creation of macros. The tools let you interactively record, play, and test your macros and command files. You can also use text-editing applications to modify existing macros or create them from scratch.
About Creating Macros
To create a Macro, give Adams View the list of commands you want executed, as well as a new command that will execute them. You write the commands that the macro executes using the Adams View command language.
You can use parameters in macros. Parameters give you a way to send data to the macro each time you use it. They are placeholders for information that you will provide when you actually execute the macro. When you issue a macro command containing a parameter, Adams View substitutes the values that you provide into the commands contained in the macro.
You can create macros in four different ways:
■Typing the commands to be executed into the Macro Editor. You can also use the Macro Editor to edit an existing macro.
■Reading in a command file that contains the commands that the macro will execute. Learn about Creating Macros from Existing Files.
■Using the Command Navigator or Command Window to type in the commands to create macros as well as the commands to be executed. Learn about using the Command Navigator and Command Window.
Recording a macro is easiest for simple macros, while reading in a file is best for more complex macros. When you read in a file, you can also specify the help file or string that you want associated with the macro. Using the Macro Editor is best for editing existing macros. If you use the Macro Editor to create macros, you must type in the commands that the macro is to execute.
Editing and Creating Macros Using the Macro Editor
You can use the Macro Editor to edit macros that you recorded or that you created by importing a macro file. You can also use the Macro Editor to create a macro.
To use the Macro Editor:
1. On the Tools menu, point to Macro, point to Edit, and then select either New or Modify.
2. If you selected Modify, the Database Navigator appears. Select a macro to modify.
The Macro Editor appears as shown below. If you chose to edit a macro, the macro commands appear in the Commands text area of the Macro Editor.
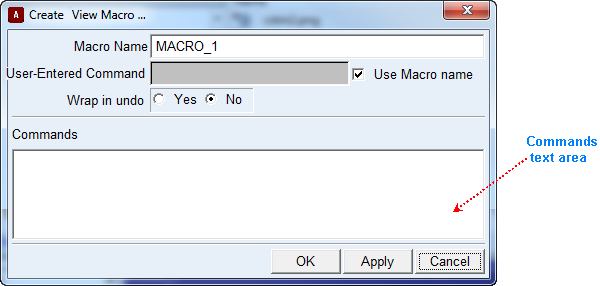
3. If you are creating a macro, in the Macro Name text box, enter the name of the macro.
4. In the Command text box, enter the command string that executes the macro. To use the name of the macro, select Use Macro Name.
Note: | The command string you enter must be unique. You cannot redefine an existing command, although you can add a new keyword at any level to an existing command. For instance, entering MARKER CREATE is invalid, because a MARKER CREATE command already exists, but entering MARKER GENERATE is valid. |
5. Specify whether or not the entire macro can be undone with a single Undo command. Note that a single Undo=yes, while convenient, can consume a great deal of memory for very large macros, or slow macro execution noticeably, even if you do not ever use the Undo. You might want to specify Undo=yes during initial creation and debugging until your macro works properly, then switch to Undo=no to improve performance.
6. In the Commands text area, enter the commands that the macro is to execute, and select OK.
Recording Macros
Recording a Macro is easiest for simple macros.
To record a macro:
1. From the Tools menu, point to Macro, point to Record/Replay, and then select Record Start.
2. Perform the operations you want included in the macro.
3. To stop recording the macro, from the Tools menu, point to Macro, point to Record/Replay, and then select Record Stop.
To play back a macro you recorded:
■From the Tools menu, point to Macro, point to Record/Replay, and select Execute Recorded Macro.
To save a recorded macro:
■From the Tools menu, point to Macro, point to Record/Replay, and then select Write Recorded Macro.
Adams View saves the macro as the command file macro.cmd. If a file called macro.cmd already exists, Adams View asks you if you want to overwrite it or create a backup copy of it.
Important: | Macro record/replay supports only basic menu, dialog box and graphics window actions. Actions performed in the model browser, wizards and most complex dialog boxes (for example, dialogs which dynamically update based on user interactions with them) are not supported. |
Creating Macros from Existing Files
You can use the Read command to read in an existing command file containing the commands to be executed. You can also assign a help file or text string to the macro that explains the macro's use.
The file you supply that contains the macro definition is a command file that can also contain parameters embedded in the commands and can have special comments at the top.
Some of the comments in the file you supply can correspond to Read command parameters that are listed in the Macro Read dialog box, such as the command users enter to execute the macro. These comments must appear at the beginning of the file and must contain the name of one of the reserved parameters (USER_ENTERED_COMMAND, WRAP_IN_UNDO, HELP_STRING, or HELP_FILE) followed by an appropriate value.
These reserved parameters must be in uppercase letters and must immediately follow the comment character (!). You enter the values without equal signs or quotes. Adams View treats the values in the comments as defaults. For example, the following comments set the default values for USER_ENTERED_COMMAND and HELP_STRING.
!USER_ENTERED_COMMAND lmark
!HELP_STRING This command lists information on all markers in your database.
list_info marker marker_name=.*
If you specify values for these parameters using the Macro Read dialog box, the values in the dialog box override the values in the comments.
To create a macro by reading in a file:
1. On the Tools menu, point to Macro, and then select Read.
The Macro Read dialog box appears.
Note: | The Macro Read dialog box contains an option to create a panel. This option is no longer supported or recommended. |
2. In the Macro Name text box, enter the name of the macro that Adams View uses to store the macro in the current database.
3. In the File Name text box, enter the name of the file containing the commands to be executed.
4. In the User Entered Command text box, specify the command string that will execute the macro. The command string defaults to the name of the macro if you do not enter a command string.
5. Specify whether or not the entire macro can be undone with a single Undo command. Note that a single Undo, while convenient, can consume a great deal of memory for very large macros or slow macro execution noticeably, even if you do not actually use the Undo.
6. Specify a text file containing help on the macro or enter a text string describing the macro. Currently, you can only specify help for the entire macro command, not its parameters or leading keywords.
7. To ensure that you do not create an outdated dialog box, from the Create Panel option menu, select no.
8. Select OK.
Note: | To create an up-to-date dialog box to execute your macro, go to the Command Navigator and double-click on the name of your macro after you have created it. Adams View automatically creates a dialog box whose name is based on the user-entered commands associated with the macro. For example, if you create a macro called mar_scale_down and associated with it the user-entered commands: marker scale down, then Adams View names the auto-generated dialog box .gui.mar_sca_dow (Adams View uses the first three characters of each command in the user-entered commands to create the name of the dialog box). See also Customizing Dialog Boxes Using the Dialog-Box Builder, and the example. |
Saving Macros
Adams View automatically stores your macros in the current modeling session. You can also export your macros to command (.cmd) files, which allows you to edit, archive, or import them into other modeling session. It also lets you give the macro to another user, and also helps you to modify long macros when you do not have the original file
If you used non-default values for the other macro data, such as the help string, the command file includes comments with those values. You can read in the command file using the Macro Read command.
To save a macro to a command file:
1. On the Tools menu, point to Macro, and then select Write.
The Macro Write dialog box appears.
2. Enter the name of the macro to save to a file.
3. Enter the file name in which to save the macro.
4. Select OK.
Deleting Macros
To delete objects using the Database Navigator:
 .
. 2. On the Edit menu, select Delete.
The Database Navigator appears.
3. Select the macro or macros that you want to delete. Learn about navigating through a modeling database using the Database Navigator.
4. Select OK.
Note: | If the Database Navigator does not appear as indicated in Step 2, the select list was not cleared before executing the Delete command. You can always use the Edit -> Select List commands to be sure it is cleared. |
Debugging Macros
Adams View provides a debugging tool to help you troubleshoot your macros if they don't run or work as expected. You can use the debugging tool to:
■View your macro and the output from it.
■Step through each command in the macro.
■Print your macro.
To access the macro debugging tool:
■On the Tools menu, point to Macro, and then select Debug.
Executing Macros
Once you have created a macro, you execute it by issuing the command that you specified when you created the macro. You can issue the command by:
■Entering the command in the Command Window. The full command is a combination of the command and macro parameters, if any.
■Using the Command Navigator to execute the command. Selecting the macro command in the Command Navigator, automatically displays a dialog box in which to enter parameters.
■Using a custom dialog box and menu command that you created to execute the macro. Learn more about Customizing Dialog Boxes Using the Dialog-Box Builder.
Adams View treats the macro as it does other Adams View commands. For example, if you enter the command in the command window, but do not enter all required parameters, Adams View prompts you for the missing required parameters.
Tips on Writing Macros
Command Echo and Screen Update
As Adams View executes a macro, it updates the view windows each time their content changes. If you execute a macro from the command window, Adams View, by default, echoes each command to the command information area of the command window as it executes the macro. This can be useful when debugging because you can see the executed commands and their immediate effects.
It can also be slow and distracting, however, once your macro is working properly. You can prevent this by including the following as the first command in the macro:
defaults command_file echo=off update=off
Including the command allows macros to run more quickly because Adams View does not echo the macro commands to the command information area and updates the views only once, when the macro is finished. You can reset the defaults by including the following command as the last line in your macro:
defaults command_file echo=on update=on
If you execute a macro from a dialog box or menu, Adams View, by default, updates the screen at each change, but does not echo the macro commands to the command information area.
Using Conditionals and Loops
The Adams View command language contains commands for creating conditional constructs and loops. You will find these very useful in writing macros. The constructs are:
■FOR/END
■WHILE/END
■CONTINUE
■BREAK
■IF/ELSE/ELSEIF/END
■RETURN
For example, you can use an IF command to conditionally execute commands within your macro. You can create a parameter to specify a choice of options, then use the IF statement to determine which option was chosen and execute the appropriate commands.
For more information on the different conditional constructs, see Conditional Constructs and Loops.
Writing Text Files
To create macros that write formatted reports, command files, or other data files, you can use the commands:
file text write=...
This command writes information from Adams View into a text file. You control the format of the output and, using database access expressions, you can write any model or simulation data from the Adams View database.
Executing System Commands
You can execute system commands using the Adams View System command. Its Adams View command language is:
system command_text=...
By including the System command, you can create macros that invoke outside utilities and programs. You could, for example, create a macro that generates hardcopy files for a standard series of plots, then use the System command to issue comments to print and delete the plots.
Ensuring Unique Names and Adams Identifiers
If your macro creates new entities, you must take special care to construct unique names and unique Adams identifiers each time you execute the macro. Otherwise, the macro fails the second time you run it because the names or identifiers already exist. One way to construct unique names is to create a string parameter and use it in creating all the new names. If, for example, a macro creates three plots, use a string parameter $pname to create three plot names such as $'pname'_1, $'pname'_2, and $'pname'_3. Each time you run the macro, enter a new string and all the new names are unique.
If you want a special numbering scheme for the Adams identifiers, you can also pass in an integer parameter for constructing them. It is usually easier, however, to leave them out and let Adams View create them automatically. If you do not specify an adams id, then it defaults to adams id=0. The next time you write an Adams Solver data set, Adams View replaces zero identifiers with unique, nonzero identifiers.
Including a Literal "$" in a Macro
Normally, Adams View interprets any "$" character as the start of a parameter name. You can avoid this by using a backslash first: "\$". Adams View deletes the "\ " and keeps the "$" as part of the macro text.
Speeding up Object References in Expressions
When Adams View executes expressions in the macro command text, it must look up each referenced object name in the database. Object names in expressions can refer to almost anything, so if you use a local name such as MAR1, Adams View must search the entire database for any object named MAR1.
This is relatively slow, and in large macros with several object references, it can consume a large portion of the overall macro execution time.
You can drastically reduce the lookup time by using full database names in expressions within the macro. Instead of referencing variable DV1, use .MOD1.DV1 for example. This way, Adams View only needs to search a fraction of the database to find the proper object.