Moving Objects Using the Move Tools
The move tools available from the Object Manipulation Strip on the Main Menu provide many different ways to move objects.
Translating Objects by Dragging
You can quickly translate objects by dragging them. To protect you from accidentally translating objects, you need to press Ctrl and Shift before you can translate the objects. You can translate objects in the Working grid if it is turned on or about the global coordinate system.
To translate objects by selecting and dragging:
1. Select the objects that you want to translate as explained in Selecting Objects.
2. Hold down the Ctrl and Shift keys.
3. Click anywhere on the selected objects and hold down the mouse button.
4. Drag the selected objects to the desired location and release the mouse button.
Moving Objects By Increments
You can position an object incrementally using the By Increments tool  . It lets you specify the angle of rotation or the translational distance. The next two sections explain how to translate and rotate objects by increments:
. It lets you specify the angle of rotation or the translational distance. The next two sections explain how to translate and rotate objects by increments:Rotating Object by Increments
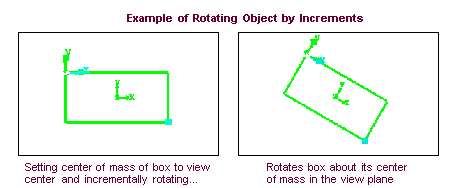
Rotates an object by increments about the center (origin) of the View window. As you rotate the object, you can select where the origin of the view window is.
To incrementally rotate an object:
1. Select the object that you want to move.
3. If desired, select a new view center about which to rotate the object. To select a new center:
■Select the blank box in the center of the rotation arrows.
■Select a point on screen about which you want to rotate the object.
4. In the Angle text box, set the amount by which you want to incrementally rotate the object.
5. Select the appropriate rotation arrows to rotate the object. Adams View rotates the object each time you select an arrow.
Translating Object by Increments
Translates an object by increments.
To incrementally translate an object:
1. Select the object that you want to move.
2. From the Object Manipulation Strip, select the By Increments tool . The settings in the Definition container change as shown below
. The settings in the Definition container change as shown below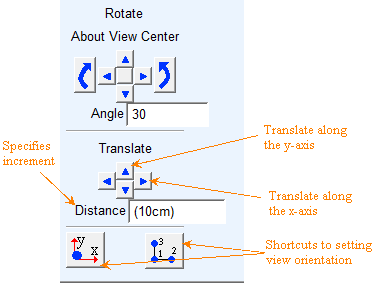
3. In the Distance text box, set the amount by which you want to incrementally translate the object.
4. Select the appropriate translation arrows to translate the object along the x- or y-axis of the view coordinate system. Adams View translates the object each time you select an arrow.
 Exact Position Tool - Moving Objects Exactly
You can position an object precisely by specifying the translational coordinates and the rotational angles of the object’s position handle relative to the Working grid axes, global coordinate system, or any object on the screen. In addition, you can display the current position of an object’s position handle.
The following figure shows an example of entering the exact location of a box’s object handle position so that the handle is in the same position as the handle of a second box.
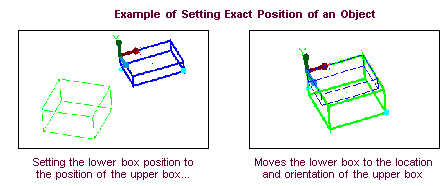
If more than one object is selected or you’ve created a global position handle, Adams View moves the first object you selected or the handle to the specified location and moves all other selected objects to positions relative to the first selected object or the handle.
To position an object precisely or get the location of an object:
1. Select the object or objects that you want to position or the object whose coordinate location you want to display.
2. From the Main Menu → Object Manipulation Strip → Exact Position tool . The settings in the definition container change as shown below.
. The settings in the definition container change as shown below. 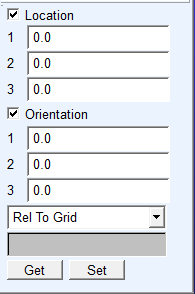
3. Do one or more of the following:
■Select Get to obtain the coordinates of the selected object.
■In the 1, 2, or 3 Location and Orientation text boxes, enter the locations and orientations to which you want to move the object.
The coordinate locations are in the current coordinate system. For example, if the coordinate system is set to Cartesian, then Location 1 is the x coordinate.
Orientation 1 is the first rotation angle, Orientation 2 is the second, and Orientation 3 is the third. The axis to which Adams View applies these angles depends on the current rotation sequence. Learn about Rotation Sequences. For example, if the rotation sequence is body-fixed 313, Adams View applies Orientation 1 to the z-axis.
4. Select the object to which the locations and orientations are relative. The coordinates are relative to the location of the object’s position handle. By default, the coordinates are relative to the working grid.
5. If you selected that the coordinates are relative to an object, enter the object in the lower text box. To browse for an object or select an object from a list, right-click the lower text box, and then select the appropriate command.
6. Select Set.
 Point-to-Point Tool - Translating from Initial Location to Another
Moves objects by translating them from an initial location to another. There are two ways to move an object from one location to another:
■Pick two locations. The first location defines the location from which to move and the second location defines the point to which to move the selected object. The objects move relative to the selected locations.
■Define a distance and a vector along which to translate the selected objects.
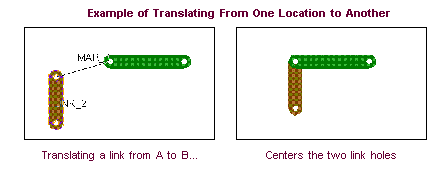
The following figures show a link (LINK_2) being centered over a hole of LINK_1 by moving the link from position A to position B.
As you translate the objects, you can rotate an object that you select during the translation operation or translate all objects currently selected. In addition, you can translate a copy of the selected objects instead of the actual objects.
To translate objects from one location to a another by defining two points:
2. In the settings container, specify the following:
■If desired, select Selected to translate the currently selected objects.
■If desired, select Copy to translate a copy of the selected object or objects.
■Select From To from the pull-down menu.
3. If you did not choose Selected in the settings container, select the object that you want to translate.
4. Select the first point on the screen from which to translate the object or objects.
5. Select the second point on the screen to which to translate the object.
To translate objects along a vector:
2. In the definition container, specify the following:
■If desired, select Selected to translate the currently selected objects.
■If desired, select Copy to translate a copy of the selected object or objects.
■Select Direction Distance from the pull-down menu, and then enter the distance to translate the object in the Distance text box.
3. Select the object that you want to translate. if you did not select Selected in the definition container.
4. Select an axis or define the vector along which to translate the object by selecting two points on the screen.
 Align & Rotate Tool - Rotating Objects About or Along Grid or Features
Rotates objects about an axis or aligns them with the axes of other objects. You can set the alignment in the following ways:
■About - Rotates an object about the axis of another object.
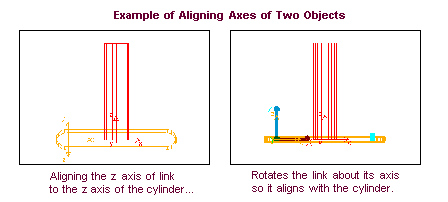
■Align - Rotates an object about its axis to align it with another object.
■Align Same As - Aligns an object to the orientation of another object.
■Align One Axis - Orients an axis of an object to be in the same direction as the axis of another object. This is useful if the axis of a joint or force is defined by a marker in your model.
■Align Two Axes - Orients an object so it is the same direction as the axis of another object and rotates the object about that axis to place a second axis in the plane defined by the two directions.
You can rotate an object that you select during the rotate operation or rotate all objects currently selected. In addition, you can rotate a copy of the selected objects instead of the actual objects.
To rotate objects about an axis or axes:
2. In the definition container, specify the following:
■To rotate the currently selected objects, select Selected.
■To rotate a copy of the selected object or object, select Copy.
■From the pull-down menu, select the method you want to use to rotate or align objects. If you selected About, enter the amount to rotate the object in the Angle box.
3. If you did not choose Selected in the settings container, select the object or objects that you want to rotate.
4. Follow the prompts in the status bar to select the axis or axes about which to rotate or align the objects. Refer to the table below for assistance.
If you selected: | Do the following: |
|---|---|
About | Select the axis about which to rotate the object or objects. |
Align | Select the axis about which to rotate the object or objects. Select the axis to move. Select the axis with which to align the object. |
Align Same As | Select the object to which you want to align the already selected objects. |
Align One Axis | Select the axis of the object to align. Select the object to which to align the axis. |
Align Two Axes | Select the first axis of the object to control (x, y, or z). Select the object to which to direct the first axis. Select the second axis of the object to control. Select the object towards which to direct the second object. Note: Adams View rotates the object so that the first axis points toward the first object, and the second axis points as closely as possible towards the second object. Depending on the locations that you selected, it may not be possible for both axes to pass through the locations. Adams View orients the object so that the first axis passes through the first location, and the plane defined by the two axes passes through the second location. This means that the second axis comes as close as possible to the second location, but may not pass through it. |
 Mate Faces Tool - Positioning Objects by Aligning Faces
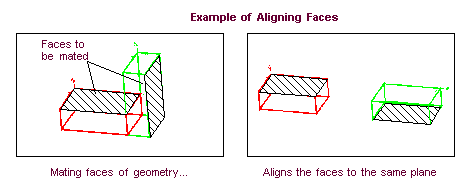
Positions an object by mating one object face with another object face so they are in the same plane. The following figure shows two objects whose top and bottom faces were mated.
The objects must be in shaded render mode to mate their faces. See Rendering mode.
To align an object’s face with another object’s face:
2. Select the face of the object to be aligned.
3. Select the face with which to align the selected object’s face.