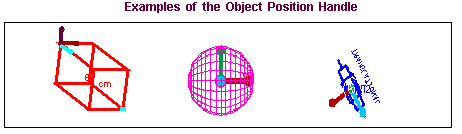
Using Object Position Handle (Classic Interface)
The Object position handle is a powerful tool for translating and rotating various objects in your model.
Displaying the Object Position Handle
To display the object position handle on an object:
■Select the object on which you want to display the handle. To see the handle, you can have only one object selected.
The position handle appears over the first point of the geometry that you created or in the center of spherical geometry.
Translating an Object Along Its Axes
You can use the Object position handle to translate an object along an axis of the object position handle.
To translate an object along its axes:
1. Display the position handle as explained in Displaying the Object Position Handle.
2. Click on any of the axis stems of the object position handle and drag the stem. The position handle moves the object in either direction along the selected axis.
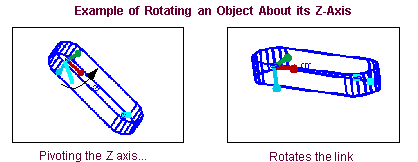
Rotating an Object About Its Axes
You can use the Object position handle to rotate an object about an axis of the object position handle.
To rotate the object about any of its three axes:
1. Display the position handle as explained in Displaying the Object Position Handle.
2. Click on the ball at the end of any of the axes of the handle and pivot the axis around the origin of the handle. Moving the x-axis ball rotates about the y-axis, moving the y-axis ball rotates about the z-axis, moving the z-axis ball rotates about the x-axis.
3. You can also use the object position handle to rotate an object in the plane of the screen when one axis of the object is perpendicular to the screen.
Tip: | To gain more precise control on the rotation angles, move the mouse away from the center of the position handle as you rotate the object. The farther you move the mouse away from the position handle, the smaller Adams View makes the angles of rotation. |
Creating a Global Position Handle
You can create a global position handle with respect to the which you can translate and rotate selected objects.
Tip: | You can also locate the global position handle by entering precise locations as explained in Exact Position Tool - Moving Objects Exactly. If other objects are also selected, Adams View moves them to positions relative to the new position of the global position handle. |
To set a global position handle:
1. Do either of the following:
■From the Settings menu, select Object Position Handle.
 .
. The Object Position Handle dialog box appears.
2. Select Set Handle Location, and then click on the screen to indicate the location for the handle.
3. If desired, orient the axes of the handle as explained below. By default, the orientation of the position handle is set to that of the current Working grid axes.
■Set Orientation Via to how you want to orient the handle.
■Select Orientation Via, and then define axes as necessary.
4. Select Close.
To reset the global position handle to the default location for the selected object:
■Select Reset from the Object Handle Settings dialog box.
Tip: | You can also delete the global position handle just as you would any object as explained in Deleting Objects. |