Editing Objects Using the Table Editor
The Table Editor is a convenient way to manage the objects in your model. It displays the objects in your Modeling database in table format so you can compare the objects and quickly update them. For example, you can update the x, y, and z locations of all parts in your model at once or parameterize the locations of parts to the locations of other parts. The information that you can view and update about an object depends on the type of object. The Table Editor also lets you create and delete objects.
Learn about:
Display Options
Working with Objects and Cells
Applying and Saving Information
For general information on using tables in Adams View, see Using Tables to Enter Values.
Displaying the Table Editor
To display the Table Editor:
■From the Tools menu, select Table Editor.
By default, the Table Editor displays the x, y, and z location of parts in your model.
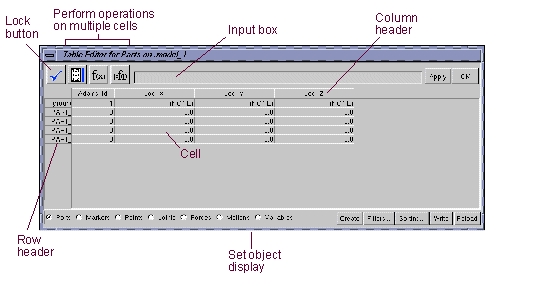
Setting Types of Objects Displayed in the Table Editor
You can display any type of object that is in your current Modeling database through the Table Editor. For example, you can select to view all Markers or all motions. You can only view one type of object at a time.
Adams View provides option buttons for selecting the most common modeling objects. The option buttons appear along the bottom of the Table Editor.
To set the type of objects displayed:
■From along the bottom of the Table Editor, select a check box of the desired object type.
Adams View updates the Table Editor to display the selected type of object.
If you do not see any objects in the Table Editor, the filter may not be set correctly for the type of object you selected. For example, by default, the filter for joints is set to only display revolute joints. Therefore, if you have no revolute joints in your model, you will not see any joints displayed in the Table Editor when you select Joints as the type of object.
You can change the filter the categories of information that the Table Editor displays. You can also narrow the display of objects based on an object's name or parent, such as to display only markers that belong to PART_1, which is called setting the scope. You can also narrow the display based on the names of objects. For example, you can set the name filter to only display the names of objects that contain the number 2 (MARKER_20, MARKER_21, and so on). Using the scope and name filter together, you can focus on those objects of interest and filter out the rest.
The categories of information that you can display about an object depend on the type of object. For example, for parts, you can display their location, initial conditions, and attributes, such as whether they are visible or active in the current simulation. For markers, you can view their locations, as well as their locations relative to ground. For forces, you cannot change the information displayed, only the types of forces displayed. For joints, you can change the information displayed as well as the type of joints displayed.
To filter the information displayed in the Table Editor:
1. Set the type of object displayed to a standard object as explained in To set type of objects displayed.
2. Select Filters from the Table Editor.
A Table Editor Filters dialog box appears. The options in the dialog box depend on the type of object currently displayed.
3. In the Scope text box, limit the scope of the search, if desired, to all objects beneath a particular object in the database hierarchy by entering the name of the object. Note that you cannot enter wildcards in the Scope text box.
For example, enter .model_1 to display all objects under your entire model or enter .model_1.PART_3 to display objects belonging only to PART_3.
4. In the Name Filter text box, enter the name of the object or objects that you want to display. Type any wildcards that you want included. By default, Adams View displays all objects that meet the scope entered in the previous step regardless of their name. Learn more about Using Wildcards.
For example, enter the following to display all markers whose names start with MARKER_2 or MARKER_3 (MARKER_20, MARKER_30, MARKER_31, and so on).
MARKER_[23]*
5. Select the categories of information or set the type of object that you want displayed and select OK.
The following figure shows an example of displaying information about markers. In the example, you first select Markers from the bottom of the Table Editor. When the Markers Table Editor Filters dialog box appears, you set the types of information to display about markers. The result in the Table Editor is a listing of six markers.
Sorting Objects in the Table Editor
You can sort the information in the Table Editor by object name or by a particular column and set the type of sorting. You can select:
■Alphanumeric sorting, which sorts the information so that alphabetic characters are first followed by numeric characters.
■Numeric sorting, which sorts objects based on their numeric value. It sorts any alphabetic characters as zeros.
Note: | When you sort the Table Editor, Adams View sets the values displayed in cells back to those stored in the Modeling database. Therefore, you lose any changes that you made to cells and did not apply to your modeling database |
To sort objects in the Table Editor:
1. Select Sorting in the Table Editor.
The Sorting Settings dialog box appears.
2. Set the sorting options as explained in the table below, and then select OK.
To set: | Select one of the following: |
|---|---|
The category on which objects are sorted | ■No sorting - Objects appear in the Table Editor in the order they are stored in the modeling database. ■Sort By Name - Sorts the objects by their name (by rows). ■Sort By Column Labelled and enter the name of the column on which to sort the objects. To select a column name from a list, select Select. |
Sort order | ■Alphabetic to sort alphabetic characters first. ■Numeric to sort in numeric order. It sorts any alphabetic characters as zeros. |
Copying Objects in the Table Editor
You can create a new object by copying an existing object in the Table Editor. Adams View assigns the new object a default name and displays its information in the last row of the Table Editor.
To copy an object:
1. Select the row containing the object you want to copy.
2. Right-click a cell in a row that is not selected. From the shortcut menu that appears, select Copy Object.
Adams View creates a duplicate of the object. It places the object in the last row of the Table Editor.
Note: | The operations you perform with the Table Editor are not stored in your Modeling database until you apply them. Learn Applying Changes in the Table Editor. |
Creating Objects in the Table Editor
Using the Table Editor, you can create certain types of modeling objects. For most types of objects, you can only create an object if another object of that type already exists in the Modeling database. For example, if the Table Editor is set to display forces but you currently have no forces in your modeling database, you cannot create a force through the Table Editor.
You can create parts, points, and coordinate system markers, however, regardless of whether or not an object of that type already exists in the modeling database. For example, you can create a new marker if the Table Editor is set to display coordinate system markers. You do not have to have an object of this type already in the database.
Note that you cannot create a joint through the Table Editor.
To create a part, marker, or point with default values:
1. Display parts, markers, or points in the Table Editor. Learn about Displaying the Table Editor.
2. Select the Create button along the bottom of the Table Editor.
Adams View creates an object with default values. It displays the object's information in the last row of the Table Editor.
To create other types of objects:
1. Display the type of object you want to create in the Table Editor. An object of the type to be created must already exist in the database.
2. Right-click a cell that is not selected. From the shortcut menu that appears, select Create Object.
Adams View displays a dialog box that helps you create the object.
3. Enter the values in the dialog box, and then select OK.
Note: | The operations you perform with the Table Editor are not stored in your Modeling database until you apply them. Learn Applying Changes in the Table Editor. |
Deleting Objects in the Table Editor
You can delete any object in the Modeling database using the Table Editor. Be careful, however, when you delete non-standard objects, such as view layouts or interface objects. Deleting a non-standard object may have more consequences that you are not aware of.
To delete an object:
1. Select the row containing the object you want to delete.
2. Right-click a cell in the row. From the shortcut menu that appears, select Delete Object.
Adams View deletes the object from the Table Editor.
Note: | The operations you perform with the Table Editor are not stored in your Modeling database until you apply them. Learn Applying Changes in the Table Editor. |
Working with Cells in the Table Editor
The cells of the Table Editor display information about the objects in your Modeling database. You can modify the information displayed about objects to make changes to the objects in the modeling database. For example, you can move a point by changing its x location in the Table Editor from 50 inches to 60 inches.
Learn about:
Note: | The operations you perform with the Table Editor are not stored in your modeling database until you apply them. Learn Applying Changes in the Table Editor. |
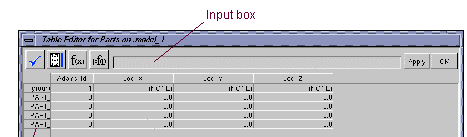
Entering Text in Cells
While you can enter text directly into the cells of the Table Editor, you can also use the input box that appears at the top of the Table Editor, as shown below. The input box lets you add text to more than one cell at a time and quickly update the values in the cell.
To enter text in a cell:
1. Click the cell. The text cursor appears in the cell.
2. Type the text you want.
To enter text through the input box:
1. Click the cell whose text you want to edit.
The text in the cell appears in the input box.
2. Place the cursor in the input box and type the text you want.
3. To insert the text in the input box into the cell, do either of the following:
■Select the Lock tool  .
.
.■Press Enter.
Inserting Text into a Multiple Cells
You can use the input box to insert the same text into multiple cells at once.
To insert text into multiple cells:
1. Select the cells in which you want to insert the text.
2. In the input box, enter the text that you want to insert as explained in Entering Text in Cells.
3. Select the Insert tool  ..
..
..Entering Object and Information Names in Cells
When you create function expressions or parameterize your model, you often need to include the full name of a modeling object, which is the name of the object's parent followed by the object's name, and the name assigned to the information you want associated with the object as it appears in the modeling database. For example, when building a function for a force, you often refer to a marker's displacement in the x direction. In a function expression, enter the following:
.model_1.PART_2.MAR_1.Loc_X
The Table Editor provides a shortcut for entering the object and field names so that you can build functions and parameterize your model quickly.
To quickly enter an object's full name and information field into the input box:
1. Place the cursor in the input box where you want the object name to be inserted.
2. Select the Object Name & Field tool f(x) on the Table Editor.
3. Select any cell in the row containing the object whose name you want to input.
Adams View inserts the object's full name and field information into the cell.
For more information on building functions, see the Adams View Function Builder online help. For information on parameterizing your model, see Improving Your Model Designs.
Modifying Cells Based on Their Current Contents
Using the Table Editor, you can quickly update the current value in many cells at once. For example, you can update the x location of all markers to be that of their current location plus 3. The Table Editor creates a variable based on the current contents of a cell ( $cell), which you can use to update the cells.
For a marker example, the Table Editor would create a text string in the input box that represents the current x location of all selected markers. You would then create an expression to add 3 to any current cell value. The input box would look like the following:
$cell + 3
When you insert the expression into the x location cell of a selected marker, the variable changes to the current value of the selected cell. For the marker example, the cell for MARKER_1 whose current value is 20, now looks like the following:
(20 + 3)
When you apply the changes to the modeling database, Adams View stores the value as an expression (an expression in Adams View always is enclosed in parenthesis ( )):
(20 + 3)
To have Adams View evaluate the expression and store only a number, enter eval in front of the expression in the input box as shown below and then insert the expression to the cells:
eval($cell + 3)
To modify the cells based on their current contents:
1. Display the type of object you want to update in the Table Editor, if necessary. Learn about Setting Types of Objects Displayed in the Table Editor.
2. Select the cells you want to update.
3. Enter how you want to update the cells in the input box as explained in Entering Text in Cells.
4. Select the Cell Variable tool  to create a variable representing the current contents of the cells.
to create a variable representing the current contents of the cells. 5. Select the Insert tool .
.Adams View updates the cells with the information in the input box.
Reloading Database Values in the Table Editor
If you have made changes to values in the Table Editor that you would like to clear out and reset to the current values of the object, you can reload the table.
To reload the Table Editor:
■Select Reload.
Applying Changes in the Table Editor
You must apply any changes you make to objects in the Table Editor before Adams View saves them in the Modeling database.
To apply changes:
■From the Table Editor, select Apply.
Saving Table Editor Information
You can save the current contents of the Table Editor in ASCII format. Adams View places spaces between each cell.
To save the current contents:
1. From the Table Editor, select Write.
The File Selection dialog box appears.
2. In the Directories list box, select the directory in which you want the file located.
3. In the Selection text box, enter the file name.
4. Select OK.