Overview
Starting Adams View
You or your system administrator can customize how you start Adams View and how Adams View looks after you start it.
To start Adams View in Linux:
1. At the command prompt, enter the command to start the Adams Toolbar, and then press Enter. The standard command that MSC provides is adamsx, where x is the version number, for example adams2024_1, which represents Adams 2024.1.
The Adams Toolbar appears.
2. Click the Adams View tool  .
.
. For more information on the Adams Toolbar, see Running and Configuring Adams.
To start Adams View in Windows:
1. On the Start menu, point to Programs, point to Adams 2024.1, and then select Adams View.
For more information on running Adams products from the Start menu, see Running and Configuring Adams.
Starting a New Modeling Session
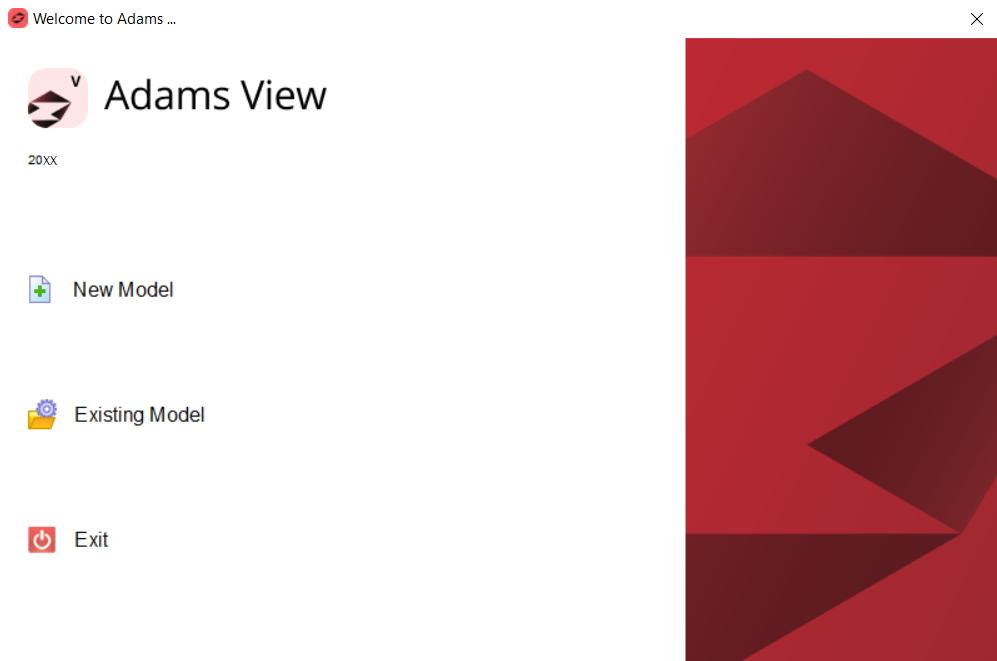
When you start Adams View, Adams View displays a Welcome to Adams dialog box that lets you to create a new Modeling database or use an existing one. The Welcome dialog box also lets you to specify your working directory.
Adams View also displays the Welcome dialog box when you use the New Database command to create a new modeling database in which to store your models. The Welcome dialog box is shown below.
To create a New Model:
1. Specify the directory to be used as your working directory. Adams View saves all files in this directory. You can change the working directory at any time. Learn about specifying working directory.
2. If you selected to create a new model, do the following:
■In the Model name text box, enter the name you want assigned to the new model. You can enter up to 80 alphanumeric characters. You cannot include special characters, such as spaces or periods.
■Select the gravity settings for the new model. You can select:
♦Earth Normal - Sets the gravity to 1 G downward.
♦No Gravity - Turns off the gravitational force.
♦Other - Lets you set the gravity as desired. The Gravity Settings dialog box appears after you select OK on the Welcome dialog box.
3. Select a preset unit system for your model. In all the preset unit systems, time is in seconds and angles are in degrees. You can set:
■MMKS - Sets length to millimeter, mass to kilogram, and force to Newton.
■MKS - Sets length to meter, mass to kilogram, and force to Newton.
■CGS - Sets length to centimeter, mass to gram, and force to Dyne.
■IPS - Sets length to inch, mass to slug, and force to PoundForce.
4. If you do not want any of the preset unit systems, you can change the units as required. Learn about changing the default units.
5. Select OK.
Adams View creates a new model for you. If you selected to set gravity when creating a new model, the Gravity Settings dialog box appears. Learn about specifying gravitational force.
To open an Existing Model:
1. Using Browse option:
a. Right-click a text box that requires a file name to display a shortcut menu.
b. Select Browse to display the Select File dialog box.
c. Double-click the directory that contains the file.
d. In the File Name box, type the file name you want to open, or highlight the file in the list.
The file name with extension .bin, .adm and .cmd can be opened through Browse option.
e. Select Open.
2. Using a Search Path:
a. Right-click a text box that requires a file name to display a shortcut menu.
b. Point to Search, and then select a search path that contains the file you are looking for. For example, if you are searching for a examples view files, select $aview_dir/examples.
The Select File dialog box appears.
c. Locate the file in the list, and then select Open.
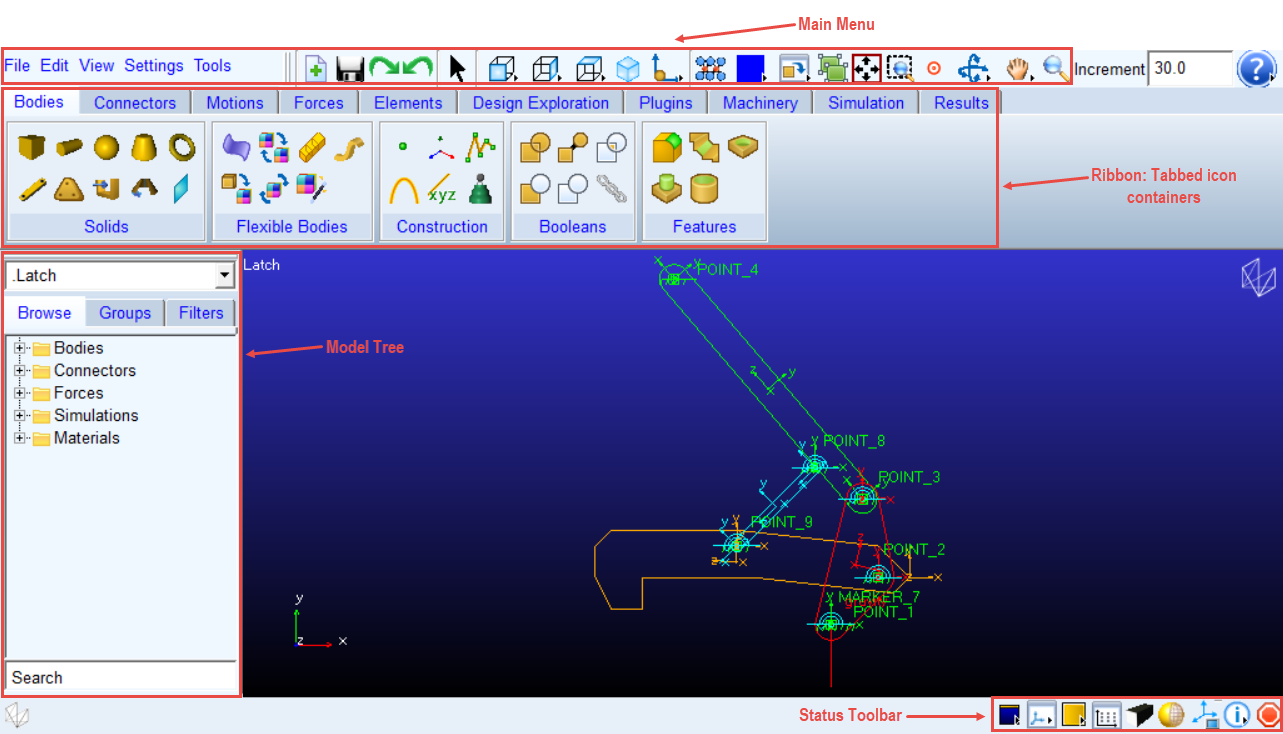
Adams View Main Window
After you create the new or open the existing model the Adams View main window appears.
Adams View Ribbon based Interface
Exiting Adams View
To exit Adams View:
1. On the File menu, select Exit.
2. If you did not save your work, asks you if you want to save your work:
■To save your work and exit Adams View, select OK. If you want to save the modeling database with a new name in the current directory, enter the new name in the Filename text box.
■To exit without saving your work, select Exit, Don’t Save.
■To continue using Adams View, select Cancel.
Note: | If you accidentally exit without saving your work, you can use the Adams View Log file (aview.log) to recover your work. Learn about using the Adams View log file |
See the section Adams File Types for more information on Adams View file types.
Starting Adams View (Classic)
You or your system administrator can customize how you start Adams View and how Adams View looks after you start it.
To start Adams View in Linux:
1. At the command prompt, enter the command to start the Adams Toolbar, and then press Enter. The standard command that MSC provides is adamsx, where x is the version number, for example adams2024_1, which represents Adams 2024.1.
The Adams Toolbar appears.
2. Click the Adams View tool .
. For more information on the Adams Toolbar, see Running and Configuring Adams.
To start Adams View in Windows:
1. On the Start menu, point to Programs, point to Adams 2024.1, and then select Adams View.
For more information on running Adams products from the Start menu, see Running and Configuring Adams.
Starting a New Modeling Session
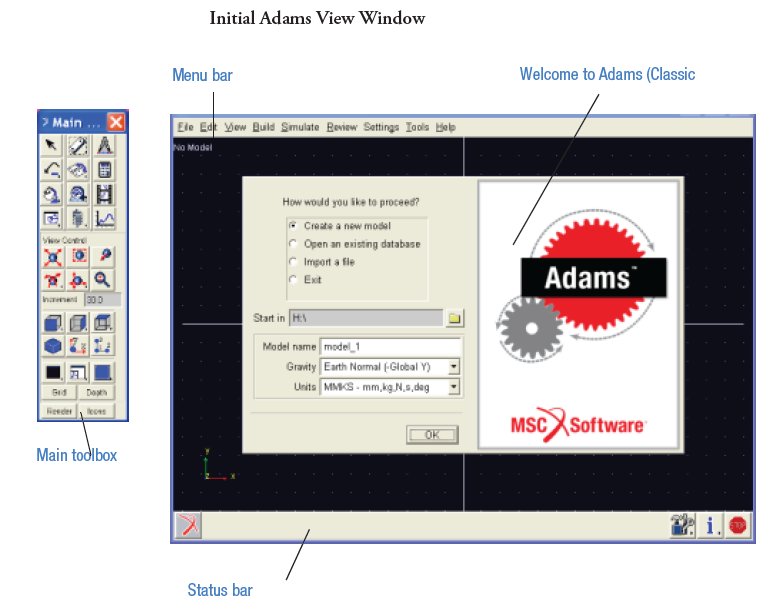
When you start Adams View, Adams View displays a Welcome to Adams (Classic Interface) dialog box that lets you create a new Modeling database or use an existing one. The Welcome dialog box also lets you import modeling data and specify your working directory.
Adams View also displays the Welcome dialog box when you use the New Database command to create a new modeling database in which to store your models. The Welcome dialog box is shown below.
To start a new session:
1. Select one of the options explained in the table below to indicate how you'd like to start using Adams View, and then select OK.
The option: | Does the following: |
|---|---|
New Model | Lets you start a new modeling session with a new modeling database. Follow Steps 2 and 3 to create the new modeling database. |
Existing Model | Lets you open an existing modeling database. Learn about Opening a Modeling Database. |
Exit | Lets you exit Adams View without performing an operation. |
2. Specify the directory to be used as your working directory. Adams View saves all files in this directory. You can change the working directory at any time. Learn about specifying working directory.
3. If you selected to create a new model, do the following:
■In the Model name text box, enter the name you want assigned to the new model. You can enter up to 80 alphanumeric characters. You cannot include special characters, such as spaces or periods.
■Select the gravity settings for the new model. You can select:
♦Earth Normal - Sets the gravity to 1 G downward.
♦No Gravity - Turns off the gravitational force.
♦Other - Lets you set the gravity as desired. The Gravity Settings dialog box appears after you select OK on the Welcome dialog box.
4. Select a preset unit system for your model. In all the preset unit systems, time is in seconds and angles are in degrees. You can set:
■MMKS - Sets length to millimeter, mass to kilogram, and force to Newton.
■MKS - Sets length to meter, mass to kilogram, and force to Newton.
■CGS - Sets length to centimeter, mass to gram, and force to Dyne.
■IPS - Sets length to inch, mass to slug, and force to PoundForce.
5. If you do not want any of the preset unit systems, you can change the units as required. Learn about changing the default units.
6. Select OK.
Adams View creates a new model for you. If you selected to set gravity when creating a new model, the Gravity Settings dialog box appears. Learn about specifying gravitational force.
Modeling Process
The steps that you use in Adams View to create a model mirror the same steps that you would use to build a physical prototype. Click a step below or use the arrows on the right to read the steps sequentially.
Functional Virtual Prototyping Process

Although we’ve listed the steps that you perform to create a model as though you create the entire model at once and then test and improve it, we recommend that you build and test small elements or subsystems of your model before you build the entire model. For example, create a few modeling objects, connect them together, and then run a simple simulation to test their motion and ensure that you are connecting them correctly. Once these are modeled correctly, add more complexity to your model. By starting out slowly, you can ensure that each subsystem works before moving on to the next step. We call this the crawl-walk-run approach.
Adams View Main Window (Classic)
After you start Adams View, the Adams View main window appears.
Exiting Adams View
To exit Adams View:
1. On the File menu, select Exit.
2. If you did not save your work, asks you if you want to save your work:
■To save your work and exit Adams View, select OK. If you want to save the model with a new name in the current directory, enter the new name in the Filename text box.
■To exit without saving your work, select Exit, Don’t Save.
■To continue using Adams View, select Cancel.
Note: | If you accidentally exit without saving your work, you can use the Adams View Log file (aview.log) to recover your work. Learn about using the Adams View log file |
Displaying Product Information
When using any Adams product, you can display the following information:
■Software version number and the date it was built
■Directory where Adams is installed
■Copyright statement
To display information about Adams View:
1. From the Help menu, select About.
2. View the information, and then select OK.
Tip: | Shortcut from the Status bar, select |
Loading and Unloading Plugins
MSC has many add-on modules or plugins to Adams View, which expand its functionality. The plugins include Adams Controls, Adams Vibration, Adams Durability and Adams Mechatronics. You run these products from within Adams View. You can set Adams View to load them automatically when you start up. You can also unload them while in your current session of Adams View. To run a plugin, you must have a license to it. (To learn more about the various plugins, see their online help.)
To see if there is a license available to run a plugin:
1. From the Tools menu, select Plugin Manager.
The Plugin Manager appears.
2. At the top of the Plugin Manager, select a plugin.
3. At the bottom of the Plugin Manager, in the text box Licenses, view the number of licenses available.
To load an available plugin:
1. From the Tools menu, select Plugin Manager.
2. In the Load column, next to the plugins you want to load, select Yes.
3. Select OK.
The commands or menus for the plugins are added to Adams View.
To unload a plugin:
1. From the Tools menu, select Plugin Manager.
2. In the Load column, next to the plugin you want to unload, clear the selection of Yes.
3. Select OK.
Adams View removes any plugin menus or commands.
To set up a plugin so it loads automatically when you start Adams View:
1. From the Tools menu, select Plugin Manager.
2. In the Load at Startup column, next to the plugin you want to load automatically, select Yes.
3. Select OK.
Executing a System Command
You can execute an operating system command from within Adams View so that you do not have to leave the Adams View window.
You can select to display the results of the command in the Information Window or the Log file. If you select to display the results of the command in the Information window, you can:
■Clear the window and only view the results of the command.
■Save the results of the command to a file.
If you select to display the results in the log file, you can keep the command results with the other commands that you execute so that you can cut and paste the information together into a new file.
To execute a system command within Adams View:
1. On the Tools menu, select System Command.
The Execute System Command dialog box appears.
2. In the Command Text text box, enter the operating system command that you want to execute. See your operating system documentation for more information.
3. Select whether or not you want the output of the command to be displayed in the Information window or the log file.
4. Select OK.
Using the Adams View Log File
Adams View generates a log file during each Adams View session, called aview.log.
While you are running Adams, you can display the current contents of the log file. In addition, you can display the log file in a text editor. The following sections explain how to display the log file in Adams View and set the type of messages displayed.
Note: | You can change the name of the log file through the initialization file .mdi_init. For more information, see Running and Configuring Adams. |
Viewing the Log File in Adams View
You can use the Log File command on the Tools menu to display the log file. You can keep the dialog box open as you execute commands so you can keep track of the commands and messages that you receive.
To help you use the log file as a command file, Adams View marks any messages as comments so that it does not try to execute them when you import the command file. It indicates a comment by placing an exclamation mark (!) in front of the message. Adams View also displays as comments any commands that it executes when it starts up. To help you distinguish the startup commands from messages, Adams View follows the exclamation mark (!) with the command prompt (>>).
To display the log file:
1. On the Tools menu, select Log File.
The Display Log File dialog box appears.
2. Select Info to display all messages written to the log file. The default is to display only warnings, errors, and fatal messages.
Updating the Log File
Adams View does not update the Display Log File dialog box each time you execute a command. Therefore, if you want to see the commands that you executed since you opened the dialog box, you must update the log file.
To update the contents of the log file:
■From the Display Log File dialog box, select Update.
Setting the Log File Information
When you display the log file, Adams View displays only warnings, errors, and fatal messages that you have received. You can change the type of messages that Adams View displays as well as display the commands that Adams View has executed. You can also display only lines that contain certain information, such as display only commands that create links, and remove any duplicate lines that occur if you encounter the same error again.
To set the type of information displayed in the Display Log File dialog box:
1. Select the Show only lines of type check box and then select one of the following:
■Info - Displays all commands that you have executed in Adams View.
■Warning - Displays non-fatal messages that warn you of possible problems with commands you entered.
■Error - Displays fatal messages that Adams View did not understand and, therefore, did not successfully process.
■Fatal - Displays messages that indicated that your model would not simulate.
2. If desired, select Show only lines containing and enter the text that the line must contain in the text box. You can also enter wildcards. Learn about using wildcards.
3. Select Apply.
To remove duplicate lines:
■From the Display Log File dialog box, select Suppress duplicate lines.
Using Wildcards
You can use wildcards to narrow any search, set the type of information displayed in a window, such as the Database Navigator or the Log file, or specify a name of an object in a dialog box.
This character: | Represents: |
|---|---|
* (asterisk) | Zero or more characters |
? | Any single character |
[ab] | Any one of the characters in the brackets |
[^AB] | Any character other than the characters following the caret symbol (^) in the brackets |
[a-c] | Any one character in a range enclosed in brackets |
{AB, bc} | Any of the character strings in the braces |
Tips on Using Wildcards
Here are some tips for entering wildcards:
■Case is insignificant so xYz is the same as XYz.
■You can match alternative sequences of characters by enclosing them in braces and separating them with commas. For example, the pattern a{ab,bc,cd}x matches aabx, abcx, and acdx.
■You can form character sets that match a single character using brackets [ ]. For example, [abc]d matches ad, bd, and cd
■You can use a dash (-) to create ranges of characters. For example, [a-f1-4] is the same as [abcdef1234].
■You can use a backslash (\) to include a special character as part of the character set. For example, [AB\]CD] includes the five characters A, B, ], C, and D.
Here are some examples of more complex patterns and possible matches:
■x*y - Matches any object whose name starts with x and ends with y. This would include xy, x1y, and xaby.
■x??y - Matches only those objects with four-character long names that start with x and end with y. This would include xaay, xaby, and xrqy.
■x?y* - Matches all of those objects whose names start with x and have y as the third character. This would include xayee, xyy, and xxya.
■*{aa,ee,ii,oo,uu}* - Matches all those objects whose name contains the same vowel twice in a row. This would include loops and skiing.
■[aeiou]*[0-9] - Matches any object whose name starts with a vowel and ends with a digit. This would include eagle10, arapahoe9, and ex29.
■[^aeiou]?[xyz]* - Matches any object whose name does not start with a vowel and has x, y, or z as the third letter. This would include thx1138, rex, and fizzy.
■You can use quotation marks to identify all objects with a certain naming pattern. The following example describes how to set a damping ratio of 0.05 to all beams in .model_1 that have ‘_beam’ in the name.
for var=the_beam obj=.model_1."*_beam*" type=Beam
force modify element_like beam &
beam_name = (eval(the_beam).name) &
damping_ratio = 0.05
end !for
Using Extended Names
■You can use special characters as well as Unicode characters to define the names of Adams objects.
■Allowed special characters in Adams objects' names: ~`@# $ ^ ()'%. &-+;',{}[]= and Space
■While using the Adams View command language with Adams object names containing special characters, the subject name should be enclosed in double quotes (" ").
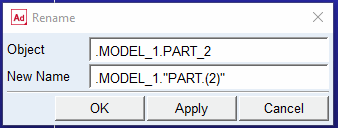
geometry create shape link &
link_name = .MODEL_1.PART_2."LINK(1)" &
i_marker = .MODEL_1.PART_2."My Marker 1" &
j_marker = .MODEL_1.PART_2."My Marker.2" &
width = 65.7647321898 &
depth = 32.8823660949
■You can define Unicode object names without double quotes.
Here are some examples of extended name usages:
■In the Model name field, enter the name you want assigned to the new model. You can enter up to 80 alphanumeric/special/Unicode characters.
■Rename an existing object with an extended name
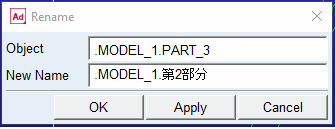
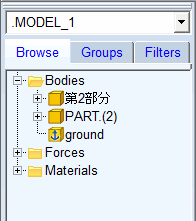
■Model Browser
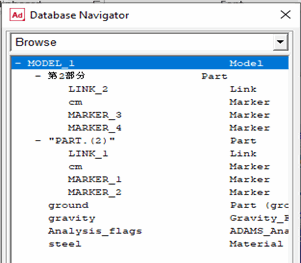
■Database Navigator
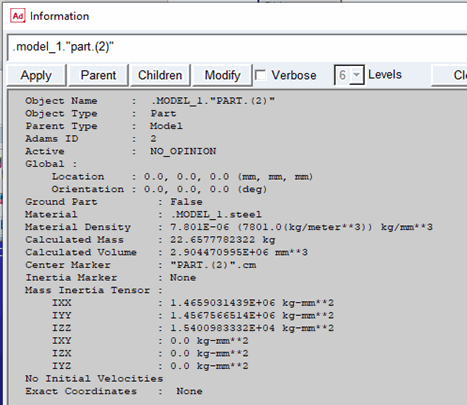
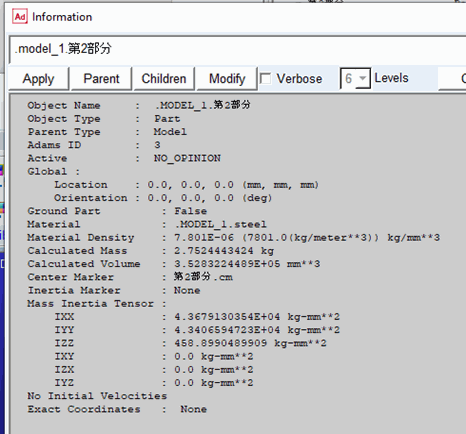
■Info Window
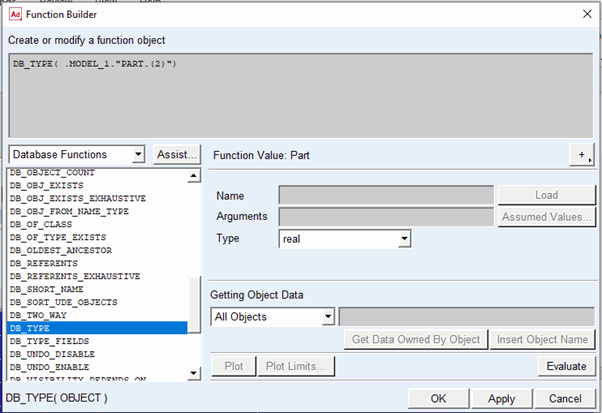
■Function Builder

■CMD Version Flag
CMD Version:2
Version 2 enables expanded acceptable characters for object names.
If unspecified or set to any value other than 2, Adams View assumes traditional naming requirements.
CMD Version:2 | CAD import using CMD file with CMD Version:2 will retain the Unicode/special characters from object names and display the same names throughout the interface including the model browser. Export using CMD file with CMD Version:2 will generate a CMD file that retains any object names in the session using Unicode/special characters. |
CMD Version flag CMD Version:2 is missing | CAD Import using CMD file will replace the Unicode/special Characters from object names with an underscore ('_') and convert them into traditionally supported Adams names and display those throughout the interface including the model browser. Export using CMD file will export the converted names present in Adams database. |
■Wildcards with Extended Names
Tips on Using Wildcards
Here are some tips for entering wildcards:
■Special character names should be enclosed in double quotes.
■You can form character sets that match a single character using brackets [ ].
For example, [abc]"Part (1)" matches "aPart (1)", "bPart (1)", and "cPart (1)"
■Here are some examples of more complex patterns and possible matches:
You can use quotation marks to identify all objects with a certain naming pattern.
var cre var = ."mod 123"."my test[abc]@1"
var cre var = ."mod 123"."my test[abc]@2"
var cre var = ."mod 123"."my test[abc]@3"
var cre var = ."mod 123"."my test[abc]@4"
var cre var = ."mod 123"."my test[abc]@5"
lis ent ent=."mod 123"."\"my test[abc]@\"[2-4]" This would include
"my test[abc]@2", "my test[abc]@3", "my test[abc]@4"
var cre var = ."mod 123"."a@my test[abc]"
var cre var = ."mod 123"."b@my test[abc]"
var cre var = ."mod 123"."c@my test[abc]"
var cre var = ."mod 123"."d@my test[abc]"
lis ent ent= ."mod 123"."[bd]\"@my test[abc]\"" This would include
"b@my test[abc]" and "d@my test[abc]"
Limitations with extended naming
■At present extended naming support is available in Adams View only.
■MSC Nastran doesn't support Unicode/special characters. To address this, whenever such object names are involved in the flex body creation process (for example, via ViewFlex), Adams converts the names so that they can be processed by MSC Nastran.
Adams View Tools
Adams View provides following tools. Click on each tool to learn more.