Customizing the Interface
All of the menus, windows, and dialog boxes that you see in your template-based product are interface objects that you can modify easily. Most of the interface customization that you'll do involves creating new dialog boxes, modifying existing ones, or modifying menus and push buttons. Learn about saving changes to interface objects.
A template-based product stores the interface objects in its modeling database along with all the other modeling objects (such as parts, models, and markers). You access the interface objects through the Database Navigator. The objects have a defined hierarchy, which you can also view through the Database Navigator. You use the Adams View Dialog-Box Builder to access and edit the interface objects that you can include in a dialog box, such as labels, fields, and buttons.
For an overview of all aspects of customizing an Adams product interface, including menus, and using the Dialog-Box Builder, see the Adams View online help.
Learn more about customizing the interface:
Naming Conventions
We recommend that you use a naming convention when you create and modify interface objects or macros. A naming convention reduces the chances of naming conflicts and provides a simple method for organizing files, macros, and dialog boxes.
The naming convention that we recommend is the same one that template-based products currently use. The naming convention uses the abbreviation of the object (for example, mac for macro) followed by a set of characters that identify the commands or functionality that the object executes or performs. The naming conventions for macros and dialog boxes are explained next.
■Macro naming convention - The macro naming convention uses the abbreviation mac for macro followed by the first three characters of each command in the user-entered command that executes the macro. For example, if the user-entered commands for a macro are as shown below (the first three characters are highlighted in boldface type):
acar analysis suspension single_travel submit
Then, the name of the macro is:
mac_ana_sus_sin_sub
■Dialog box naming convention - The naming convention for dialog boxes uses the abbreviation dbox for dialog box followed by the first three characters of the words that identify the functionality of the dialog box. For example, if a dialog box is the interface through which a user creates a hardpoint, then the words that define its functionality are:
template_builder hardpoint create
and, its name is:
dbox_tem_har_cre
If, however, the dialog box performs two or more functions, as many dialog boxes do, then the dialog box name does not include the words for the function. For example, if a dialog box lets a user both create and modify a spring damper, the words that define its functionality are:
template_builder damper create/modify
and, its name is:
dbox_tem_dam
Using Libraries
We recommend that you use libraries to store the interface objects and macros that you create. Libraries are repositories for Adams View objects such as variables, assembly instances, macros, and dialog boxes. Using libraries allows you to easily find, retrieve, or remove specific custom objects. You can add to your template-based product as many libraries as you need. You can also have libraries within libraries.
Your template-based product stores all its objects in libraries, named as follows:
Product name: | Library name: |
|---|---|
Adams Car | .ACAR |
You can view the objects in the library using the Database Navigator. See About the Database Navigator.
To create libraries, execute the following command either in your .cmd file or during an interactive session. In the following command, MY_LIBRARY is the name of the library that will be created:
library create library_name=.MY_LIBRARY
Alternatively, you can add the command in the file you use to generate the site or private custom binary. The files are named as follows:
Product name: | File name: |
|---|---|
Adams Car | acar_build.cmd |
Libraries can also be nested. For example:
library create library_name=.MY_LIBRARY.variables
library create library_name=.MY_LIBRARY.variables.torques
Creating and Modifying Dialog Boxes
The template-based products use dialog boxes to provide you with an easy way to input data or perform operations. A dialog box is usually an entry point to a custom or standard macro. The dialog box collects data from you, manipulates it, and then communicates the data to a macro or to an Adams View function, which performs an operation using the data. Learn about macros.
Although you can set up a dialog box so that commands perform a particular task within the dialog box, we recommend that you use the dialog box as an entry point to a macro or a set of macros. By making the dialog box an entry point to a macro, you:
■Are consistent with the standard dialog boxes in template-based products.
■Take advantage of the Adams powerful macro language programming.
Note that we supply many examples of how to code dialog boxes. You can find those examples in their respective libraries. For example, acar.dboxes.
The next topics explain more about creating dialog boxes. For a general overview of creating and editing dialog boxes in Adams products, see the Adams View online help, under the Customize tab.
When you have finished modifying your dialog boxes, review the options for saving your changes and having them automatically included in your own version of your template-based product. Learn about saving dialog boxes.
Accessing Dialog Box Programming Tools
You use the Dialog Box command on the Tools menu to create and modify dialog boxes. Learn about the Dialog-Box Builder.
To view, change, and create dialog boxes, you must have expert user access to your template-based product. Learn about Setting User Access.
Dialog Box Objects
Dialog boxes are a combination of different interface objects that you can modify using the Dialog-Box Builder. These include the following:
List of Common Dialog Box Objects
The objects: | Are: |
|---|---|
Containers | Subregions in a dialog box that can hold objects. |
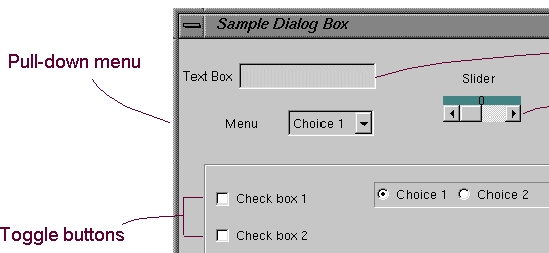
Text boxes | Boxes in which you can enter information. |
Pull-down menus | Menus that display a list of options from which you can select only one option. |
Radio boxes | Toggles that set a state or mode. You can only select one state or mode. |
Toggle buttons (Check boxes) | Toggles that indicate an active state. You can select more than one state. |
Push buttons | Buttons that execute a command or set a state. |
Sliders | A continuous range of possible values from which you can select one value. |
The following figure shows some of the different objects. Learn more about Interface objects.
Layout and Sizing of Dialog Boxes
When you create dialog boxes, always try to minimize the amount of screen area that they take up. To be consistent with the other dialog boxes in your template-based product, you should use the size specifications listed in tables Standard Interface Dialog Box Specifications and Template Builder Dialog Box Specifications. The specifications also include where on the screen dialog boxes should appear, so they always appear in the same location on the screen.
We also recommend that you fix the height of dialog boxes. In most cases, only the ability to change the width of a dialog box is useful to a user because he or she may want to stretch the dialog box to see the full name of an object in a particular text box. This isn't really necessary for the height of a dialog box.
To fix the height of a dialog box, include the parameters height_minimum and height_maximum in the interface command that creates the dialog box. You must do this directly in the command file that contains the commands to create the dialog box. You cannot do this through the Dialog-Box Builder. For example, for Adams Car, you can enter:
interface dialog modify &
dialog=.ACAR.dboxes.dbox_tem_har_mod &
height=150.0 height_minumum=150.0 height_maximum=150.0
When building dialog boxes, always test to ensure that the resizing attributes of each object in the dialog box are appropriate. Under Resizing in the Dialog-Box Builder, there are resizing attributes for interface objects. These attributes describe how the size of the objects on a dialog box are affected if the width or height of the dialog box changes. You should set the resizing attributes of the objects on a dialog box so that if the size of the dialog box changes, the general look of the dialog box remains the same. For example, if all the text boxes in a dialog box are right justified along the edge of the dialog box, the text boxes should all remain right justified if you increase or decrease the width of the dialog box.
Standard Interface Dialog Box Specifications
For the dialog box attribute: | Set its position or size to: |
|---|---|
Location | 33, 154 |
Width | 370 |
Label width | 150 |
Label height | 25 |
Text box width | 240 |
Template Builder Dialog Box Specifications
For the dialog box attribute: | Set its position or size to: |
|---|---|
Location | 15, 150 |
Width | 404 |
Label width | 150 |
Label height | 25 |
Text box width | 244 |
Commands in Dialog Boxes
All of the objects in dialog boxes can execute commands when a user acts on the object. For example, a button can execute a command when a user pushes on it, and an option choice can execute a command when a user selects that option from a pull-down menu. Having an object execute a command gives you great flexibility in how your dialog box works.
For example, you can set up your dialog box so that the commands assigned to a particular database object field can:
■Check to determine whether the object that the user selects exists in the database
■Issue a warning message if it does not exist
You can also have commands operate on other objects in dialog boxes, which causes the dialog box to change its appearance when a user makes a selection from an object. For example, when a user selects an option from a pull-down menu, the dialog box changes to display objects for entering values for the selected option as shown next.
Dialog Box Error Handling
Each dialog box that you create should have a variable, named errorFlag, that represents the error condition of the dialog box. You should use the start commands of a dialog box to create the variable and set its initial value to zero or no error condition, as shown next:
variable set variable_name=$_self.errorFlag int=0
You should also reference the variable in the OK command that executes the dialog box.
For information on:
■Variables, see Using Local Variables.
■$_self, see Using Commands in Dialog Boxes.
■OK command, see OK, Apply, and Cancel Buttons.
Start, Execute, and Finish Commands
You can assign start, execute, and finish commands to higher-level objects, such as containers, and to the dialog box itself. The commands are described below. Learn more about Using Commands in Dialog Boxes.
■Start commands - Your template-based product automatically executes start commands associated with a particular interface object when that object is displayed. The start commands ensure, for example, that the dialog box is displayed properly based on the display parameters.
You should use the start commands to set an errorFlag variable to an initial value of zero, or no error condition, as shown next:
variable set variable_name=$_self.errorFlag int=0
Template Builder dialog boxes usually have two possible startup parameters, which you should set up in the start commands when a dialog box is displayed. The states are:
■mode - Mode has two states, which represent the creation or modification states of a dialog box. The states are create and modify.
■object - Object used with the state modify.
An example of using the states in a start command for Adams Car:
interface dialog display dialog=.ACAR.dboxes.dbox_tem_dam &
parameters="modify", ".template1.dal_ride_damper"
■Execute commands - The execute commands of a dialog box usually work with OK and Apply buttons. You should limit the execute commands to calling macros because we recommend that you use dialog boxes as a front-end to macros. Using dialog boxes as input mechanisms to macros ensures consistency and upgradeability.
■Finish commands - Your template-based product automatically executes finish commands when an object is no longer displayed. You use them to clean up after a macro, delete unnecessary objects, such as temporary variables, and so on.
To clean up variables:
■You can use the command:
variable delete variable_name=(eval(db_children($_self, "variable")))
To clear the text boxes of a dialog box:
■You can use the command:
for var=$_self.loopobj
object(eval(db_children($_self,"graphic_interface_field")))
interface field set
field=(eval($_self,"graphic_interface_field")))
string="" execute=no
end
Learn more at Using Commands in Dialog Boxes.
OK, Apply, and Cancel Buttons
Each dialog box in your template-based product has three standard buttons:
■OK - Executes the commands associated with the dialog box, and if it executes the command successfully, it exits the dialog box.
■Apply - Executes the commands associated with the dialog box but leaves the dialog box open so that you can execute the command again.
■Cancel or Close - Exits the dialog box without executing a command or executing only a selected command. Only dialog boxes that have an Apply button have a Close button.
Button Size
To keep your dialog boxes consistent with the dialog boxes of your template-based product, you should always keep the size of these buttons to 25 pixels high and 76 pixels wide.
Error Handling
Make sure that the commands associated with the OK button reference the dialog box error variable (errorFlag). By referencing the error variable you ensure that the dialog box will not be closed if an errorFlag was set during the execution of the dialog box commands. Because the following commands are generic, you can use them to reference the errorFlag with any dialog box:
interface dialog execute dialog=$_parent undisplay=no
if condition=(!$_parent.errorFlag)
interface dialog undisplay dialog=$_parent
end
Customizing the Model Browser
Model Browser support is available in the Adams Car and Adams Driveline.
To customize the Model Browser in the Adams Car:
1. On the View menu, point to Toolbox and Toolbars. Tool Settings dialog box appears as shown below:
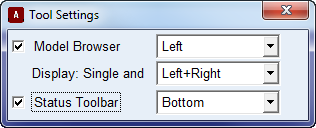
2. For more information about the Model Browser and settings, see Model Browser section.
Working with Assemblies
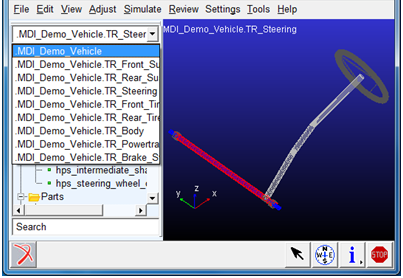
If an assembly is loaded in Adams Car or Adams Driveline, you can display any of its subsystem by either:
■Double-clicking it in the Subsystems folder in the Model Browser.
■Selecting the subsystem from the drop down menu at the top of the Model Browser.

To switch back to the parent assembly from a subsystem, you need to select it from the drop-down at the top.
Creating and Modifying Macros
A macro is a collection of single commands that enable you to perform a series of actions during a session. You write commands using the Adams View command language.
You can modify the existing macros or add customized macros to your template-based product so your users work smarter in their template-based product. For example, in Adams Car you can write a macro to perform a particular full-vehicle analysis. By implementing the macro, a user only needs to enter the requested values for the analysis in a dialog box and push a button. The button executes the macro, which performs the full-vehicle analysis.
You can use macros to:
■Automate repetitive procedures.
■Build general-purpose extensions, such as custom analyses, to your template-based product.
See an example of creating a macro. Although this is an Adams Car example, you can use the general concepts to create a macro for any template-based product.
For a complete overview of creating macros, see About Creating Macros.
Learn more about adding macros to your template-based product:
When you have finished modifying your macros, review the options for saving your changes and having them automatically included in your own version of your template-based product. Learn about saving macros.
Accessing Macro Programming Tools
You use the Macro command on the Tools menu to create and modify macros. For information on the Macro command, see Editing and Creating Macros Using the Macro Editor.
To view, change, and create macros, you must have expert user access to your template-based product. Learn about Setting User Access.
Viewing Existing Macros
Because macro programming is so well developed in your template-based product, you may find it helpful to look at existing macros. Once you find a macro that most closely meets your needs, use it as the basis of customization.
As you look at the existing analysis macros within your template-based product, notice that all of them have the same basic structure.
To view existing macros:
1. From the Tools menu, point to Macro, point to Edit, and then select Modify.
The Database Navigator appears.
2. Select a macro to view.
The Macro Editor appears with the macro commands of the selected macro in the Commands text area.
Using Parameters
Parameters are placeholders for information that users provide when they execute a macro in a template-based product. You write parameters in a macro as a $ followed by the name of the parameter. Parameters let you make macros very flexible. When you create a macro, your template-based product scans the command text to identify all the parameters.
When you issue the command to execute the macro, you provide values for the parameter or the parameters assume default values. Your template-based product substitutes the values in place of the parameters in the macro and executes the macro commands.
You identify parameters in macros using qualifiers. Qualifiers define a parameter's type, range, count (number of values), and defaults. Learn about Parameter Qualifiers and Formats.
The following is an example of a list of parameters and their qualifiers for a macro:
! $part_name:t=string
! $location:t=location
! $type:t=string
! $orientation:t=orientation
! $mass:t=real
! $cm_location_from_part:t=location:d=0,0,0
! $Ixx:t=real
! $Iyy:t=real
! $Izz:t=real
! $Ixy:t=real:d=0
! $Izx:t=real:d=0
! $Iyz:t=real:d=0
!END_OF_PARAMETERS
Using the Echo Command
The command echo=on, which is the default, is a very helpful command because it lets you review the full log of the macro execution in the command window or echoed in the acar log file.
To use the echo command, you can add the following line at the top of your macro:
default command echo=on
You will find it very helpful for debugging purposes.
Using Local Variables
You can create Adams View variables to be used in your macros. A variable is storage location that can contain data. Once you define a variable, you can use it in any parameter, macro, or function in your template-based product.
You can define a variable as a child of any modeling object, including a macro. Defining a variable as a child of a macro is helpful in macro programming when you need to create auxiliary Adams View variables, such as variables that call an Adams View function or that act as a return variable from a called macro. Being able to create these variables as children of the macro results in a cleaner macro.
As a child of the macro object, the variable inherits the object's name. Therefore, the text $_SELF evaluates to the name of the parent object, which is the macro.
In addition, most often you will want to delete these auxiliary variables when the macro is finished. Creating these variables under the macro simplifies this cleanup procedure.
You can delete local variables very easily as shown next:
To use local variables:
■You should do the following:
variable set variable_name=$_self.filename &
string_value="tmpfile.cmd"
To clean up local variables:
■You should do the following:
variable delete variable_name=(eval(db_children($_self,"variable")))
For more information on variables and the commands to create and clean them up, see the help in the Command Navigator associated with the command variable.
Macro Error Handling
Each macro that you create should have checks to:
■Identify inappropriate or invalid user-entered values.
■Ensure that the values specified by the user for specific parameters are realistic.
The following Adams Car example shows how error handling works in a macro. The acar toolkit warning utility macro displays a message in a window, informing you that it encountered an error condition. The window remains open until you close it.
!---- Ensure a brake subsystem exists ----
if condition=(!subsystem_role_exists($assembly,"brake_system"))
acar toolkit warning &
warning="This assembly does not have a brake subsystem!"
variable set variable_name=$error_variable integer=1
return
end
You can use the acar toolkit in all template-based products.
Creating Dialog Boxes for Templates
In your template-based product's Template Builder, you can create your own dialog boxes to access parameters within a template that you may want to modify on a regular basis.
After you create a custom dialog box, you can attach it to a particular template. When you save the template to your default writable database, your product saves the dialog box with the template. You can also export dialog boxes as command files, and later import them into other templates.
We recommend using your template-based product's dialog boxes as a starting point to understand what you can achieve with the Dialog-Box Builder.
To create a custom dialog box for templates:
1. From the Build menu, point to Custom Gui, point to Dialog Box, and then select Create.
Your product displays an empty dialog box named dbox_1, along with the Dialog-Box Builder.
2. Add buttons and commands as explained in Customizing Dialog Boxes Using the Dialog-Box Builder in the Adams View online help.
3. To close the Dialog-Box Builder, from the Dialog-Box Builder's Dialog Box menu, select Exit.
To validate your dialog box:
■From the Dialog-Box Builder's Option menu, select Test Box.
To permanently attach the dialog box to a template:
Note: | If you do not attach your dialog box to a template, the dialog box will be lost when you close the current session. |
1. From the Build menu, point to Custom Gui, point to Dialog Box, and then select Attach.
2. Select << Add.
3. In the Selections dialog box, double-click the name of your dialog box. In this case, dbox_1. If you have multiple dialog boxes you want to store, repeat these steps for each dialog box.
4. Select OK.
To verify that your product stored your dialog box:
1. From the Build menu, point to Custom Gui, point to Dialog Box, and then select Display.
2. In the Selections dialog box, double-click the name of the dialog box you want to display.
Your product displays the dialog box.
To export a custom dialog box:
■From the Dialog Box Builder's Dialog Box menu, point to Export, and then select Command File.
To import a dialog box:
■To import a dialog box from a command file and attach it to a template, you must manually rename every entity in the command file for .ACAR.custom. For example:
■MY_LIBRARY.dboxes.dbox_1 becomes .ACAR.custom.dbox_1
■MY_LIBRARY.dboxes.dbox_1.field_1 becomes .ACAR.custom.dbox_1.field_1
Adding Minor Roles
The file <product_name>BS.cmd is a command file that your template-based product automatically reads in when you start a new session. You use this type of file to add a new minor or major role to your template-based product.
Learn Adding Major Roles.
To add a new minor role in your template-based product:
1. Create a command file named <product_name>BS.cmd (where product_name is the abbreviation for your product, see Product Abbreviations). The contents of the command file should be similar to the contents of the following Adams Car command file:
!--- Add a new minor role ----
variable modify variable=.ACAR.variables.minor_roles &
string_value=(eval(.ACAR.variables.minor_roles)),"rear2"
2. Place the command file in your home directory.
3. When your template-based product starts, it automatically reads in <product_name>BS.cmd. The command file will expand the minor roles available in your template-based product. The minor_roles variable is referenced everywhere in the underlying software and is the only change required to allow you to create new subsystems with minor roles different than the default.
4. Create a new subsystem with the new minor role. (File -> New -> Subsystem).
Notice the new entry in the Minor Role option menu.
Keep in mind the new minor role you define when you are creating/matching communicators.
Adding Major Roles
The file <product_name>BS.cmd is a command file that your template-based product automatically reads in when you start a new session. You use this type of file to add a new minor or major role to your template-based product.
To add a new major role in your template-based product:
1. Create a command file named <product_name>BS.cmd (where product_name is the abbreviation for your product, see Product Abbreviations). The contents of the command file should be similar to the contents of the following Adams Car command file:
!--- Add a new major role ----
variable modify variable=.ACAR.variables.major_roles &
string_value=(eval(.ACAR.variables.major_roles)),"subframe"
2. Place the command file in your home directory.
3. When your template-based product starts, it automatically reads in <product_name>BS.cmd. The command file will expand the major_roles available in your template-based product. The major_roles variable is referenced everywhere in the underlying software and is the only change required to allow you to create new subsystems with major roles different than the default.
4. Create a new template with the new major role. (File -> New).
5. Notice the new entry in the Major Role option menu.
Creating Menus for Template Builder
You can modify your template-based product to add custom menus and buttons to the Template Builder:
■Submenu - You can create submenus using the Build menu. A submenu provides a container that you can use to collect push buttons (in this context, think of push buttons as options located under a submenu). For example, under the Build menu, Hardpoint is a submenu containing five push buttons/options (Modify, Table, New, Info, and Delete), as shown next.
■Push button - You can use a push button to execute a command such as displaying a dialog box or executing a macro.
When creating menus, we recommend that you first think about the structure of what you are trying to achieve. By using a hierarchical approach, you can use submenus to categorize different buttons.
In the following example we assume that you have created a custom dialog box named dbox_1. We are first going to create a submenu named Example.
To create a submenu:
1. From the Build menu, point to Custom Gui, point to Menu, point to Submenu, and then select Create.
Your product displays the Create Custom Sub-Menu dialog box.
2. Enter the label that you want to use, in this case Example, and then reference the template in which this custom menu will be stored.
3. Select OK.
Now you create a push button that resides as a child of submenu, and call the button Display. You then execute a command to display the custom dialog box, dbox_1.
To create a push button:
1. From the Build menu, point to Custom Gui, point to Menu, point to Push Button, and then select Create.
Your product displays the Create Custom Push Button dialog box.
2. Enter the label that you want to use, in this case Display.
3. Set Parent Menu to menu1, which is the submenu Example you created above. Note that as you create submenus, your product references them internally as menu1, menu2, and so on, rather than by name (in this case, Example). If you created several submenus and lost track of their names, you can use the Info command to see how your product names them: from the Build menu, point to Custom Gui, point to Menu, and then select Info.
4. The execution command is highly dependent on what you want to achieve. In this example, you want to display the custom dialog box, dbox_1, so in the Commands text box enter:
interface dialog_box display dialog_box_nam = .ACAR.custom.dbox_1
If, however, you wanted to view the front view of your model, you would enter a command similar to the following:
acar interface view_restore view_orientation = front
5. Select OK.
6. To validate that the push button works, from the Build menu, point to Example, and then select Display. Your template-based product should display your dialog box.
To change the order of your submenus:
1. From the Build menu, point to Custom Gui, point to Menu, and then select Reorder.
To get information about your custom menu structure:
■From the Build menu, point to Custom Gui, point to Menu, and then select Info.
Your product displays the information in the Information window.
Automatically Loading Interface Changes
You can configure the user interface by automatically reading one of the start-up scripts for your template-based product. Learn more.
The following is an example command file, acar_build.cmd, that customizes Adams Car. It changes the title at the top of the Adams Car window and reads in menu and dialog box command files that customize the Adams Car interface. If this file is located in the start-up directory used by your template-based product, then your template-based product will read and execute it automatically. Although this file can be used to configure the product at startup, we recommend that you save either a site or private binary, as they are more efficient at startup.
You can customize the other template-based products in a similar way, using the appropriate build command files listed in table File Names. In this example, we assume that the environment variable MDI_ACAR_SITE is set.
! Adams Car
! Copyright (C) 1995-2005 MSC Software
! All Rights Reserved. !
!****************************************************
!---- Modify the window title ----
interface window modify &
window_name=.gui.main &
title="Adams Car: Company XYZ" &
icon_label="A/XYZ"
!---- Set-up libraries and variables ----
file command read file_name=(getenv("MDI_ACAR_SITE")//"/build_gui/libraries.cmd")
!---- Interface Menus ----
file command read file_name=(getenv("MDI_ACAR_SITE")//"/interface/menus_int.cmd")
!----Site Initialization ----
macro create macro=.ACAR.macros.acar_init_site &
user_entered_command="acar toolkit initialization standard plugin=acar"
For private binaries, please substitute "acar_init_site" with "acar_init_private". You will need one 'acar toolkit initialization ...' command for each plugin you want to include in your private or site customization. If you decide to build either a site or private binary file, then you must place this file at the top level, as defined by the path in MDI_ACAR_SITE or MDI_ACAR_PRIVATE.
Saving Interface Changes
All the changes that you make to the interface are active as long as you stay in your current session. This includes changes to interface objects and macros. You can save the changes for yourself in your private directory or you can make the changes so that all users can access them from the site directory.
There are many ways to save the changes. The most efficient is to create a private or a site binary that contains the changes. You can then instruct your template-based product to read the changes when it starts up. The following procedure summarizes the steps you would perform to save the changes in a binary. For more information, see the references noted in each step. In addition, for an overall description of creating binaries for your template-based product, see Running and Configuring Adams.
To save changes as a binary:
1. Export the new or modified macro as a command file:
■From the Tools menu, point to Macro, and then select Write.
■In the Macro Name text box, enter the name of a macro you have created or modified.
■Note that it's not mandatory to provide a file name for the macro. If you name the macro .MY_LIBRARY.macros.mac_ana_ful_tst_sub, then Adams Car saves it as mac_ana_ful_tst_sub.cmd, automatically adding the .cmd extension.
2. Export the new or modified dialog box, as a command file:
■From the Tools menu, point to Dialog Box , and then select Modify, to open the Database Navigator. Learn About the Database Navigator.
■Select the dialog box you want to export.
Adams Car displays the dialog box in build mode, along with the Dialog Box Builder. Learn Customizing Dialog Boxes Using the Dialog-Box Builder.
■From the Dialog Box Builder's Dialog Box menu, point to Export, and then select Command File.
Adams Car writes a command file to your file system. The name of the resulting command file will be derived from the dialog box name. If the dialog box is named dbox_ana_ful_tst_sub, then the dialog box will be saved as dbox_ana_ful_tst_sub.cmd.
3. Create a command file, named as shown in table File Names, that reads in the command files that customize the interface. See an example of an acar_build.cmd file.
4. Add commands to that command file that automatically reads the macro and dialog box. The following would read the macro and dialog box, as saved in the steps above.
!------Read a macro-----
macro read &
macro_name = .MY_LIBRARY.mac_ana_ful_tst_sub &
file_name = "C:\temp\mac_ana_ful_tst_sub.cmd" &
user_entered = "Analysis full-vehicle test submit" &
wrap_in_undo = no &
create_panel = no
!------Read a dialog box-----
file command read &
file_name = "C:\temp\abox_ana_ful_tst_sub.cmd
5. Store the file in the desired private or site file repository. Learn about private and site file repositories.
6. Create a private or a site-specific binary, including the saved interface objects, as explained in
■Creating Binary Files in the guide Running and Configuring Adams