Use and Understanding of Adams Tire
How to Use Adams Tire
The Tire Basic help section provides overview material for using Adams Tire to add tires to a mechanical system model. It assumes that you know how to run Adams Car, Adams Solver, or Adams View. It also assumes that you have a moderate level of tire-modeling proficiency.
You use Adams Tire to simulate tires according to your analysis requirements. You can create your own tire models or you can use the tire models that come with Adams Tire. The following describes how you use Adams Tire. For more about how you can create your own tire models, see User-Written Tire/Road Models.
Adams Tire Steps
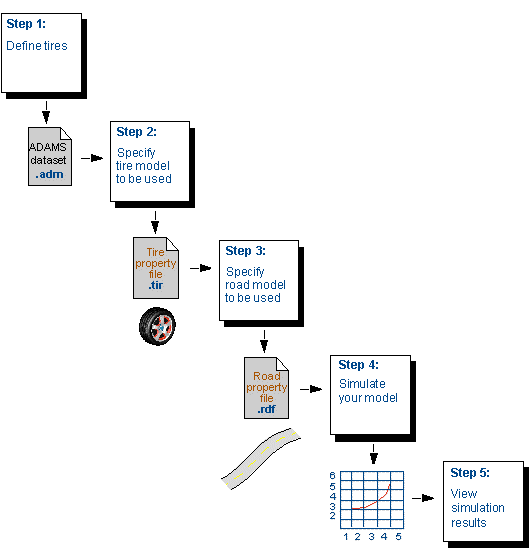
To use Adams Tire:
1. Define tires. How you define tires depends on the product you are using (Adams Car, or Adams Solver). For more information on defining tires, see Defining Tires.
Regardless of the product you use, the product creates an Adams dataset (.adm), which contains the necessary statements that represent the tires in your Adams model, as well as other elements of the vehicle, such as the wheel, suspension, and landing gear strut. The primary statement for each tire is a GFORCE that applies the tire force to the wheel in your suspension.
2. Reference an existing tire property file from:
■Adams Tire (/install_dir/solver/atire)
■Tire manufacturers or testing companies.
■Files that you create. For example you can create your own tire property file for simple kinds of tire models, such as the Fiala model or you can calculate the PAC2002 parameters out of tire measurement data with the Adams Tire Data and Fitting Tool (TDFT).
You can find examples of tire property files for all tire models in the Adams installation directory at:
install_dir/solver/atire/tires.tbl
where install_dir/ is the path to the installation directory for Adams Tire.
3. Reference an existing road property file.
You can find an example road property file for a flat road in the Adams installation directory:
install_dir/solver/atire/roads.tbl/2d_flat.rdf
where install_dir/ is the path to the installation directory for Adams Tire.
4. Run a simulation of your model.
You can run a simulation using Adams Car's version of Adams Solver (you do not need an Adams Car license) or you can create an Adams Solver user library and then run your simulation using this library and Adams Solver. For more information, see Performing Simulations.
5. View the results of the simulation in a postprocessor, such as Adams PostProcessor.
Understanding Adams Tire Processes
When you add tires to your Adams model, three processes occur:
Flow of Information in Adams Tire
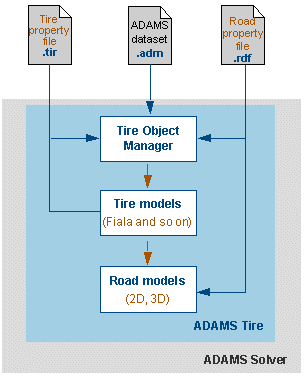
Invoking Adams Tire
■When you perform an analysis, Adams Solver investigates your .adm file to find elements that represent a tire. For example, it looks for a GFORCE with the necessary parameters to define the force to the wheel in your suspension. When it finds these parameters, it invokes Adams Tire.
■Adams Solver obtains the names of the tire property file (.tir) and road property file (.rdf) from the STRING statements in the .adm file.
Determining Tire and Road Model to Use
Inside Adams Tire, the Tire Object Manager examines the tire property file to determine the tire model (for example, Fiala or Pacejka '89) to use and examines the road property file to determine the road model (for example, 2D or 3D Spline Road) to use.
Performing Calculations
■The Tire Object Manager calls the selected tire model to calculate the tire forces and moments.
■The tire model reads the tire property file to obtain data for calculating the tire forces and moments. It then calls the road model to evaluate where the road is in relation to the tire.
■The road model reads the road property file to obtain data about the road.
■The tire model returns the forces and moments to Adams Solver.
■Adams Solver applies the forces and moments to the wheel part.