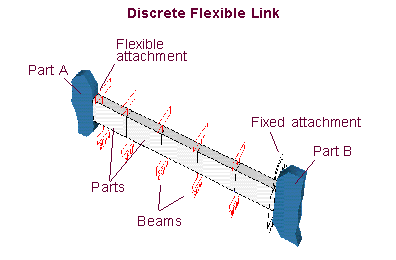
Discrete Flexible Links
A discrete flexible link consists of two or more rigid bodies connected by beam force elements. You indicate the following and Adams View creates the appropriate parts, geometry, forces, and constraints at the endpoints:
■Endpoints of the link
■Number of parts and the material type
■Properties of the beam
■Types of endpoint attachments (flexible, rigid, or free)
The following figure shows a flexible link composed of rigid bodies whose cross-section geometry is rectangular.
For more information on beam force elements, see Adding a Massless Beam. Also note the caution about the asymmetry of beams explained in that section.
Learn more:
Types of Flexible Link Geometry
To make it convenient to create discrete flexible links, Adams View provides a set of geometry you can select for the cross-section of the link. If the pre-defined geometry does not meet your needs, you can also define your own cross-section based on area and inertia properties that you enter. If you enter area and inertia properties yourself, Adams View creates short angular geometry to represent the link.
The pre-defined cross-section geometry that you can select includes:
■Solid rectangular
■Solid circular
■Hollow rectangular
■Hollow circular
■I-beam
Adams View uses the cross-section geometry to calculate the following:
■Area and area moments of inertia (Ixx, Iyy, Izz) for the beams.
■Mass, mass moments of inertia (Ixx, Iyy, Izz), and center-of-mass Markers for the rigid bodies.
Note that Adams View does not directly use the geometry to account for stress on the beam. Therefore, any stress values are based on the area and area moments.
Positioning Flexible Links
You use two or three Markers to define the locations and orientation of a discrete flexible link: Markers 1 and 2 (attachment markers) and an orientation marker, which is required for only certain types of cross-section geometry. See a Picture for Orientation Marker.
As you can see from the examples, the attachment markers (Markers 1 and 2) define the total length of the flexible link and the x (longitudinal) direction of the associated beam forces. Adams View creates new markers on top of Markers 1 and 2, as well as at the centers-of-mass of the geometry associated with the discrete flexible link. For the resulting beams, the vector from Marker 1 to Marker 2 defines the x-axis while the vector from Marker 1 to the orientation marker defines the xz-plane. The global axes are not relevant to the orientation of the beam forces unless you erroneously specify three colinear markers.
The orientation marker works with the two attachment markers (Markers 1 and 2) to define a plane. The x-axis of the beam markers will be aligned along the line formed between the attachment markers. The beam markers will be oriented such that their z-axes are in the plane formed by the two attachment markers and the orientation marker. If the orientation marker is colinear with the two attachment markers, the plane formed by those three points is indeterminate. Adams View will not attempt to adjust the orientation marker by adding unit vectors until a noncolinear solution is found. The orientation marker itself is not changed.
About Number of Beams Created
The following table shows how the number of beams that get created for your flexible link depends on the number of segments and the types of endpoint attachments.
Types of endpoint attachments: | Number of beams created: |
|---|---|
Free-Free | Number of segments - 1 |
Rigid-Rigid | Number of segments - 1 |
Free-Rigid or Rigid-Free | Number of segments - 1 |
Flexible-Free or Free-Flexible | Number of segments |
Flexible-Rigid or Rigid-Flexible | Number of segments |
Flexible-Flexible | Number of segments + 1 |
For links with axisymmetric cross-sections, such as solid and hollow circular sections, the orientation of the cross section is not critical and so Adams View does not require the use of an orientation marker.
Creating a Flexible Link
To create a flexible link:
1. Click the Bodies tab. From the Flexible Bodies container, click the Discrete Flexible Link tool .
.
. or
(Classic interface) From the Build menu, point to Flexible Bodies, and then select Discrete Flexible Link.
The Discrete Flexible Link dialog box appears.
2. Define the overall properties of the flexible link as explained in the table below.
To specify: | Do the following: |
|---|---|
Name for parts, constraints, forces, and Markers | In the Name text box, enter a text string of alphanumeric characters. Adams View prepends the text string you specify to the name of each object it creates. For example, if you specify the string LINK, the first rigid body is LINK_1, the first marker is LINK_MARKER_1, and so on. |
Type of material | In the Material text box, enter the type of material to be used for the rigid bodies and beam properties. Tips on Entering Object Names in Text Boxes. Learn about Setting Up Material Types. |
Number of segments | Enter the number of rigid bodies that you want in the link. |
Damping ratio | In the Damping Ratio text box, enter the ratio of viscous damping to stiffness for the beam forces. |
Color | In the Color text box, enter the color to be used for the geometry in the flexible link. |
3. Define the length of the link and its flexibility at its ends as explained in the table below.
To specify: | Do the following: |
|---|---|
Ends of the link | Enter the markers that define the endpoints of the link in the Marker 1 and Marker 2 text boxes. Marker 1 defines the start of the link and Marker 2 defines the end of the link. Marker 1 and Marker 2 are also used to calculate the orientation of the link. Learn more about Positioning Flexible Links. |
Flexibility at the ends of the link | Select how to define the ends of the link from the Attachment pull-down menus. You can select the following for each end of the link: ■free - The end is unconnected. ■rigid - A fixed joint is created between the parent of Marker 1 and the first part of the discrete flexible link or between the parent of Marker 2 and the last part of the discrete flexible link. ■flexible - The link has discrete flexibility all the way to the endpoint. To create this flexibility, Adams View creates an additional beam force between the first or last segment of the link and the parent part of Marker 1 or Marker 2. The length of the beam is one half of the segment length. |
4. Select one of the following to define the geometry of the link or specify the area and area moments of inertia of the flexible link, and then select OK.
Defining Link Cross Section
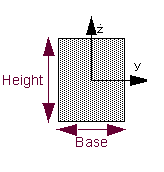
Solid Rectangle
In the following text boxes, enter:
■Orient Marker - The marker that defines the orientation (z-axis) of link. For information on setting the orientation of the geometry, see Positioning Flexible Links.
■Base - The width of the rectangle (dimension in local y direction).
■Height - The height of the rectangle (dimension in local z direction).
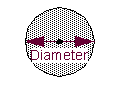
Solid Circle
■Diameter - Diameter of the circular cross-section.
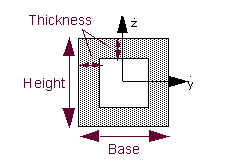
Hollow Rectangle
■Orient Marker - The marker that defines the orientation (z-axis) of the link. See Positioning Flexible Links on setting the orientation of the geometry.
■Base - The outer width of the rectangular shell.
■Height - The height of the outer rectangular shell.
■Thickness - Uniform width of the wall of the rectangular shell.
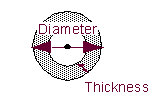
Hollow Circle
■Diameter - Outer diameter of the circular shell.
■Thickness - Width of the wall of the circular shell.
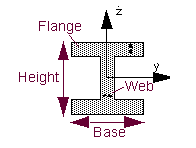
I-Beam
■Orient Marker - The marker that defines the orientation of the link. See Positioning Flexible Links for information on setting the orientation of the geometry.
■Base - Enter the width of the I-beam.
■Height - Enter the height of I-beam.
■Flange - Enter the width of the flange of the I-beam.
■Web - Enter the width of the web of the beam.
Properties
Enter values in the following text boxes to create your own custom-shaped cross-section:
■Orient Marker - The marker that defines the orientation (z-axis) of the link. For information on setting the orientation of the link, see Positioning Flexible Links.
■X Section Area - Specify the uniform area of the beam cross section. The centroidal axis must be orthogonal to this cross section.
■Link Mass - Enter the total mass of all the link segments combined.
■Link Segment Inertias - Specify the area moments of inertia for the link.
■Ixx - Enter the torsional constant, also referred to as torsional shape factor or torsional stiffness coefficient. It is expressed as unit length to the fourth power. For a solid circular section, Ixx is identical to the polar moment of inertia J = (πr4/2). For thin-walled sections, open sections, and noncircular sections, consult a handbook.
■Iyy, Izz - Enter the area moments of inertia about the neutral axes of the beam-cross sectional areas (y-y and z-z). These are sometimes referred to as the second moments of area about a given axis. They are expressed as unit length to the fourth power. For a solid circular section, Iyy=Izz = (πr4/4). For thin-walled sections, open sections, and noncircular sections, consult a handbook.
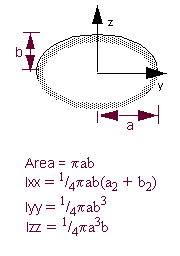
Note: | The example of an elliptical cross-section below is only one example of many cross-sections that you can create using the Properties option. |
Modifying Flexible Links
Once you create a discrete flexible link, you must modify each object separately, such as each beam and Rigid body. Therefore, you might find it easier to delete the beam and create it again instead of modifying each object individually.
If you find that link does not bend enough, investigate your cross-section and material properties and possibly increase the number of segments in the link.