Using the Parameterization Move Tools
You can also create geometric relationships using the parameterization move tools on the Move Toolstack and palette:
■f(x) tool controls modeling object locations.
Note: | The f(x) tool described in this section is not the same as the f(x) tool explained in the Table Editor. They perform different operations. For more information on the f(x) tool in the Table Editor, see Working with Cells in the Table Editor. |
■f( ) tool controls modeling object orientations.
) tool controls modeling object orientations. For general information about the move tools, see Moving Objects Using the Move Tools.
f(x) Tool

Ties the location of a modeling object to a point or marker. You can either superimpose the object on the point or marker (collapse the two objects) or keep the object offset from a point or marker (maintain current distance).
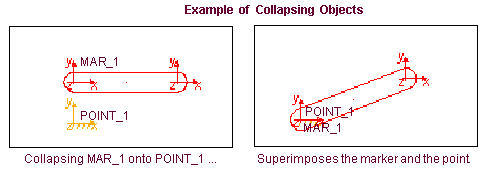
The following figures show the two options for parameterizing locations using f(x). The first figure shows how you can use the f(x) tool to collapse a marker that belongs to a link on a point. In the figure, Adams View replaces the specific location of MAR_1 in the database with the expression:
(LOC_RELATIVE_TO ( {0,0,0}, .model_1.part_1.POINT_1))
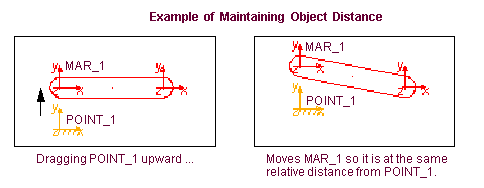
The second figures shows the effects of using the f(x) tool to maintain the position of a marker on the link, relative to a point. If you set Adams View to maintain their distance, when you move the point, the marker moves so it and the point are always the same distance relative to each other. In the figure, Adams View replaces the specific location of MAR_1 in the database with the expression:
(LOC_RELATIVE_TO ({0,10,0}, .model_1.part_1.POINT_1))
Using the F (x) Tool
To collapse an object onto another point or marker and lock it there:
2. Select the option Collapse.
3. Select the object to lock.
4. Select the point or marker to which to lock.
Adams View moves the object to the location of the point or marker and creates an expression in the object to keep it superimposed on the point or marker. If you move the point or marker, Adams View moves the object to the same location.
To keep an object fixed relative to a point or marker:
1. From the Move tool stack, select the f(x) tool.
2. Position the objects as desired.
3. Select the option Maintain.
4. Select the object to lock.
5. Select the point or marker to which to lock.
Adams View creates an expression in the object to maintain it at its current position relative to the point or marker. If you move the point or marker, Adams View moves the object to the same relative offset.
If you offset an object from a marker, Adams View maintains the offset in the coordinate system of the marker. This means that if you rotate the marker, Adams View moves the object to the same position in the marker’s coordinate system.
f( ) Tool


Ties the orientation of a marker, constraint, or force to a marker. You have three options for tying the orientation:
f( ) - Same As
Same As is similar to using the f(x) Tool. It keeps the orientation of the object the same as a marker or keeps the orientation offset from a marker. The Collapse and Maintain options are similar to those in the f(x) tool, and the steps for parameterizing are the same as when using the f(x) tool.
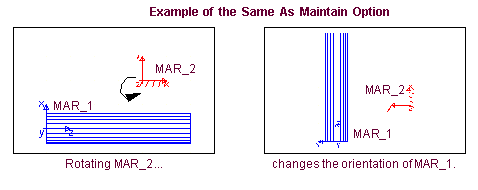
The following two figures show the two options you have available for parameterizing locations using Same As. The first figure shows how you can use the maintain option. The maintain option sets one object so its current orientation is locked relative to a second object. In the figure, when you rotate MAR_2, MAR_1 on the cylinder also rotates so it maintains its orientation relative to MAR_2. In the figure, Adams View replaces the orientation of MAR_1 in the database with the expression:
(ORI_RELATIVE_TO ({90d, 90d, 0}, .MODEL_1.PART_1.MAR_2))
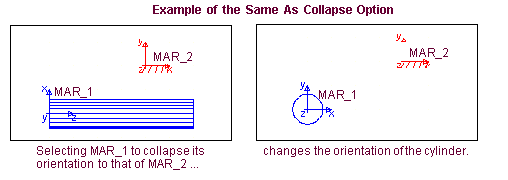
The next figure shows how to use the collapse option. The collapse option keeps the orientation of two objects the same. The figure shows that when you lock the orientation of MAR_1 to that of MAR_2, the cylinder changes accordingly when you rotate MAR_2. In the figure, Adams View replaces the orientation of MAR_1 in the database with the expression:
(ORI_RELATIVE_TO ({0, 0, 0}, .MODEL_1.PART_1.MAR_2))
f( ) - Along Axis
Keeps an axis of a marker, constraint, or force pointed toward a marker. This is useful if a marker in your model defines a unique axis used in a joint or force.
Along Axis only controls one axis of the object. Adams View positions the object at an arbitrary angle about the axis. If you need to completely control the orientation of the object, use the Same As or In Plane options.
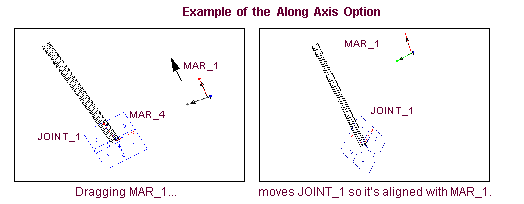
The following figure shows how you can set the alignment of the unique axis (z) of a revolute joint to that of a marker using Along Axis so the joint always aligns to the marker. In the figure, Adams View replaces the orientation of the I and J markers that JOINT_1 references with the expression:
(ORI_ALONG_AXIS (.MODEL_1.PART_1.MAR_4, .MODEL_1.PART_1.MAR_1, “z”))
f( ) - In Plane
Controls the orientation of a marker, constraint, or force by pointing one axis towards one marker and another axis towards another marker. This completely determines the orientation because the third axis must be perpendicular to the first two, with the positive direction based on the right-hand rule. In Plane uses the function expression ORI_IN_PLANE.
Using the f( ) Tool
To tie an axis of a marker, constraint, or force so it points along the axis of another point or marker:
2. Select the Along Axis option.
3. In the settings container, select the axis of the object to control (X, Y, or Z). For example, select Z to control the z-axis of the object.
4. Now define two objects (markers or design points) that define the vector to use for the specified axis. These are the axis start and end locations. The selected object can be one of these two locations.
Adams View rotates the object so that the axis you selected points toward the marker you selected, and creates an expression to keep the axis directed at the marker. If you move the marker, Adams View rotates the object to realign the axis with the marker.
To tie two axes of a marker, constraint, or force to a plane defined by three markers:
1. From the Move tool stack, select the f( ) tool.
) tool. 2. Select the option In Plane.
3. In the settings container, set the first and second axes of the object to control (X, Y, or Z).
4. Select the marker, constraint, or force to control.
5. Now define three locations to define the plane:
■The marker defining the axis start location.
■The marker defining the axis end location.
■A final location to complete the plane.
Adams View rotates the object so that the first axis points toward the first point or marker, and the second axis points as closely as possible towards the second point or marker. Adams View also creates an expression to keep the axes directed at the markers. If you move either of the markers, Adams View rotates the object to realign the axis with the marker.
Depending on the locations that you selected, it may not be possible for both axes to pass through the locations. Adams View orients the object so that the first axis passes through the first location, and the plane defined by the two axes passes through the second location. This means that the second axis comes as close as possible to the second location, but may not pass through it.