Using Template-Based Product Tools
Learn about using the following template-based product tools:
Working with the Coordinate Window
You can use the Coordinate window to help you identify the coordinates of any location in the Main window. You can also measure the distance between objects based on their coordinate locations.
The sections below explain how to work with the coordinate window:
Displaying the Coordinate Window
To toggle on and off the display of the coordinate window, do one of the following:
■On the View menu, select Coordinate Window.
The coordinate window appears in the lower right corner of the screen. You can move and size it as you do any window in your operating system.
Tip: | Press the F4 key to toggle the display of the coordinate window. |
Measuring the Distance Between Points
In Delta mode, you can use your mouse and the coordinate window to find the distance between two points.
To measure the distance between two points:
1. Move the cursor to the point in the main window where you want to begin, and press and hold down the mouse button.
2. Drag the cursor to the next point. As you drag the cursor, your template-based product displays the distance the cursor moves in the coordinate window.
3. To end delta mode, release the mouse button.
Command Navigator
Enables you to enter Adams View commands without having to know the entire syntax of the commands. See Command Navigator dialog box help.
The Command Navigator displays a list of all Adams View command Keywords. A plus (+) in front of a keyword indicates that the command has more keywords below it but they are hidden. A minus (-) indicates that all keywords below the keyword are displayed. No indicator in front of a keyword indicates that there are no more keywords below the object. When you select an object with no indicator, a dialog box appears in which you enter parameters for executing the command.
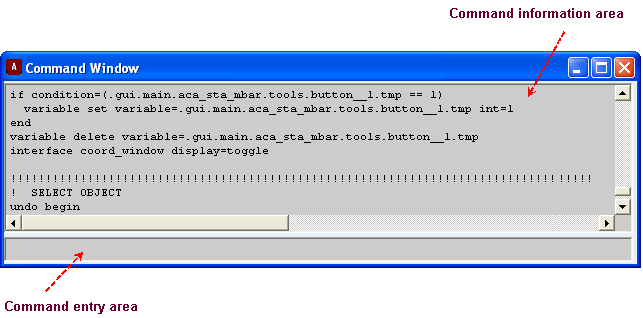
Using the Command Window
The command window provides a text-based way to enter commands. It assumes that you understand the command language underlying your template-based product's interface. The command window contains both a command entry area for entering commands and a command information area for displaying informational and error messages:
Learn about using the command window:
About Commands
The commands that you enter in the command window or Command Navigator are made up of keywords, parameters for the keywords, and parameter values as shown next:
{keywords} {parameters=values}
In a command:
■Keywords correspond to menu selections.
■Parameters correspond to dialog box choices.
■Parameter values correspond to values you enter or select in the dialog boxes.
For example, the following command contains the keyword constraint followed by other keywords, then by parameters, such as the name of the joint. In the example, an ! indicates a comment and an & at the end of a line indicates that the command continues onto the next line.
constraint create joint revolute & !{keywords}
joint_name=.model_1.JOINT_1 & !{parameter=value}
i_marker_name=.model_1.PART_1.MAR_3 & !”&” for continuation
j_marker_name=.model_1.ground.MAR_1 &
friction_enabled = no
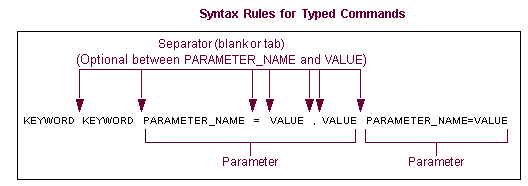
Syntax Rules for Entering Commands
There are several rules that you must follow when you enter commands in the command window. For example, the commands must be entered in the order shown below. Because commands are case insensitive, you can type upper or lowercase letters or a mix of both.
To help you enter commands correctly, your template-based product checks for syntax errors whenever you enter a space, comma, or equal sign (except in a string or expression) in the command window. If it detects an error, it displays a message above the command information area. You cannot proceed until you correct the error.
Syntax Rules for Entering Values
The values that you can enter in commands are data that have a particular type. There are five data types that template-based product commands support: integer, real, string, matrix, and database object references. The following table lists the data types and their use.
Data type: | Use: |
|---|---|
Integer | Whole numbers in the range -maxint ... +maxint, where maxint is machine dependent (usually around two billion) |
Real | Most numeric values |
String | Character strings of varying length |
Object | Database objects |
The rules for entering values are that they:
■Can contain letters, numbers, and underscore characters. For more information, see Using Extended Names.
■Must begin with a letter or underscore character.
■Can contain any characters that are enclosed by double quotation marks.
■Have separators (blank space or tab) between keywords and parameters. Placing separators between parameters and their values is optional.
For strings, you must use a backslash (\) in front of special characters to ensure that your template-based product does not try to interpret the characters. These characters include quotation marks (") and backslashes. For example, to be sure to include the quotation marks in the string: This is a "string", you would enter:
string "This is a \"string\"."
To get a single backslash into the string, you, therefore, enter double backslashes. For example, to specify d:\users, you would enter:
"d:\\users..."
Note also for path names on Windows, you can use backslashes as the separators, but you are not required to do so. You can write portable path names by using the forward slash so your template-based product interprets the following as the same path:
"d:\\users\\efhl\\some.file"
"d:/users/efhl/some.file"
Miscellaneous Command Information
Continuing Commands
You can continue a command you enter in the command window for as many lines as necessary. To continue a command, place an ampersand (&) at the end of a line and then continue the command on the next line. Note that a command must be entered all at once.
Mixing Comments and Commands
If you want to mix comments and commands (so that your comments appear in the Log file), use one of the formats below:
To create: | Enter: |
|---|---|
A comment alone on one line | !comment <CR> |
A command followed by a comment on one line command | !comment<CR> |
A command followed by a comment on one line, with the command continuing on the next line command | &!comment<CR> continue command |
A command followed by a comment on one line, with the comment continuing on the next line, and the command continuing on the following line command | &!comment<CR> &!comment<CR> continue command |
Entering Abbreviations
You can enter abbreviations for commands and parameters when you are entering commands directly in the command window. You should always use full keywords for macros and command files to avoid any future compatibility problems. Also note that if you use abbreviations, your template-based product takes longer to execute your commands because it must substitute an abbreviation with its full command.
Verifying Command Input
Your template-based product verifies command input whenever you enter a space, comma, or equal sign (except in a string or expression) in the command window. If your template-based product detects an error, it displays a message above the command information area. You cannot proceed until you correct the error.
Reviewing Commands
You can use the scroll bar at the side of the command information area to view the last 50 commands that were entered.
Getting Help Completing Command Parameters
In the command window, you can get help with possible parameter values for modeling objects and files. For example, you can get a list of possible marker names in your model or you can display the File Browser to help you find a file. Learn about Markers.
To get assistance with values for a parameter:
1. Enter the parameter name but do not include the parameter value. For example, enter the command mar del mar=.
2. Type ? in the command line.
If the parameter value requires a modeling object, the command window displays a list of possible objects in your current model. If the parameter value requires a file, the File Browser appears.
3. Copy or select the desired object and place it in the parameter value.
Grouping Operations into an Undo Block
As you issue commands from the command window, you can group them into undo blocks. By grouping them into undo blocks, you can use a single Undo command to reverse all the operations in the block. You can define undo blocks around macros, command files, or any group of commands. You can nest them to any level.
To create an undo block:
1. Enter the following command in the command window to mark the beginning of the block:
UNDO BEGIN_BLOCK
2. Issue all the commands to be included in the undo block.
3. To close the block, enter the command:
UNDO END_BLOCK
Once you have closed the undo block, any individual commands that you issue that are not in the undo block or any nested undo blocks within the undo block are not affected by an Undo command. Once you close the undo block, you cannot open it again.
The following is an example of an undo block with individual commands surrounding it and several undo operations that were issued. The undo commands reverse all operations that were performed to create the model and part.
MODEL CREATE...
UNDO BEGIN_BLOCK
PART CREATE...
MARKER CREATE...
UNDO BACKWARD ! Undo the MARKER CREATE above, not entire undo block
MARKER CREATE...
GEOM CREATE...
UNDO END_BLOCK
PART DELETE...
UNDO BACKWARD ! Undo the PART DELETE command
UNDO BACKWARD ! Undo the entire undo block
UNDO FORWARD ! Restore the entire undo block
UNDO BACKWARD ! Undo the entire undo block again
UNDO BACKWARD ! Undo the MODEL CREATE command
Note the following about the example:
■The first UNDO BACKWARD within the undo block undoes only the preceding MARKER CREATE command.
■The third UNDO BACKWARD command after the Undo block undoes the entire contents of the undo block.
■The UNDO FORWARD reverses the undo of the entire undo block as if the undo block were a single command.
The limit on the number of commands your template-based product remembers does not apply to commands within an undo block. You may notice slowed system performance if you store too many commands in a single undo block.
Message Window
Provides you with messages on the status of Adams View and displays helpful information while you are using Adams.
Adams View displays messages about the execution of a command in the message window. By default, the message window only displays messages about commands you execute from the user interface. You can also set it to display messages about commands that you execute from the Command Window, Command Navigator, and Adams View command files.
Learn about Managing Messages.
Information Window
Adams View uses the Information window to display many different types of information about your model, simulation, or motion data. In addition to just viewing information about your model, you can perform a variety of operations in the Information window.
The information includes:
■Topology on the different objects in your model
■Object information, such as information about a part or a view
■Model verification results
■Measurements from one coordinate system marker to another
■Result set component information
■View attributes
■Results from a system command you run using the Tools -> System Command
Learn about:
The Option: | Does the following |
|---|---|
Apply | Executes the command but leaves the dialog box open so you can execute the command again. |
Parent | Displays an object's parent. |
Children | Displays an object's children. |
Modify | Select to display the modify dialog box for the object displayed in the text box at the top of the Information window. |
Verbose | Select if you want to display more information about the object such as children of the object, its geometry, whether or not commands are associated with it, and its attributes like color and visibility. |
Clear | Removes all current information in the window. |
Read from File | Allows you to read information from a saved file. |
Save to File | Allows you to save the information. |
Database Navigator
Displays the types of objects appropriate for the command you are executing and shows objects in their database hierarchy. You can browse for objects or set it to rename objects, view information about the objects and view dependencies. You can also set a filter for the types of objects displayed in the Database Navigator.
Learn more about Database Navigator.
For the option: | Do the following: |
|---|---|
Pull-Down Menu | Use the pull-down menu to choose a mode option. Select one: ■Browse (the default; the options on this page describe Browse) |
Filter | Select if you want to filter the types and names that you want displayed in the Database Navigator. Then, enter the name of the objects you want to display in the text box and use the pull-down menu to the right to select the type of object(s) you want to display. You can also use the pull-down menu below the Filter text box to only display those objects that are active or inactive. |
Sort by | Use the pull-down menu to choose how you want the objects sorted. You can also select to not sort the objects so they appear in the order they are stored in the modeling database. |
Highlight | Off by default. Select if you want an object to appear selected in the main window and the reverse. |
 | Use the plus sign (+) or the minus (-) (--) signs to display or hide all of the children hidden/shown in the tree view. |